Dynex DX-UC104 Setup Guide
Dynex DX-UC104 - USB 2.0 PCI Desktop Card Manual
 |
UPC - 400060000925
View all Dynex DX-UC104 manuals
Add to My Manuals
Save this manual to your list of manuals |
Dynex DX-UC104 manual content summary:
- Dynex DX-UC104 | Setup Guide - Page 1
Guide d'installation rapide I Guía de instalación rápida Features / Caractéristiques / Características • Four high-speed USB 2.0 ports • Plug-and-Play, hot swappable • Support For more information For troubleshooting, specifications, legal notices, warranty, and instructions for installing the card - Dynex DX-UC104 | Setup Guide - Page 2
USB: 2 Retirer le couvercle du boîtier de l'ordinateur. Voir le guide de l'utilisateur 1 Apague su computadora y desconecte el cable de alimentación y y los demás cables, luego encienda la garantie et les instructions pour l'installation de l'adaptateur sous d'autres computadora. CMY systèmes
-
 1
1 -
 2
2
 |
 |
Features / Caractéristiques / Características
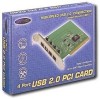
DX-UC104 USB 2.0 4-Port PCI Host Adapter
Adaptateur hôte USB 2.0 PCI à 4 ports DX-UC104
Adaptador de host USB 2.0 PCI de 4 puertos DX-UC104
• Four high-speed USB 2.0 ports
• Plug-and-Play, hot swappable
• Support for simultaneous connections of multiple USB peripherals
• Fully backward compatible with USB 1.1 devices
• Fully compliant with EHCI and UHCI specifications
• Supports high-speed USB 2.0 data transfer rates up to 480 Mbps
• Compliant with the latest PCI 2.2 data bus specification
• Supports Windows 7, Windows Vista, Windows XP SP1,
Windows 2000 SP4
• Quatre ports USB 2.0 à haut débit
• Prêt à l’emploi et remplacement à chaud
• Permet la connexion simultanée de plusieurs périphériques USB
• Rétrocompatibilité totale avec tous les périphériques USB 1.1
• Compatibilité totale avec les spécifications EHCI et UHC
• Permet des transferts de données USB 2.0 à haut débit
jusqu’à 480 Mbit/s
• Conforme aux dernières spécifications de bus de données PCI 2.2
• Compatible Windows 7, Windows Vista, Windows XP SP1,
Windows 2000 SP4
• Cuatro puertos USB 2.0 de alta velocidad
• Plug-and-play e intercambio en caliente
• Admite conexiones simultáneas de múltiples equipos USB
• Totalmente compatible con los dispositivos USB 1.1
• Totalmente compatible con las especificaciones EHCI y UHCI
• Admite transferencias de datos USB 2.0 de alta velocidad
de hasta 480 Mbps
• Se adhiere a la última especificación del bus de datos PCI 2.2.
• Compatible con Windows 7, Windows Vista, Windows XP SP1,
Windows 2000 SP4
Package contents/ Contenu de la boîte/
Contenido de la caja
• DX-UC104 USB 4-port PCI host adapter card
•
Quick Setup Guide
• Adaptateur hôte USB 2.0 PCI à 4 ports DX-UC104
•
Guide d’installation rapide
• Adaptador de host USB 2.0 PCI de 4 puertos DX-UC104
•
Guía de instalación rápida
Windows System requirements/Configuration
Windows requise/ Requisitos del sistema Windows
• One available PCI bus slot
• Windows 7, Windows Vista, Windows XP SP1,
Windows 2000 SP4
• Un connecteur bus PCI disponible
• Windows 7, Windows Vista, Windows XP SP1, Windows 2000 SP4
• Una ranura de bus PCI disponible
• Windows 7, Windows Vista, Windows XP SP1, Windows 2000 SP4
Installing the USB card/Installation de l’adaptateur
USB/ Instalación de la tarjeta USB
Caution:
Opening your computer’s case may void your computer’s
warranty. Contact your computer‘s manufacturer before opening the case
to make sure that you do not void the warranty.You may need to have the
card installed by your computer’s manufacturer or an authorized
computer technician.
Caution:
Before touching any electronic components, make sure that you
first touch an unpainted, grounded metal object to discharge any static
electricity stored on your clothing or body.
Caution:
Handle the card by the metal mounting bracket and the circuit
board edges only. Avoid touching the gold-plated PCI connectors and the
on-board
electronic components.
To install the USB card:
1 Turn off your computer and unplug the power cord and all cables.
2 Remove your computer’s case cover. See your computer’s
user guide
for
information about removing the cover.
3 Locate an available PCI slot.
4 Remove the screw that secures the backplate (the small piece of metal
on the back panel of your computer that covers the opening for the
slot), then remove the backplate.
5 Carefully insert the card into the PCI slot, seating
it firmly. Do not touch the metal connector on
the card.
6 Secure the card to the case using the screw you
removed from the backplate.
7 Reinstall your computer’s case cover.
8 Plug in the power cord and other cables, then turn on your computer.
9 Windows automatically installs the correct driver and displays
confirmation.
For more information
For troubleshooting, specifications, legal notices, warranty, and instruc-
tions for installing the card in other operating systems, see
www.dynexproducts.com.
Attention :
l’ouverture du boîtier de l’ordinateur peut annuler sa garantie.
Contacter le fabricant de l’ordinateur avant d’ouvrir le boîtier pour vérifier
si la garantie serait annulée. Il se peut que l’adaptateur doive être installé
par le fabricant de l’ordinateur ou un spécialiste autorisé.
Attention :
avant de toucher un composant électronique, veiller à
toucher d’abord un objet métallique non peint et mis à la masse, afin de
décharger toute électricité statique emmagasinée sur les vêtements ou le
corps.
Attention :
manipuler l’adaptateur uniquement par le support de
montage métallique et les bordures du circuit imprimé. Éviter de toucher
les connecteurs plaqués or du bus PCI et les composants électroniques de
l’adaptateur.
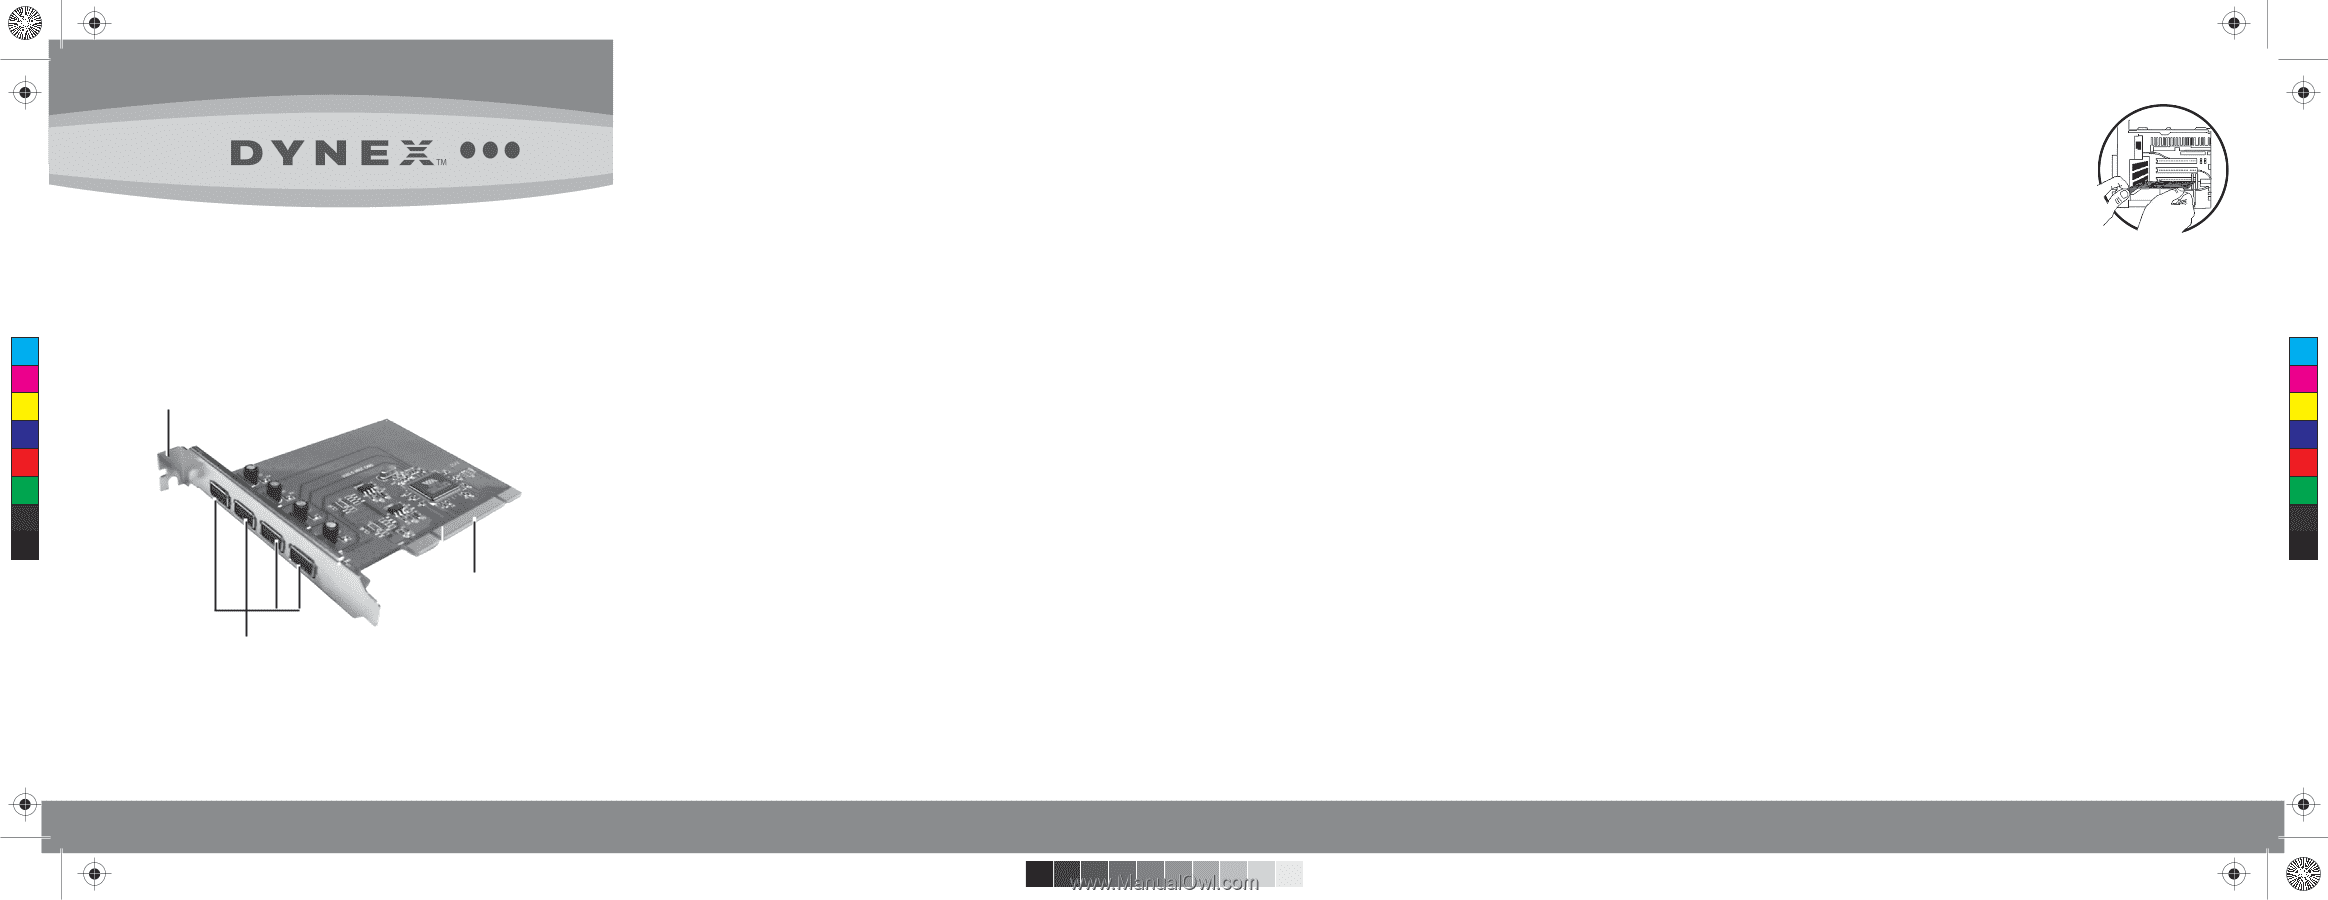
Quick Setup Guide I Guide d’installation rapide I Guía de instalación rápida
Mouting bracket
Support de montage
Soporte de montaje
USB 2.0 ports
Ports USB 2.0
Puertos USB 2.0
PCI connector
Connecteur PCI
Conector PCI
C
M
Y
CM
MY
CY
CMY
K
DX-UC104_09-1060_QSG_V2_Final_pg1.eps
1
11/24/2009
12:54:24 PM
DX-UC104_09-1060_QSG_V2_Final_pg1.eps
1
11/24/2009
12:54:24 PM