EMC CX700 Initialization Guide
EMC CX700 - Insignia CLARiiON Hard Drive Array Manual
 |
View all EMC CX700 manuals
Add to My Manuals
Save this manual to your list of manuals |
EMC CX700 manual content summary:
- EMC CX700 | Initialization Guide - Page 1
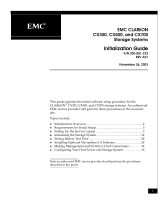
EMC CLARiiON CX300, CX500, and CX700 Storage Systems Initialization Guide P/N 300-001-272 REV A01 November 26, 2003 This guide explains the initial software setup procedure for the CLARiiON® CX300, CX500, and CX700 storage systems. An authorized EMC service provider will perform these procedures at - EMC CX700 | Initialization Guide - Page 2
❑ Install software options (page 30). ❑ Set initial security parameters (page 32). 5 Make Management and Switch or Host ❑ Connect a fibre-optic switch or Fibre Channel Connections host (page 34). 6 Configure Your Host Server and Storage System (page 36) 2 EMC CLARiiON CX300, CX500, and CX700 - EMC CX700 | Initialization Guide - Page 3
one system in the domain.) The EMC Navisphere Manager 6.X Release Notes are on Powerlink. To access EMC Powerlink, use the link, http://powerlink.emc.com. After you log in, select Support > Document Library and find the release notes. EMC CLARiiON CX300, CX500, and CX700 Initialization Guide 3 - EMC CX700 | Initialization Guide - Page 4
DHCP. If your service laptop is not set up for dial-up PPP support or dial-up networking, continue to the next section. If you have already set up your service laptop, you are ready to initialize the storage system at the customer site. 4 EMC CLARiiON CX300, CX500, and CX700 Initialization Guide - EMC CX700 | Initialization Guide - Page 5
The service laptop COM port modem type must be set to Dial-Up Networking Serial Cable between 2 PCs. This is the most flexible modem type, and allows either a NULL modem cable or actual modem to connect to the laptop and SP. Physical Modem Table 1 If the laptop uses a physical modem, configure the - EMC CX700 | Initialization Guide - Page 6
which is not used by the installed modem (whose port you noted in step 1b). Note the port you select. The default is COM 1. What Next? 10. Click Next. 11. On the next screen, click Finish. 12. Click OK. Continue to the next section. 6 EMC CLARiiON CX300, CX500, and CX700 Initialization Guide - EMC CX700 | Initialization Guide - Page 7
click Configure. The Modem Configuration dialog box opens. 13. In the Modem Configuration dialog box, for the Maximum Speed (bps) select 115200. Make sure the Enable hardware flow control is checked. 14. Click OK to close the dialog box. EMC CLARiiON CX300, CX500, and CX700 Initialization Guide 7 - EMC CX700 | Initialization Guide - Page 8
You will enter a user name and password when you initialize the storage system at the customer site. The service laptop is ready to initialize a storage processor at the customer site. Refer to Initializing the Storage System on page 12. 8 EMC CLARiiON CX300, CX500, and CX700 Initialization Guide - EMC CX700 | Initialization Guide - Page 9
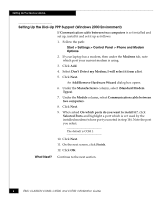
Setting Up the Service Laptop Setting Up the Dial-Up PPP Support (Windows NT 4.0 Environment) 1. If Dial-Up Networking between 2 PCs is not installed and set up, install it and set opens, click Yes to continue configuring the serial cable. EMC CLARiiON CX300, CX500, and CX700 Initialization Guide 9 - EMC CX700 | Initialization Guide - Page 10
Up the Service Laptop What Next? 2. Configure the serial connection for remote access (RAS) by doing the following: a. In the Add RAS Device dialog box, select the dialup networking serial cable with the correct COM port noted in step 1i. b. Click OK. 3. From the Remote Access Setup dialog box - EMC CX700 | Initialization Guide - Page 11
button and select Workgroup. e. Click the Workgroup radio button, then click OK. f. In the Network dialog box, click OK. The service laptop is ready to initialize a storage processor. Refer to Initializing the Storage System on page 12. EMC CLARiiON CX300, CX500, and CX700 Initialization Guide 11 - EMC CX700 | Initialization Guide - Page 12
dots, spaces, or underscores are not allowed. Examples: Array1-A, Array1-B. IP Address Subnet Mask Gateway Change Management Port settings on SP A and SP B to EMC-specific assigned value for added security? YES____ NO____ 12 EMC CLARiiON CX300, CX500, and CX700 Initialization Guide - EMC CX700 | Initialization Guide - Page 13
-232 Cable Figure 1 COM 1 to Service Port Connection (CX700 Shown) SP B SP A EMC2306 2. Turn the service laptop on. Be sure that the system is powered up. The SP's power LED should be a steady green, and no amber LEDs should be blinking. EMC CLARiiON CX300, CX500, and CX700 Initialization Guide - EMC CX700 | Initialization Guide - Page 14
log in as user clariion with password clariion!. Ignore the Domain field. e. Click OK. 4. Open a supported browser window, and enter the following URL: 192.168.1.1/setup The Storage Processor Networking Configuration setup screen opens, similar to Figure 2. 14 EMC CLARiiON CX300, CX500, and CX700 - EMC CX700 | Initialization Guide - Page 15
Initializing the Storage System Figure 2 Storage Processor Networking Configuration Setup Screen (SP A) EMC CLARiiON CX300, CX500, and CX700 Initialization Guide 15 - EMC CX700 | Initialization Guide - Page 16
the network configuration information you entered in step 5, and includes a message informing you that SP A is rebooting. You will set security in a later step. 7. Close the Storage Processor Network Configuration confirmation screen. 16 EMC CLARiiON CX300, CX500, and CX700 Initialization Guide - EMC CX700 | Initialization Guide - Page 17
Initializing the Storage System Figure 3 Network Configuration Confirmation Screen (SP A) 8. Remove the NULL modem cable from SP A and connect it between the laptop serial port (COM 1) and the SP B service port (|0|0|, or ). 9. Depending on your operating system, do one of the following: For - EMC CX700 | Initialization Guide - Page 18
log in as user clariion with password clariion!. Ignore the Domain field. e. Click OK. 10. Open a supported browser, and enter the following URL: 192.168.1.1/setup 11. The Storage Processor Networking Configuration setup screen opens, similar to that shown in Figure 4. 18 EMC CLARiiON CX300, CX500 - EMC CX700 | Initialization Guide - Page 19
Initializing the Storage System Figure 4 Storage Processor Networking Configuration Setup Screen (SP B) EMC CLARiiON CX300, CX500, and CX700 Initialization Guide 19 - EMC CX700 | Initialization Guide - Page 20
must remove the node from its domain before you can change its port setting from the default. If you do change the configuration information you entered in step 12, and includes a message informing you that SP B is rebooting. 20 EMC CLARiiON CX300, CX500, and CX700 Initialization Guide - EMC CX700 | Initialization Guide - Page 21
you install the Navisphere software (see page 32). 18. The system asks you to select a connection type. Select the Serial Connection button, and then press OK. 19. As shown in Figure 6, right-click the SP B icon in the directory display, and select Properties. EMC CLARiiON CX300, CX500, and CX700 - EMC CX700 | Initialization Guide - Page 22
Initializing the Storage System Figure 6 Viewing SP B Properties The SP Properties screen opens, as shown in Figure 7. 22 EMC CLARiiON CX300, CX500, and CX700 Initialization Guide - EMC CX700 | Initialization Guide - Page 23
for SP B by selecting the date, year, hour, or minute and using the arrows to scroll up and down. 22. Click Apply. A Confirm SP B: SP Properties dialog box opens. 23. Verify the date and time and click Yes, then OK on the success screen. EMC CLARiiON CX300, CX500, and CX700 Initialization Guide 23 - EMC CX700 | Initialization Guide - Page 24
a CX500 or CX300 storage system, you will see two ports.) 25. Set the port speeds to 1 or 2 gigabits/second for SP B. When you set the port speed, match it to the device to which it will be connected. Figure 8 Setting the Port Speed 24 EMC CLARiiON CX300, CX500, and CX700 Initialization Guide - EMC CX700 | Initialization Guide - Page 25
On the Laptop, select Start > Settings > Network and Dial up Connections. Select the connection name that you assigned when you set up dial-up networking. b. In the Connect to dialog box, log in as user clariion with password clariion!. EMC CLARiiON CX300, CX500, and CX700 Initialization Guide 25 - EMC CX700 | Initialization Guide - Page 26
section. c. Click Dial. d. In the Connect to dialog box, log in as user clariion with password clariion!. Ignore the Domain field. e. Click OK. 30. Open a supported browser, and enter the following URL: 192.168.1.1/setup The Storage Processor Networking Configuration screen opens. 31. In the Storage - EMC CX700 | Initialization Guide - Page 27
Be Displayed message. Refresh the screen (press F5) until the setup screen opens. 34. Once the Management Server has restarted, you can close the browser. 35. Repeat steps 16 through 27, setting the time, date, and port speed for SP A. EMC CLARiiON CX300, CX500, and CX700 Initialization Guide 27 - EMC CX700 | Initialization Guide - Page 28
is working in each standby power supply (SPS) or battery backup unit (BBU) of the storage system. While the test runs, storage-system write caching is disabled, but communication with the descriptions of each property in the dialog box. 28 EMC CLARiiON CX300, CX500, and CX700 Initialization Guide - EMC CX700 | Initialization Guide - Page 29
the laptop. 2. Connect the crossover cable from the service laptop to the LAN port on SP A or SP B. Figure 11 shows this connection on a CX700 system. LAN Cable Figure 11 Connecting the Crossover Cable (CX700 Shown) NIC Card EMC229 EMC CLARiiON CX300, CX500, and CX700 Initialization Guide 29 - EMC CX700 | Initialization Guide - Page 30
above are on the Navisphere Manager CD-ROM. 2. If you have SnapView, MirrorView, SAN Copy, or Analyzer software, install those drivers from the SnapView, MirrorView, SAN Copy, or Analyzer CD-ROM in a subsequent software installation. 30 EMC CLARiiON CX300, CX500, and CX700 Initialization Guide - EMC CX700 | Initialization Guide - Page 31
. The Storage System Properties dialog box opens. 4. Select any software packages that have a (commit required) specification next to its Status and click COMMIT. Some features may not be available until you commit the software. EMC CLARiiON CX300, CX500, and CX700 Initialization Guide 31 - EMC CX700 | Initialization Guide - Page 32
/setup c. In the Navisphere 6.X Setup Pages that appear, set Security and/or Privileged Users as needed. 2. Disconnect the crossover cable that links the service laptop to your SP LAN port. Security is automatically set for the other SP. 32 EMC CLARiiON CX300, CX500, and CX700 Initialization Guide - EMC CX700 | Initialization Guide - Page 33
the service laptop. 2. In the URL window, enter the following IP address: 192.168.1.1/setup 3. In the Navisphere 6.X Setup Pages that appear, set Security and/or Privileged Users as needed. Security is automatically set for the other SP. EMC CLARiiON CX300, CX500, and CX700 Initialization Guide 33 - EMC CX700 | Initialization Guide - Page 34
Connections Connect each SP to the LAN from which you will run Navisphere management, as shown in Figure 12 and Figure 13. Hub Figure 12 Connecting to a Local Management Client (CX500 Shown) EMC2723 LAN Figure 13 Connecting to a Shared LAN (CX700 Shown) EMC2309 34 EMC CLARiiON CX300, CX500 - EMC CX700 | Initialization Guide - Page 35
(HBA). If the HBA is not yet installed in the host server, use your device-specific documentation to install the HBA in your host, then connect the SP. • For a storage area network (SAN) configuration - to a Fibre Channel switch port. EMC CLARiiON CX300, CX500, and CX700 Initialization Guide 35 - EMC CX700 | Initialization Guide - Page 36
Storage System 4. Connect the other end of the Port 1-3 cables as follows: • In a system without MirrorView - to an HBA port (direct-attach configurations) or switch port (SAN configurations) • In a system with MirrorView - Port 1 (CX500) or Port 3 (CX700) to a storage processor (SP) host port on
-
 1
1 -
 2
2 -
 3
3 -
 4
4 -
 5
5 -
 6
6 -
 7
7 -
8
-
9
-
10
-
11
-
12
-
13
-
14
-
15
-
16
-
17
-
18
-
19
-
20
-
21
-
22
-
23
-
24
-
25
-
26
-
27
-
28
-
29
-
30
-
31
-
32
-
33
-
34
-
35
-
36
 |
 |

1
This guide explains the initial software setup procedure for the
CLARiiON
®
CX300, CX500, and CX700 storage systems. An authorized
EMC service provider will perform these procedures at the customer
site.
Topics include
◆
Initialization Overview
.........................................................................
2
◆
Requirements for Initial Setup
.............................................................
3
◆
Setting Up the Service Laptop
.............................................................
5
◆
Initializing the Storage System
..........................................................
12
◆
Setting Battery Test Time
....................................................................
28
◆
Installing Optional Navisphere 6.X Software
..................................
29
◆
Making Management and Switch or Host Connections
................
34
◆
Configuring Your Host Server and Storage System
.......................
36
Only an authorized EMC service provider should perform the procedures
described in this guide.
EMC CLARiiON
CX300, CX500, and CX700
Storage Systems
Initialization Guide
P/N 300-001-272
REV A01
November 26, 2003