Electrolux EDW7505HPS Installation Instructions - Page 2
Water Line, Electrical, Supply, check these items, Operate the machine, through at, least one fill - manual
 |
UPC - 012505111402
View all Electrolux EDW7505HPS manuals
Add to My Manuals
Save this manual to your list of manuals |
Page 2 highlights
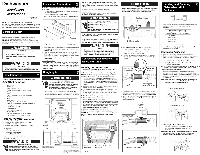
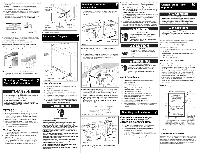
, If levelers need to be removed, make sure that the floor is free of all obstructions. 7. Carefully place dishwasher inside cabinet area such that is centered in opening. Use caution when moving dishwasher to prevent damage to cabinet, dishwasher and floor. , Front of door needs to be even with the front of adjoining cabinets. Front levelers should allow 5/16" below underside of countertop to top of console. , Check that dishwasher is level from side to side by placing a level against the top front section of the tub. See Figure 5a. Green Wire to Green Wire (Ground) Junction Box Figure 5a Junction Box Cover Figure 6a Blac_ Wire to Black Wire (Hot) 4. Replace junction box cover. White Wire to White Wire (Neutral) 10. Check that the dishwasher is level from front to back by taking out the lower rack, place level on the lower rack wheel support at the bottom of the tub. See Figure 5b. 11. Adjust levelers up or down until dishwasher is level. Holes need to be pre-drilled using a #5 drill to secure unit. 12. Screw mounting brackets firmly to cabinet using screws provided in literature packet. See Image Below. Cabinet Attach Clip Cabinet Seal Side Cabinet Seal 1. Review Figures 7, 8 and 9 to see the different ways to connect dishwasher to drain system. Choose method that best suits your need. Entry Must be Above 5. If the cabinet wall is wood, sand edges of hole until smooth and rounded. If cabinet wall is metal, cover all sharp edges with electrical or duct tape to avoid cutting drain hose. 6. Move unit back in place while routing drain hose through access hole. Use caution to prevent damage to the dishwasher, floor and cabinets. IMPORTANT: Make sure there are no sharp bends or kinks that might restrict drain flow. , Secure drain hose to sink drain, disposer, or separate trap with a clamp. IMPORTANT: Be careful not to overtighten clamp or you may damage end of hose. Do not connect hose to horizontal pipe between sink drain and disposer. , Be sure unit does not rest on drain hose. It should be free of electrical components and door springs. Do not cut corrugated drain hose. Pull excess through cabinet and place under sink. Make sure hose does not come in contact with any sharp edges. Weight Keep children away from the front of the dishwasher so that they are not accidentally hit by the door during loading or unloading or if door should unexpectedly open. The weight of the door can cause injury. ,,y,, Branch Tailpiece Sink at Left Figure 7 Sink at Right 2" Drain Hose Hole The drain hose loop must be at least 32" high f!'om the floor to insure proper drainage. , If you connect to a sink drain, entry will need to be above trap. A "Y" branch tailpiece and connector kit, not included, will make this method easier and includes all needed fittings and instructions. See Figure 7. Electric Shock Hazard Disconnect electrical power at the fuse box or circuit breaker box before beginning installation. Failure to follow this warning could result in death or serious injury. Cut Hazard Metal color panels are sharp and should be handled with care. Wear gloves to protect hands. Failure to follow this warning may result in injury. Screws To prevent the possibility of damage to dishwasher, replace factory installed outer door screws with factory supplied wood panel screws, The EDW7505HSS & EDW7505HPS can be installed with a fully integrated, buyer supplied custom door panel. The custom panel should be 1/2" to 3/4" (19mm) thick. Items provided with the unit: Six 1V8"screws for mounting the custom wooden panel to the dishwasher. Tools you will need to install the Custom Wood Panel: # 32 Drill Bit (7/64") 2 # 7 _/2"screws (Optional) INSTALLING THE CUSTOM PANEL Figure 5c Figure 5d 13. Open and close dishwasher door slowly. Ensure that there is clearance to the console. Adjust accordingly until door opens and closes freely. Property Damage Do not solder within 6" of the water inlet valve. Damage to the plastic parts in the valve may occur. Use care that no sealer, dirt, or other objects enter the valve. Damage to the filter screen may occur. Be sure the dishwasher is placed where the water inlet valve will be kept from freezing. If the valve freezes, it may rupture and flooding may occur. Water Line 1. Flush water line before connecting it to water inlet valve to prevent early clogging of filter screen. Place a bunched towel over end of line to prevent splashing. Open water supply valve for a few seconds and let water drain into a pan. Turn offwater supply at shut-off valve. 2. Route water line to water inlet valve as shown in Figure 4. 3. While firmly pulling water supply line into 90 ° elbow, tightly connect water supply to water inlet valve. Supply line must be free of kinks, scales, chips, and lubricants. 4. Turn on water supply and check for leaks. Electrical Supply 1. Remove junction box cover and pull house wiring into junction box. See Figures Below. 2. Use a UL listed conduit connector (not included) at box to stabilize wiring. 3. Connect incoming black lead to dishwasher's black lead, incoming white lead to dishwasher's white lead and incoming green lead to dishwasher's green lead with wire nuts. (See Grounding Instruction Warning). Wire nuts must be tight. Leveling Leg Air Gap Electric Shock Hazard If all connections are correct, there are no leaks, and unit runs properly, replace the kickplate assembly before placing unit into operation. Failure to follow this warning could result in electric shock. Water Line Figure 6b check these items: Electrical Line [3 Water and electrical lines are straight out in front of the dishwasher. [3 All four leg levelers are positioned properly. [3 Cabinet Seals are positioned on the sides and top of the dishwasher. [3 Cabinet Attachment Clips are attached to the cabinet on both corners on top of the dishwasher. [3 Remove protective film before replacing toe and kickplate then replace Toe and Kickplate. Note: When replacing Toe and Kickplate hand tighten screws. check these items: 3. If you connect to a sink trap, local codes may require you to install an air gap kit, (not included). The drain hose will be routed from dishwasher to air gap inlet as shown in Figure 8. An air gap kit is available from a plumbing supply store. (If the drain hose is installed through the floor, an air gap is necessary). 4. If you connect to a disposer, the large end of drain hose will fit. Figure 9(a). The knock out plug must be removed from inside disposer inlet before making the final fit to drain hose. See Figure 9(b). Cut for 5/8" connection. \ _YY22UYU--_T- (_ _Larger end / of hose /fits disposer / inlet fitting. [3 Water and drain lines have no kinks and move freely behind the dishwasher. [3 Water supply is turned on. [3 Joints are free of leaks. [3 Wiring connections to junction box are tight all access panels are secured back in place. [3 Replace kickplate. See Figure 1 [3 Drain hose is assembled to Drain Hose Connector. [3 All packing materials and consumer literature have been removed from inside unit. [3 Dishwasher is level and securely fastened. [3 Open and close door to make sure it does not hit surrounding cabinet or countertop. [3 Make sure that all wire ties are removed from the Adjustable Rack Assembly, Versa Tray, Utility Tray and Silverware Baskets. Electric Shock Hazard Grounding Instructions: The dishwasher must be connected to a grounded metal, permanent wiring system or an equipment-grounding conductor must be run with the circuit conductors and connected to the appliance's equipment grounding terminal or lead. It is the consumer's responsibility to contact a qualified installer to make sure the electrical installation conforms with the National Electrical Code and local codes and ordinances. Do not connect the dishwasher to the power supply until the appliance is permanently grounded. All wiring connections must be enclosed in the junction box. This unit has copper lead wires. Joining aluminum building wire to stranded copper wire should be done by a qualified electrician using materials recognized by UL and local codes. Do not use an extension cord. Such use can result in fire, electrical shock, or other personal injury. Failure to follow these instructions could result in death or serious injury. Figure 9(a) -Cut for 3/4 connection. Drain Hose Sink at Left / Drain Air Gap //i ! II /q _C I1", ', // i' / /// " "lI , - &/ ate Drain Floor into Separate Trap Sink at Right Figure 9(b) 2" Drain Hose Hole The drain hose loop must be at least 32" high f!'om the floor to insure proper drainage. Operate the machine through at least one fill and pump-out, checking the following items: [3 On EDW7505HSS and EDW7505HPS press and hold SANTIZE touchpad for 8 seconds before first use. [3 At first fill, approximately 2 minutes make sure water completely covers filter surface. [3 At pump-out: (pump-out is either when the cycle is completed or canceled, refer to the Use and Care Manual for Start/Cancel), make sure all water is pumped out. [3 Check water connections again for leaks. Refer to the Figure 10 for instruction references. 1. Fit the handle onto the panel according to the manufacturer's instructions. (NOTE: A handle should be used rather than a knob. A knob does not provide enough grip.) 2. The two short screws go into the back of the panel 1 417/32" from the upper edge of the panel and 9/_6"from the edge of the panel. Insert the short screws into the panel, leaving Vs" of space between the screw head and the panel. 3. Hook the panel screws into the rectangular openings of the metal panel on the dishwasher door. 4. Open the door and use the six screws supplied to secure the panel to the door. NOTE: The door panel cannot exceed 12 pounds. Thiekn_: W' _1 Weight: 12Ibs,,max. _aX. 2 Pilot_[ill h01e_'_ (%"dia,:×_A"mA depth) 23d=" :t 6 PiLodtrillholes Figure 10 ADJUSTING THE DOOR SPRINGS Before you push the dishwasher into the cabinet opening, test the door to make sure it stays in place at any angle. If it tends to fall down, adjust the tension of the door springs on the sides of the machine by moving them one hole farther back. If the door moves to close, adjust the tension of the door springs on the side of the machine by moving them one hole forward.
-
 1
1 -
 2
2
 |
 |
