Electrolux EFLW317TIW Installation Instructions English Spanish French
Electrolux EFLW317TIW Manual
 |
View all Electrolux EFLW317TIW manuals
Add to My Manuals
Save this manual to your list of manuals |
Electrolux EFLW317TIW manual content summary:
- Electrolux EFLW317TIW | Installation Instructions English Spanish French - Page 1
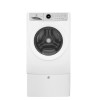
EN FRONT LOAD WASHER FR LAVEUSE Á CHARGEMENT FRONTAL ES LAVADORA DE CARGA FRONTAL INSTALLATION INSTRUCTIONS INSTRUCTIONS D'INSTALLATION INSTRUCCIONES DE INSTALACIÓN A07019401B January 2017 - Electrolux EFLW317TIW | Installation Instructions English Spanish French - Page 2
code C22.1 part 1. • To avoid back or other injury, have more than one person move or lift the washer. • Do not stack a dryer on top of washer already installed on pedestal. Do not stack washer on top of dryer. Do not stack washer on top of another washer. • The instructions in this manual and all - Electrolux EFLW317TIW | Installation Instructions English Spanish French - Page 3
toward end of drain hose Drain hose secured in place with cable tie (shipped in drum) Door Reversal Follow detailed instructions in this guide Test hinge and latch for function Electrical Power House power turned on Washer plugged in Final Checks Installation Instructions and Use and - Electrolux EFLW317TIW | Installation Instructions English Spanish French - Page 4
can advise you of your water pressure. Drain system requirements 1. Drain capable of eliminating 17 gals (64.3 the appliance is properly grounded. 1. The washer MUST be grounded. In the event of 70 (latest edition), or in Canada, the Canadian electrical code C22.1 part 1. If in doubt, call - Electrolux EFLW317TIW | Installation Instructions English Spanish French - Page 5
(2.5 cm). To minimize vibration or movement, reinforcement of the floor may be necessary. INSTALLATION IN A RECESS OR CLOSET If washer and dryer are installed in the same closet, door ventilation is required: A minimum of 120 square inches (774.2 cm²) of opening, equally divided at the top and bottom - Electrolux EFLW317TIW | Installation Instructions English Spanish French - Page 6
line washer mounted on optional pedestal floor line water supply connection on rear of unit drain hose on rear of unit3 27.0" (68.5 cm) power cord on rear of unit1 38.0" (96.5 cm) 53.25" (135.5 cm) 53.5" (136 cm)* to clear open door 32" (81.25 cm)* to front of closed door approved stacking kit - Electrolux EFLW317TIW | Installation Instructions English Spanish French - Page 7
. 1. Temporarily remove door tape. 2. Open washer door and remove everything from the drum. 3. Close door and reapply door tape. 4. Using washer damage during any future moves. IMPORTANT Do NOT tip washer upside down onto its top for any reason. WARNING ELECTRICAL SHOCK HAZARD Certain internal parts - Electrolux EFLW317TIW | Installation Instructions English Spanish French - Page 8
damage to your home, or unexpected washing results. Save all shipping bolts and spacers for future use. If the washer is to be transported at a plugs Locate hole plugs in the small bag supplied with washer instruction guides. Insert them in the holes in washer back panel. 7 HOLE PLUGS (IN BAG) - Electrolux EFLW317TIW | Installation Instructions English Spanish French - Page 9
for best performance of the washer. NOTE For pedestal installations, see additional installation instructions included with the pedestal. b WASHERS USE ONLY MUST BE PRESENT NEW HOSES c d NOTE Hoses are not included with washer purchase. See "Accessories" section for various inlet hose kits - Electrolux EFLW317TIW | Installation Instructions English Spanish French - Page 10
be 1-1/4" (3.2 cm) minimum. There must be an air gap around the drain hose in the standpipe. A snug hose fit can cause a siphoning action. IMPORTANT review the "Service Prevention Checklist" in your Use & Care Guide before calling for service. 9. Place these instructions in a location near the washer - Electrolux EFLW317TIW | Installation Instructions English Spanish French - Page 11
washer is unplugged from power source! WARNING ELECTRICAL SHOCK HAZARD Failure to disconnect power source before servicing could result in personal injury or even death. Tools needed for reversal: Screwdriver with #2 square bit Plastic knife A) Removing Door Assembly 1. Completely open the door - Electrolux EFLW317TIW | Installation Instructions English Spanish French - Page 12
may have to use a nan-scratching plastic knife if you are unable to release it manually. Slide the cover down slightly and remove it from the front panel. COARSE THREAD D) Reversing Door Assembly 1. Locate nine screws on inner door ring. Remove each and save for reinstallation later. Remove inner - Electrolux EFLW317TIW | Installation Instructions English Spanish French - Page 13
F) Verify Reversed Door Operation 1. Test door for free, smooth swinging operation and secure latching when closed. 2. Verify inner door glass is place. 3. Plug in washer and close the door. Test correct door lock operation by starting a test cycle: lock should engage, and door should not be able - Electrolux EFLW317TIW | Installation Instructions English Spanish French - Page 14
use. This pedestal will add about 15" (38 cm) to the height of your unit. *Other colors may be available. Contact the source where you purchased your washer. DRYER STACKING KIT P/N STACKIT7X Depending on the model you purchased, a kit for stacking a matching dryer on top of this washer may have been - Electrolux EFLW317TIW | Installation Instructions English Spanish French - Page 15
EN FRONT LOAD WASHER FR LAVEUSE Á CHARGEMENT FRONTAL ES LAVADORA DE CARGA FRONTAL INSTALLATION INSTRUCTIONS INSTRUCTIONS D'INSTALLATION INSTRUCCIONES DE INSTALACIÓN - Electrolux EFLW317TIW | Installation Instructions English Spanish French - Page 16
instructions ées dans ce guide sont identifiées par les instructions de l'information contenue dans ces instructions doit être suivie afin de conformément aux instructions du fabricant et ANSI/NFPA 70), ou au Canada, au Code canadien de Les instructions comprises dans ce guide et ces instructions pour - Electrolux EFLW317TIW | Installation Instructions English Spanish French - Page 17
Exigences d'Installation 3 Veuillez lire et conserver ce guide Merci d'avoir choisi Electrolux, la marque de qualité en matière d'électroménager. Ces instructions d'installation font partie de notre engagement à vous satisfaire et à vous fournir un produit de qualité pendant toute la durée de vie - Electrolux EFLW317TIW | Installation Instructions English Spanish French - Page 18
ne doit pas dépasser 68,9 kPa (10 lb/po²). Le service des eaux de votre localité peut vous informer sur la pression de votre alimentation en eau. Exigences relatives au système d'évacuation 1. Le drain doit pouvoir évacuer 64,3 L (17 gal) d'eau à la minute. 2. Tuyau - Electrolux EFLW317TIW | Installation Instructions English Spanish French - Page 19
des conditions météorologiques extérieures. 2. ...à un endroit (garage ou bâtiment similaire) où de l'essence ou d'autres substances inflammables sont entreposées. Si la machine à laver est installée dans un garage, elle doit être élevée à un minimum de 45,7 cm (18 po) au-dessus du sol. 3. ...sur un - Electrolux EFLW317TIW | Installation Instructions English Spanish French - Page 20
6 Exigences d'Installation Dimensions de laveuse 53.5" 32" (81.25 cm)* à partir de l'avant de la porte lorsqu'elle est fermée kit d'empilage approuvé (STACKIT7X) requis pour l'installation empilée raccord de l'alimentation en eau à l'arri la sécheuse électrique (Canada), environ 152,5 cm (60 po). - Electrolux EFLW317TIW | Installation Instructions English Spanish French - Page 21
Déballage de la Laveuse 7 Retrait de l'emballage en mousse AVERTISSEMENT RISQUE D'ÉTOUFFEMENT Détruisez le carton d'emballage et les sacs en plastique après avoir déballé l'appareil. Les enfants pourraient les utiliser pour jouer. Le carton recouvert de tapis, les couvertures et les feuilles de - Electrolux EFLW317TIW | Installation Instructions English Spanish French - Page 22
D'ESPACEMENT NOIR 1 CALES D'ESPACEMENT BLANC 5 RONDELLE DE MÉTAL 1 FOURCHE D'EXPÉDITION Pose des bouchons Repérez les bouchons dans le petit sac fourni avec les guides d'instructions de la laveuse. Insérez-les dans les trous du panneau arrière du lave-glace. 7 BOUCHONS (DANS UN SAC) - Electrolux EFLW317TIW | Installation Instructions English Spanish French - Page 23
plus près possible de la laveuse afin d'optimiser le rendement de la laveuse. REMARQUE Pour une installation sur socle, reportez-vous aux instructions d'installation complémentaires incluses avec le socle. Branchement de l'entrée d'eau 1. Faites couler de l'eau chaude et froide des robinets pour - Electrolux EFLW317TIW | Installation Instructions English Spanish French - Page 24
à l'utilisation initiale, veuillez revoir la section intitulée « Liste de vérification avant service » de votre Guide d'utilisation et d'entretien avant d'effectuer une demande de service. 9. Laissez ces instructions à proximité de l'appareil pour vous y reporter ultérieurement. REMARQUE Un schéma - Electrolux EFLW317TIW | Installation Instructions English Spanish French - Page 25
de positionnement à l'arrière de la plaque de charnière se disloquent du panneau avant. IMPORTANT S'assurer de ne pas éloigner la porte de la machine à laver avant d'avoir retiré le couvrebornes du faisceau de câblage. 5. Déposer la porte face vers le bas sur une surface plate protégée par un chi - Electrolux EFLW317TIW | Installation Instructions English Spanish French - Page 26
12 Inversion de la Porte B) Dépose de la Serrure de Porte et son Couvercle en Plastique 1. Localiser et retirer les deux vis de la serrure de porte. Mettre de côté pour la réinstallation. 2. Faire pivoter la serrure pendant que vous la sortez par le panneau avant. S'assurer de ne pas tirer trop - Electrolux EFLW317TIW | Installation Instructions English Spanish French - Page 27
Porte 1. Insérer le faisceau dans le couvre-borne et l'enrouler sur son support. FILETAGE FIN 4 2 E) Vérifier le Fonctionnement de la Porte Inversée de charnière jusqu'à ce que les languettes s'enclenchent 3. Brancher la machine à laver et fermer la porte. Valider le verrouillage de la porte en - Electrolux EFLW317TIW | Installation Instructions English Spanish French - Page 28
pas de nécessaire de superposition ou que vous en désirez un autre, il vous est possible d'en commander un. KITS TUYAUX D'ALIMENTATION S'il vous plaît appelez 866-233-8353 (au Canada, 800-265-8352) pour explorer les options de tuyaux d'entrée qui pourrait s'adapter à votre installation spécifiques - Electrolux EFLW317TIW | Installation Instructions English Spanish French - Page 29
EN FRONT LOAD WASHER FR LAVEUSE Á CHARGEMENT FRONTAL ES LAVADORA DE CARGA FRONTAL INSTALLATION INSTRUCTIONS INSTRUCTIONS D'INSTALLATION INSTRUCCIONES DE INSTALACIÓN - Electrolux EFLW317TIW | Installation Instructions English Spanish French - Page 30
seguridad incluidas en este manual aparecen precedidas de un digo Eléctrico de Canadá (Canadian Electrical Code) Parte 1. • Para evitar lesiones en la espalda u otro la lavadora si ya está instalada sobre un pedestal. No apile la lavadora sobre la secadora. No Electrolux Major Appliances Todos los - Electrolux EFLW317TIW | Installation Instructions English Spanish French - Page 31
guía ¿Preguntas? Gracias por elegir Electrolux, la marca de alta calidad de electrodomésticos para el hogar. Estas instrucciones de instalación forman parte de nuestro compromiso de satisfacer al la sección de "Accesorios" para verificar diferentes kits de mangueras especificas para su instalación. - Electrolux EFLW317TIW | Installation Instructions English Spanish French - Page 32
4 Requisitos de Instalación Requisitos del sistema eléctrico CIRCUITO - Circuito individual de bifurcación de 15 amp., correctamente polarizado y con conexión a tierra con fusible de retardo de 15 amp. o con interruptor automático. SUMINISTRO ELÉCTRICO: corriente alterna de 2 cables, con conexión - Electrolux EFLW317TIW | Installation Instructions English Spanish French - Page 33
o movimientos, puede que sea necesario reforzar el piso. ESPACIOS MÍNIMOS PARA LA INSTALACIÓN: cm (pulgadas) LATERALES PARTE TRASERA PARTE SUPERIOR PARTE DELANTERA Hueco Debajo de la encimera Armario 0" (0 cm) 0" (0 cm) 0" (0 cm) 0" (0 cm) 0" (0 cm) 0" (0 cm) 0" (0 cm) 0" (0 cm) 0" (0 cm - Electrolux EFLW317TIW | Installation Instructions English Spanish French - Page 34
el piso línea del piso lavadora colocada sobre pedestal opcional línea del piso 53.5" (136 cm)* para destapar abra la kit de apilado aprobado (STACKIT7X) necesario para la instalación apilada conexión del suministro de agua en la parte trasera de la lavadora manguera de drenaje en la parte - Electrolux EFLW317TIW | Installation Instructions English Spanish French - Page 35
colocar la cinta sobre esta. 4. Utilizando una alfombra, frazada o trozo de cartón para proteger el piso, recueste la lavadora cuidadosamente sobre su parte trasera. PRECAUCIÓN PELIGRO DE EXCESO DE PESO Para evitar lesiones en la espalda u otro tipo de lesiones, procure levantar o mover la lavadora - Electrolux EFLW317TIW | Installation Instructions English Spanish French - Page 36
8 Desembalaje de la Lavadora Retiro del embalaje de protección IMPORTANTE La falta de remoción completa de los pernos y accesorios de embalaje podría resultar en daños en el artefacto, daños a su casa o resultados de lavado inesperados. Guarde todos los pernos y espaciadores de embalaje para su uso - Electrolux EFLW317TIW | Installation Instructions English Spanish French - Page 37
un mejor rendimiento de la lavadora. NOTA Para instalar un pedestal, consulte las instrucciones de instalación adicionales que vienen con dicho las partículas que puedan obstruir los filtros de la llave de paso y para determinar cuál canilla corresponde a al suministro de agua caliente y cuál al - Electrolux EFLW317TIW | Installation Instructions English Spanish French - Page 38
10 Instrucciones de Instalación Conexión del desagüe y del suministro eléctrico 1. Compruebe si el disco anti-sifón está colocado. 2. Forme una "U" en el extremo del tubo de drenaje co el tubo señalando hacia el drenaje. Coloque el extremo formado del tubo de drenaje en lavadero o una tubería - Electrolux EFLW317TIW | Installation Instructions English Spanish French - Page 39
dañar la pintura). 3. Proteja las superficies de trabajo planas, como la parte superior de la lavadora o el piso cerca de esta utilizando un paño o con la otra mano hasta que los vástagos de localización de la parte posterior de la placa de la bisagra se desacoplen del panel frontal. IMPORTANTE - Electrolux EFLW317TIW | Installation Instructions English Spanish French - Page 40
del arnés de cableado de la cerradura de la puerta. Colocar a un lado la cerradura de la puerta para reinstalarla después. 4. Levantar haciendo palanca la parte inferior de la tapa de plástico del agujero para liberarla del panel frontal. Es posible que deba usar un cuchillo de plástico que - Electrolux EFLW317TIW | Installation Instructions English Spanish French - Page 41
se cierra. 2. Verifique que el vidrio de la puerta interior esté en la orientación correcta con la "cuchara" en la parte inferior. 2. Deslice la tapa del terminal sobre la parte posterior de la placa de la bisagra hasta que las pestañas queden fijas de golpe en su lugar. 3. Enchufe la - Electrolux EFLW317TIW | Installation Instructions English Spanish French - Page 42
la unidad y facilitar su uso. Dicho pedestal agregará aproximadamente 38,1 cm (15 pulgadas) contacto con el distribuidor donde adquirió la lavadora. KIT DE SECADORA PARA CENTRO DE LAVADO Pieza No. indique el Distribuidor Autorizado de Piezas Electrolux más cercano a su domicilio. ADVERTENCIA - Electrolux EFLW317TIW | Installation Instructions English Spanish French - Page 43
- Electrolux EFLW317TIW | Installation Instructions English Spanish French - Page 44
electrolux.com/shop
-
 1
1 -
 2
2 -
 3
3 -
 4
4 -
 5
5 -
 6
6 -
 7
7 -
8
-
9
-
10
-
11
-
12
-
13
-
14
-
15
-
16
-
17
-
18
-
19
-
20
-
21
-
22
-
23
-
24
-
25
-
26
-
27
-
28
-
29
-
30
-
31
-
32
-
33
-
34
-
35
-
36
-
37
-
38
-
39
-
40
-
41
-
42
-
43
-
44
 |
 |
EN
FRONT LOAD WASHER
FR LAVEUSE Á CHARGEMENT FRONTAL
ES LAVADORA DE CARGA FRONTAL
INSTALLATION INSTRUCTIONS
INSTRUCTIONS D’INSTALLATION
INSTRUCCIONES DE INSTALACIÓN
A07019401B January 2017