Electrolux EFLW317TIW Installation Instructions English Spanish French - Page 8
Removing shipping hardware, Installing hole plugs
 |
View all Electrolux EFLW317TIW manuals
Add to My Manuals
Save this manual to your list of manuals |
Page 8 highlights
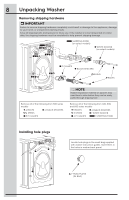
8 Unpacking Washer Removing shipping hardware IMPORTANT Failure to remove shipping hardware completely could result in damage to the appliance, damage to your home, or unexpected washing results. Save all shipping bolts and spacers for future use. If the washer is to be transported at a later date, the shipping hardware must be reinstalled to help prevent shipping damage. SHIPPING FORK (on select models) WHITE SPACER (on select models) P CLAMPS BLACK SPACERS SHIMS BOLTS Remove all of the following from 300 series models: 4 BOLTS 4 SHIMS 4 BLACK SPACERS 3 P CLAMPS NOTE Rubber expansion material on spacers may need time to relax before they can be easily pulled through shipping hole. Remove all of the following from 400, 500, and 600 series models: 5 BOLTS 5 SHIMS 4 P CLAMPS 4 BLACK SPACERS 1 WHITE SPACER 1 SHIPPING FORK Installing hole plugs Locate hole plugs in the small bag supplied with washer instruction guides. Insert them in the holes in washer back panel. 7 HOLE PLUGS (IN BAG)
-
 1
1 -
2
-
 3
3 -
 4
4 -
 5
5 -
 6
6 -
 7
7 -
 8
8 -
 9
9 -
 10
10 -
 11
11 -
 12
12 -
 13
13 -
14
-
15
-
16
-
17
-
18
-
19
-
20
-
21
-
22
-
23
-
24
-
25
-
26
-
27
-
28
-
29
-
30
-
31
-
32
-
33
-
34
-
35
-
36
-
37
-
38
-
39
-
40
-
41
-
42
-
43
-
44
 |
 |
