Electrolux EW36EC55GW Complete Owner's Guide (English) - Page 15
OPERATING THE TRIPLE SURFACE RADIANT ELEMENT, To Operate the Triple Surface Element
 |
UPC - 057112096735
View all Electrolux EW36EC55GW manuals
Add to My Manuals
Save this manual to your list of manuals |
Page 15 highlights
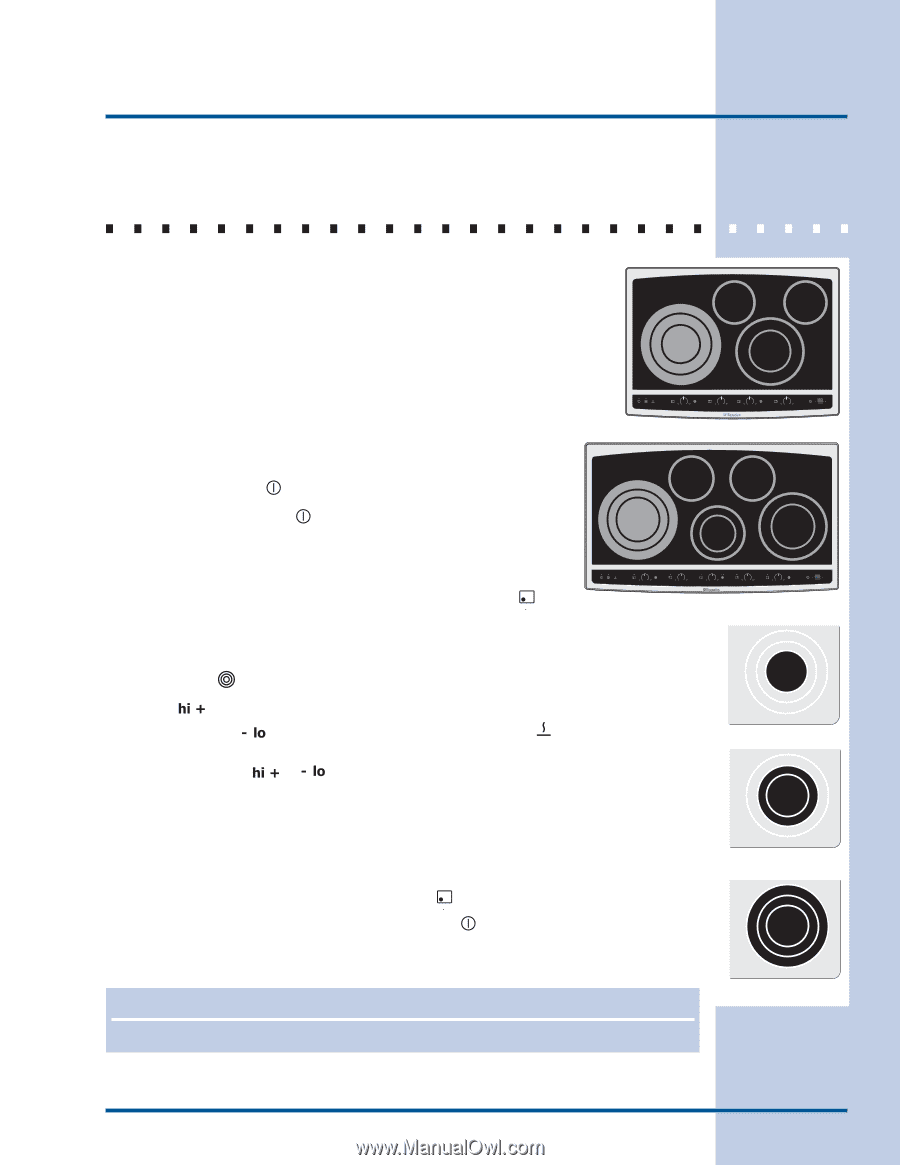
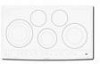
Setting Surface Controls 15 OPERATING THE TRIPLE SURFACE RADIANT ELEMENT Both the 30" and 36" cooktops are equipped with "Triple" surface radiant elements located as shown in Figs. 1 & 2. A touch key pad on the element controls is used to select one of the 3 positions of the element. Indicator lights on the control panel are used to indicate which coil of the triple radiant element will heat. One indicator light on indicates that only the INNER coil will heat (Fig. 3). Two indicator lights on indicate that both INNER and MIDDLE coils will heat (Fig. 4). Three indicator lights on indicate that all 3 portions of the element will heat (Fig. 5). You may switch from either of these settings at any time during cooking. POWER lock warm ON OFF med hot surface size ON OFF med hot surface ON OFF med hot surface size ON OFF med hot surface timer To Operate the Triple Surface Element: Fig. 1 1. Place correctly sized cookware on the radiant surface element. 2. Touch and hold the key pad until a beep sound. The power POWER indicator light above the will turn ON. Note: If no other key POWER pad is touched within 20 seconds the request to Power ON the cooktop will clear. 3. Touch and hold the pad for the desired triple element position POWER lock warm ON OFF med hot surface size ON OFF med hot surface ON OFF med hot surface size ON OFF med hot surface ON OFF med hot surface size timer until a beep is heard. The indicator light located above the ON OFF Fig. 2 pad will glow. Note: If no further pads are touched within 10 seconds the request to power the element ON will clear. 4. Select the INNER (Fig. 3), MIDDLE (Fig. 4) or ALL 3 element (Fig. 5) to heat by touching the key pad. 5. Touch size pad once to turn ON the power level to HI. Touch med pad once for MEDIUM, touch pad once for power level to LO or touch pad once to set the warm power level to KEEP WARM setting. 6. Each touch of the or pad will increase or decrease the power level. Lo is the lowest power level available. Note: The power level may be adjusted at any time while the element is ON. 7. Start most cooking operations on a higher setting and then turn to a lower setting to finish cooking. Each surface element provides a constant amount of heat at each setting. A glowing red surface heating area extending beyond the bottom edge of the cookware indicates the cookware is too small for the surface heating area. 8. When cooking has been completed touch the pad once to turn the element OFF ON OFF and if no other surface element is used touch the key pad to turn off the cooktop. POWER Note: The Hot Surface Indicator Light will turn ON if the cooktop is still hot and will remain ON until the heating surface area has cooled sufficiently. NOTE See the Recommended Setting for Surface Elements table, on page 12, to make the correct setting. Fig. 3 Fig. 4 Fig. 5
-
 1
1 -
2
-
3
-
4
-
5
-
6
-
7
-
8
-
9
-
 10
10 -
 11
11 -
 12
12 -
 13
13 -
 14
14 -
 15
15 -
 16
16 -
 17
17 -
 18
18 -
 19
19 -
 20
20 -
21
-
22
-
23
-
24
-
25
-
26
 |
 |