Epson 9600 Quick Reference Guide
Epson 9600 - Stylus Pro Color Inkjet Printer Manual
 |
UPC - 010343841888
View all Epson 9600 manuals
Add to My Manuals
Save this manual to your list of manuals |
Epson 9600 manual content summary:
- Epson 9600 | Quick Reference Guide - Page 1
EPSON Stylus® Pro 7600/9600 Quick Reference Guide - Epson 9600 | Quick Reference Guide - Page 2
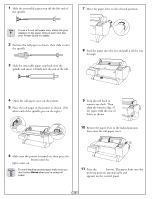
3-inch roll paper core, attach the gray adapters to the paper stops at each end. See your Printer Guide for details. 2 Position the roll paper as shown, then slide it onto the spindle. 3 Slide button. The paper feeds into the printing position automatically and READY appears on the control panel. 1 - Epson 9600 | Quick Reference Guide - Page 3
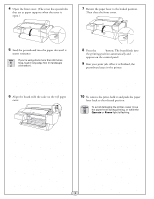
appears on the control panel. To avoid damaging the printer, never move the paper lever during printing, or while the Operate or Pause light is flashing. 7 Print your page. After it is finished, the sheet stays in the printer. 8 To remove your print, press the Paper Feed button. 4 Feed the sheet - Epson 9600 | Quick Reference Guide - Page 4
cover. (The cover has special tabs that act as paper supports when the cover is open.) 7 Return the paper lever board feeds into the printing position automatically and READY appears on the control panel. 9 Run your print job. After it is finished, the posterboard stays in the printer. 6 Align the - Epson 9600 | Quick Reference Guide - Page 5
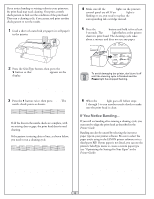
running a cleaning cycle, you may need to align the print head as described in the Printer Guide. Banding can also be caused by selecting the incorrect paper type in your printer software. Be sure to select the paper you're using in the EPSON printer software or in a third-party RIP. If your paper - Epson 9600 | Quick Reference Guide - Page 6
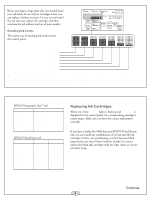
you have the correct replacement cartridge. If you have a Stylus Pro 9600 that uses EPSON UltraChrome ink, you can install any combination of 110 ml and 220 ml cartridges. Unless you are planning to switch between black print modes (see your Printer Guide for details), be sure to replace the black - Epson 9600 | Quick Reference Guide - Page 7
remains on after installing the cartridge, it may not be inserted fully. 3 Remove the empty ink cartridge from the printer. 6 Return the ink lever to its locked position. Do not shake the empty cartridge, or ink may escape. If ink gets on your hands, wash them thoroughly with soap and water. If - Epson 9600 | Quick Reference Guide - Page 8
until you see PRINTER STATUS. 2 Press , then press until you see SERVICE LIFE. 3 Press printer cover. The carriage returns to the home position and the cutter replacement is complete. Replacing the Maintenance Tank The maintenance tank stores ink that gets flushed from the system during print head - Epson 9600 | Quick Reference Guide - Page 9
Printer Guide. Message Light Explanation Response INK LOW Ink Out light(s) flashing Ink cartridge(s) nearly Replace ink cartridge(s) indicated empty (printing continues). by Ink Out light(s). See page 7. INK OUT Ink Out light(s) on Ink cartridge(s) empty (printing stops). Replace ink - Epson 9600 | Quick Reference Guide - Page 10
Go to http: //support.epson.com to download drivers, access product documentation and troubleshooting, and get technical advice through e-mail. Contact the RIP manufacturer. EPSON and EPSON Stylus are registered trademarks of SEIKO EPSON CORPORATION. EPSON UltraChrome and EPSON Photographic Dye are - Epson 9600 | Quick Reference Guide - Page 11
-
 1
1 -
 2
2 -
 3
3 -
 4
4 -
 5
5 -
 6
6 -
 7
7 -
8
-
9
-
10
-
11
 |
 |
EPSON
Stylus
®
Pro 7600/9600
Quick Reference Guide