Epson 9600 Quick Reference Guide - Page 8
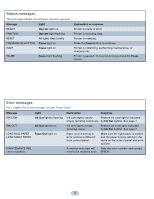
Replacing the Cutter Blade, Replacing the Maintenance Tank, SelecType, PRINTER, STATUS, SERVICE LIFE - head cleaning
 |
UPC - 010343841888
View all Epson 9600 manuals
Add to My Manuals
Save this manual to your list of manuals |
Page 8 highlights
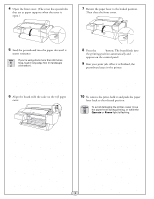
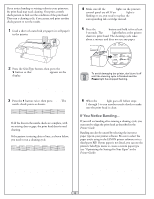
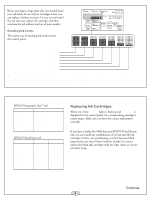
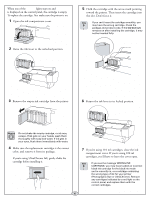
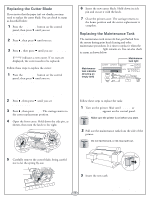
Replacing the Cutter Blade If you notice that the paper isn't cut cleanly, you may need to replace the cutter blade. You can check its status as described below: 1 Press the SelecType button on the control panel, then press until you see PRINTER STATUS. 2 Press , then press until you see SERVICE LIFE. 3 Press , then press until you see CUTTER. E*****F indicates a new cutter. If no stars are displayed, the cutter needs to be replaced. Follow these steps to replace the cutter: 1 Press the SelecType button on the control panel, then press until you see MAINTENANCE. 6 Insert the new cutter blade. Hold down its side pin and secure it with the latch. 7 Close the printer cover. The carriage returns to the home position and the cutter replacement is complete. Replacing the Maintenance Tank The maintenance tank stores ink that gets flushed from the system during print head cleaning and other maintenance procedures. It is time to replace it when the Maintenance Tank light remains on. You can also check its status as shown below: Maintenance tank light Maintenance tank indicator (showing an empty tank) 2 Press , then press until you see CUTTER REPL. 3 Press , then press Enter. The carriage moves to the cutter replacement position. 4 Open the front cover. Hold down the side pin, as shown, then turn the latch to the right. Follow these steps to replace the tank: 1 Turn on the printer. Wait until READY or PAPER OUT appears on the control panel. Make sure the printer is on before you start. 2 Pull out the maintenance tank from the side of the printer. Do not tip the tank, or ink may spill out. 5 Carefully remove the cutter blade, being careful not to let the spring fly out. 3 Insert the new tank. 7
-
 1
1 -
2
-
 3
3 -
 4
4 -
 5
5 -
 6
6 -
 7
7 -
 8
8 -
 9
9 -
 10
10 -
 11
11
 |
 |
