Epson ActionPrinter 3250 User Manual
Epson ActionPrinter 3250 - ActionPrinter-3250 Impact Printer Manual
 |
View all Epson ActionPrinter 3250 manuals
Add to My Manuals
Save this manual to your list of manuals |
Epson ActionPrinter 3250 manual content summary:
- Epson ActionPrinter 3250 | User Manual - Page 1
- Epson ActionPrinter 3250 | User Manual - Page 2
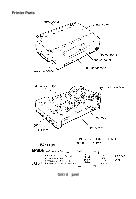
Printer Parts Control panel - Epson ActionPrinter 3250 | User Manual - Page 3
EPSON® Action Printer™ 3250 All rights reserved. No part of this publication may be reproduced, stored in a retrieval system, or transmitted in any form or by any means, mechanical, photocopying, recording, or otherwise, without the prior written permission of Seiko Epson Corporation. No patent - Epson ActionPrinter 3250 | User Manual - Page 4
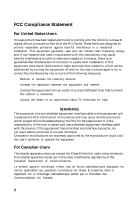
reasonable protection against harmful interference in a residential installation. This equipment generates, uses and can radiate radio frequency energy and, if not installed and used in accordance with the instructions, may cause harmful interference to radio or television reception. However, there - Epson ActionPrinter 3250 | User Manual - Page 5
Read all of these instructions before you set up your printer. . Follow all warnings and instructions marked on the printer. . Unplug the printer from the wall outlet before you clean it, and use a damp cloth for cleaning, not liquid or aerosol cleaners. . Do not use your printer near water or spill - Epson ActionPrinter 3250 | User Manual - Page 6
Epson products Information on ESC/P 2 drivers for your software Sales of the ESC/P Reference manual, which contains comprehensive information on ESC/P 2 Epson technical information library fax service Product literature with technical specifications on our current and new products Sales of ribbons - Epson ActionPrinter 3250 | User Manual - Page 7
All claims under this guarantee MUST be supported by evidence of purchase, normally the bill of contact the Service Co-ordinator Manager at Epson (UK) Limited. Epson (UK) Limited, or Epson Appointed Distributors, consumables, physical damage due to incorrect use or misuse and damage or faulty - Epson ActionPrinter 3250 | User Manual - Page 8
(UK) Limited shall not be liable against any damages or problems arising from the use of any options or consumable products other than those designated as Original Epson Products or Epson Approved Products by Epson (UK) Limited. Safety information Warning: This appliance must be earthed. Refer - Epson ActionPrinter 3250 | User Manual - Page 9
below to get the right results. 1. When you install an application program, it normally asks you what printer you are using. Make sure you choose the correct printer. See Chapter 1 for the right printer to choose. 2. Many programs include an option to set the maximum lines per page. If your program - Epson ActionPrinter 3250 | User Manual - Page 10
Installing the Ribbon Cartridge 1-5 Attaching the Output Guide 1-7 Plugging in the Printer 1-8 Running the Self Test 1-8 Connecting the Printer to Your Computer 1-11 Setting Up Your Application Software 1 -13 Chapter 2 Paper Handling 2-1 Printing on Single Sheets 2-2 Using Continuous Paper - Epson ActionPrinter 3250 | User Manual - Page 11
Appendix A-1 Technical Specifications A-1 Command Summary A-12 Character Tables A-21 Glossary GL-1 Index IN-l Contents ix - Epson ActionPrinter 3250 | User Manual - Page 12
pages manually without removing your paper cassette. Epson ESC/P 2. Along with font sizes scalable from 8 to 32 points, this powerful printer control language has enhanced graphics for sharp, 360 x 360 dots-per-inch output. Compatibility. The printer supports the Epson ESC/P® commands widely used in - Epson ActionPrinter 3250 | User Manual - Page 13
, and connecting your printer. Be sure to read and follow these instructions. Chapter 2 is a detailed discussion of paper handling. Chapter 3 describes how to use the control panel to customize your printer settings. It also contains maintenance and troubleshooting information. The Appendix includes - Epson ActionPrinter 3250 | User Manual - Page 14
Chapter 1 Setting Up the Printer Unpacking the Printer 1-2 Removing the protective materials 1-3 Choosing a Place for the Printer 1-4 Installing the Ribbon Cartridge 1-5 Attaching the Output Guide 1-7 Plugging in the Printer 1-8 Running the Self Test 1-8 Loading paper into the paper cassette - Epson ActionPrinter 3250 | User Manual - Page 15
box should include these items. printer output guide power cord** cable clip push tractor*** * The ribbon cartridge is attached near the parallel interface connector with a piece of tape. ** In some locations, the power cord is attached to the printer. *** In some countries, the push tractor - Epson ActionPrinter 3250 | User Manual - Page 16
, a print head protector and a piece of tape protect the printer and paper cassette. Before you use the printer, you must "remove these protective items. 1. Use the tabs on both sides of the printer cover to lift it off the printer. First remove the protective cover. Then remove the two protectors - Epson ActionPrinter 3250 | User Manual - Page 17
easy operation and maintenance. Avoid locations that are subject to direct sunlight, excessive heat, moisture, or dust. Use a grounded outlet; do not use an adapter plug. Place the printer where you can easily unplug the power cord. Avoid electrical outlets controlled by wall switches or automatic - Epson ActionPrinter 3250 | User Manual - Page 18
Choosing a Place for the Printer If you plan to use a printer stand, follow these guidelines: l Use a stand that supports at least 9 kg (20 lbs). l Never use a stand that tilts the printer. It should always be kept level. l Make sure to provide enough clearance below the stand and between the legs - Epson ActionPrinter 3250 | User Manual - Page 19
direction of the arrow to remove any slack in the ribbon. 3. Insert the ribbon cartridge into the printer as shown; then press both sides of the cartridge firmly to fit the plastic posts into the slots. 4. Turn the ribbon-tightening knob to feed the ribbon into place. Make sure it is not twisted or - Epson ActionPrinter 3250 | User Manual - Page 20
install the output guide to support printed pages as they come out of the printer. To install it, insert the tabs on the guide into the mounting slots on the printer case as shown below. Be sure to turn the guide over and install it in the opposite direction when you use the printer in the upright - Epson ActionPrinter 3250 | User Manual - Page 21
, contact your dealer for assistance. Do not plug in the power cord. 3. If the power cord is not attached to the printer, connect it to the AC inlet on the printer. 4. Plug the power cord into a properly grounded electrical outlet. Running the Self Test You can run the self test with either - Epson ActionPrinter 3250 | User Manual - Page 22
surface to even the edges. Note: The US version uses letter-size paper; all others use A4 paper. The paper size (letter or A4) is shown the inside of the paper cassette. The cassette holds up to 50 sheets (70 kg or 22 lb maximum). 3. Pull out the paper support. Setting Up the Printer 1-9 - Epson ActionPrinter 3250 | User Manual - Page 23
sure the paper is underneath all five tabs, especially the small ones on the top edge of the cassette. 5. Insert the paper cassette into the printer as far as it will go. The edge of the paper stack extends beyond the front of the - Epson ActionPrinter 3250 | User Manual - Page 24
FORM FEED button to start the self test. 3. To stop the self test, turn off the printer. Connecting the Printer to Your Computer If the self test prints correctly, you're ready to connect your printer to the computer. You need a shielded twisted-pair parallel cable to connect your computer to the - Epson ActionPrinter 3250 | User Manual - Page 25
Connecting the Printer to Your Computer 2. Squeeze the wire clips together until they lock in place on either side. Note: If your cable has a ground the interface connector. 3. Put the cable through the cable clip; then insert the clip in the slot on the bottom of the printer. l-12 Setting Up the - Epson ActionPrinter 3250 | User Manual - Page 26
side, route it through the slot on the back. Setting Up Your Application Software Most application programs let you specify the type of printer you use so that the program can take full advantage of the printer's features. Many programs provide an installation or setup menu that presents a list of - Epson ActionPrinter 3250 | User Manual - Page 27
ActionPrinter 3250 LQ-570 LQ-870 LQ-510/550 LQ-860 LQ-850 LQ-200 LQ-500 LQ-2550 LQ-2500 LQ-800 LQ-1500 ESC/P2 ESC/P If none of these printers is listed among your program's options, select the first available of the following: EX, FX, LX, RX, MX, Epson printer, Standard printer, Draft printer - Epson ActionPrinter 3250 | User Manual - Page 28
Printing on Single Sheets 2-2 Tips for using the paper cassette 2-2 Loading paper manually 2-3 Using Continuous Paper with the Optional Push Tractor.. 2-5 Installing the push tractor 2-5 Loading continuous paper 2-7 Tips for using continuous paper 2-10 Using the tear-off feature 2-11 Removing - Epson ActionPrinter 3250 | User Manual - Page 29
to 257 mm (10.1 inches) wide with the manual insertion slot. Tips for using the paper cassette To review the steps for loading paper in the paper cassette, the printer cover. It is marked by + and - signs. Open the printer cover and turn the gear to adjust the position. The notches on the ribbon - Epson ActionPrinter 3250 | User Manual - Page 30
can change it using your application software or printer commands, if necessary. See the Appendix for more about printer commands. l You can switch to manual insertion or to the optional push tractor without removing the paper cassette. For instructions, see "Loading paper manually" or "Switching - Epson ActionPrinter 3250 | User Manual - Page 31
data, it begins printing. Be sure to raise the flap when not using manual insertion. CAUTION: Be sure to turn on the printer before you insert the page into the slot. If you turn on the printer after paper insertion, the printer prints on the platen without loading the paper. l You can adjust the - Epson ActionPrinter 3250 | User Manual - Page 32
with Optional Push Tractor You can use the optional push tractor to print on continuous paper from 101 mm (4 inches) to 254 mm (10 inches) wide. Installing the push tractor 1. Make sure the printer is turned off and is in the flat position. Remove the paper guide. 2. Make sure the paper-release - Epson ActionPrinter 3250 | User Manual - Page 33
Using Continuous Paper with Optional Pushz Tractor 3. Hold the tractor as shown and fit the edges of both sides into the slots at the back of the printer. Then lift it straight up until you hear the unit snap into place. 4. Raise the paper-release lever to the continuous-paper position. 2-6 Paper - Epson ActionPrinter 3250 | User Manual - Page 34
Paper with Optional Push Tractor Loading continuous paper 1. Place the continuous paper supply below the printer so the paper feeds smoothly into the printer as shown. (You can also use a printer stand. ) 2. Make sure the paper-release lever is in the upper position. 3. Release the sprocket - Epson ActionPrinter 3250 | User Manual - Page 35
right sprocket unit using the arrow mark on the case and push down the lock lever to lock in place. (The arrow mark indicates the first printable position.) Then slide the left sprocket unit to match the width of your paper, but do not lock it. 5. Position the paper support midway between - Epson ActionPrinter 3250 | User Manual - Page 36
Using Continuous Paper with Optional Push Tractor 6. Make sure your paper has a Then push the lock lever down to lock it in place. Note that this printer prints on the underside of the paper. 7. Turn on the printer. It advances the paper to the loading position automatically when it receives data. - Epson ActionPrinter 3250 | User Manual - Page 37
Paper with Optional Push Tractor Tips for using continuous paper You can adjust the top-of-form position temporarily. Open the printer cover and turn the gear marked by + and - signs to adjust the position. This adjustment is lost when you turn off the printer or feed the paper backward to the - Epson ActionPrinter 3250 | User Manual - Page 38
Continuous Paper with Optional Push Tractor Using the tear-off feature When you use continuous paper, the tear-off feature makes it easier to tear off the last printed sheet and saves the paper normally lost between documents. Note: You can tell the printer to feed the perforation of your paper - Epson ActionPrinter 3250 | User Manual - Page 39
Using Continuous Paper with Optional Push Tractor 2. Turn off the printer. 3. Lower the paper-release lever to the single-sheet position. Then pull the push tractor straight down and out of the printer. 4. Replace the paper guide. 2-12 Paper Handling - Epson ActionPrinter 3250 | User Manual - Page 40
and Single Sheets When you use the push tractor, you can easily switch to single-sheet printing without removing the continuous paper supply. Switching to single sheets Here's how to switch from continuous paper to single sheets: 1. If you have a printed document still in the printer, tear off the - Epson ActionPrinter 3250 | User Manual - Page 41
FEED and FONT buttons at the same time to reverse the paper to the paper-park position. You can then lower the lever again. 3. The printer is ready to print. When it receives data, it automatically loads a single sheet from the paper cassette and begins to print. Switching to continuous paper - Epson ActionPrinter 3250 | User Manual - Page 42
the paper-thickness lever Before you print on special paper, you may need to change the paper-thickness setting for the paper you are using. 1. Remove the printer cover and set the paper-thickness lever to match the thickness of your paper. Choose the setting from the table below. -PaperType Lever - Epson ActionPrinter 3250 | User Manual - Page 43
paper manually" earlier in this chapter. l Before loading an envelope, set the paper-thickness lever to position 1 and lower the flap on the printer's rear. l Always feed envelopes by inserting the wide edge into the printer first, as shown. l Use envelopes under normal - Epson ActionPrinter 3250 | User Manual - Page 44
always slip a little. Always set the paper-thickness lever to position 1. Never feed labels backward. They can easily peel off the backing and jam the printer. Because labels are especially sensitive to temperature and humidity, use them under normal operating conditions only. Paper Handling 2-17 - Epson ActionPrinter 3250 | User Manual - Page 45
of labels. For more information on the printable area, see the Appendix. l Never leave labels loaded in the printer between jobs; if you turn on the printer with labels loaded, the printer feeds them backward to the paper-park position, possibly resulting in a jam. Here's the correct way to remove - Epson ActionPrinter 3250 | User Manual - Page 46
Selecting Character Fonts 3-4 Using the Default-Setting Mode 3-6 Changing the default settings 3-7 Default setting features 3-11 Maintenance and Transportation 3-14 Cleaning the printer 3-14 Replacing the ribbon cartridge 3-14 Transporting the printer 3-15 Troubleshooting 3-16 Power supply - Epson ActionPrinter 3250 | User Manual - Page 47
on the control panel. The indicator lights help you monitor the status of the printer. Lights The two panel lights provide information on certain printer conditions and settings. READY The READY light is on when the printer is ready to receive data from the computer. It flashes briefly each time you - Epson ActionPrinter 3250 | User Manual - Page 48
menu on the control panel to determine which font is selected. For instructions on selecting fonts with the FONT button, see page 3-5. Buttons The 3-5. When you are in the default-setting mode, use this button to enter a positive response to a printer question or to select a new default setting. For - Epson ActionPrinter 3250 | User Manual - Page 49
CAUTION: Never feed labels backward through the printer; they may peel off their backing sheet and damage it. Use the FORM FEED button to feed them hex dump allows advanced users to pinpoint communications problems between the printer and computer. For instructions on running a hex dump, see page 3- - Epson ActionPrinter 3250 | User Manual - Page 50
points in 2-point increments, using your application software or ESC/P 2 commands. If you need information about controlling font size with your application software, see your software user's guide. For a list of printer commands available with this printer, see the Appendix. Using the Printer 3-5 - Epson ActionPrinter 3250 | User Manual - Page 51
or Bidirectional Download On or Off Auto line feed On or Off Hex dump/demonstration Hex dump or Demonstration Note: Most application programs control the printer features listed here. If you can use your application program to control the printer, you may never need to use the default - Epson ActionPrinter 3250 | User Manual - Page 52
NO Here's a quick overview of how you change your printer settings: 1. Enter the default-setting mode. 2. Use the YES and NO buttons to respond to printed questions. 3. Turn off the printer to exit the default-setting mode. See the next section for step-by-step instructions. For a short summary - Epson ActionPrinter 3250 | User Manual - Page 53
you want to select appears; then press YES. Once you press the YES button, the printer saves the setting and uses your selected language to print a list of the current default settings and instructions for changing them. Here's a sample of what you'll see: Current Settinss; Meesage Language - Epson ActionPrinter 3250 | User Manual - Page 54
feature. For example, you might want to press YES to change the message direction to upside down if you are using the printer in the upright position. If you press YES, the printer adds a new message line: Message Direction: Normal. Upside-down Change? YES/NO Upside-down OK? YES/NO If you press - Epson ActionPrinter 3250 | User Manual - Page 55
Using the Default-Setting Mode 6. Continue answering the questions with the YES and NO buttons . 7. After you reach the last feature (Hex Dump/Demonstration) and make your selection, the printer prints a list of the new default settings. 8. To exit the default-setting mode, at any time, turn off the - Epson ActionPrinter 3250 | User Manual - Page 56
This section describes all the features in the default-setting mode. Character table Character tables contain the characters and symbols used in different languages. Your printer includes a wide variety of character tables. You can choose from these options: Non-European version: l PC 437 (USA - Epson ActionPrinter 3250 | User Manual - Page 57
then reverses the paper so you can use all of the next sheet. You can choose from two tear-off positions with this printer. If you select On cutter, the printer feeds the paper perforation to the edge of the printer cover. If you select Above cutter, the printer feeds the perforation about 80 mm - Epson ActionPrinter 3250 | User Manual - Page 58
the Default-Setting Mode Download You must turn on the download function before you download fonts or other user-defined characters to the printer memory. If you are not using user-defined characters, you can turn it off to increase the printer's memory capacity. Auto line feed When the auto line - Epson ActionPrinter 3250 | User Manual - Page 59
careful not to get water on the printer mechanism or electronic components. Replacing the ribbon cartridge When the printing becomes faint, you need to replace the ribbon cartridge. Epson recommends the SO15032 ribbon cartridge. CAUTION: If you have just used the printer, let the print head cool for - Epson ActionPrinter 3250 | User Manual - Page 60
installed. 5. Remove the ribbon cartridge. 6. Attach the protective materials to the printer and paper cassette. See page l-3. 7. Repack the printer, ribbon cartridge, output guide, and power cord in the original packing materials and place them in the printer's original box. Using the Printer 3-15 - Epson ActionPrinter 3250 | User Manual - Page 61
using the self test. See "Running the Self Test" in Chapter 1. If the self test works properly, the problem probably lies in the computer, the software, or the interface cable. If the self test does not work, contact your dealer or a qualified service person for assistance. 3-16 Using the Printer - Epson ActionPrinter 3250 | User Manual - Page 62
ends of the interface cable between the printer and the computer. Make sure this cable is a shielded twistedpair parallel cable that meets both the printer and computer specifications. l The READY light is-flashing. The printer may be out of paper. Load paper in the printer. Using the Printer 3-17 - Epson ActionPrinter 3250 | User Manual - Page 63
Troubleshooting l The printer sounds like it is printing, but nothing is printed. The ribbon cartridge may not be installed properly. See the section on ribbon installation in Chapter 1. The ribbon may be worn out. Replace the ribbon cartridge as described earlier in this chapter. l The printer - Epson ActionPrinter 3250 | User Manual - Page 64
loose. Re-install the ribbon cartridge as described in Chapter 1. Printed characters are not what you expected. l The typestyles or characters you sent with your software are not printed. Check that the software is correctly configured for your printer. For instructions, see Chapter 1. l The font - Epson ActionPrinter 3250 | User Manual - Page 65
Troubleshooting The print position is not what you expected. l Printing starts too high or too low on the page, or the bottom part of one page is printed at the top of the next page. Reduce or eliminate the top margin with your application software. Use -setting mode so the printer adds a line-feed - Epson ActionPrinter 3250 | User Manual - Page 66
direction to Uni-D for unidirectional printing in the default-setting mode. For instructions, see "Changing the default settings" on page 3-7. Note: l You can use hex dump mode to find the cause of communication problems between the printer and your application programs. See page 3-13. l If the - Epson ActionPrinter 3250 | User Manual - Page 67
loaded in the paper cassette. l Pages do not fully eject. Use the FORM FEED button to eject the pages. Single sheets do not feed properly from the manual insertion slot. l Paper feeding is crooked or the paper jams. Turn off the printer and pull out the paper. Insert a new sheet straight into the - Epson ActionPrinter 3250 | User Manual - Page 68
Troubleshooting l Paper feeding is crooked or the paper jams. The position of The page may be too long. Tear off the fresh supply of paper and eject the page from the printer. Use only paper that is within the specified length range described in the Appendix. l When you switch between single skeets - Epson ActionPrinter 3250 | User Manual - Page 69
Appendix Technical Specifications A-l Printer specifications A-l Interface specifications A-8 Initialization A-11 Command Summary A-12 Using the command summary A-12 General operation A-12 Paper feeding A-12 Page format A-13 Print position motion A-13 Font selection A-14 Font enhancement - Epson ActionPrinter 3250 | User Manual - Page 70
Technical Specifications Printer specifications Printing Printing method: 24-pin impact dot matrix ms per l/6-inch line; 2.22 inches/second with continuous feed 1l KB when download default setting OFF 1.75KB when download default setting ON Character sizes IO cpi IO cpi condensed 12 cpi 12 cpi - Epson ActionPrinter 3250 | User Manual - Page 71
Technical Specifications Resident fonts: Font Epson Draft Epson Roman Epson Sans Serif Epson Courier Epson Prestige Epson Script T10e cxpti 12 cpi 15 cpi Proportional You can also select other font/pitch combinations using ESC/P 2 commands. See the command summary later in this chapter for - Epson ActionPrinter 3250 | User Manual - Page 72
Technical Specifications Single sheets (Manual insertion): Width 148 to Use only two-part carbonless multi-part forms and use them only with the optional push tractor. Note: You can use recycled paper under normal conditions. If you notice increases in ribbon consumption and paper jamming, use - Epson ActionPrinter 3250 | User Manual - Page 73
Specifications Printable area: Single sheets (paper cassette and manual insertion) and envelopes A The minimum top margin is mm (0.38 inches) for the letter-size paper cassette 3 mm (0.12 inches) for manual insertion However, the maximum printable width is 203 mm (8 inches). C The minimum bottom margin - Epson ActionPrinter 3250 | User Manual - Page 74
maximum printable width is 203 mm (8 inches). Mechanical Paper-feed methods: Ribbon: MTBF: Print head life: Dimensions and weight: Friction (paper cassette and manual insertion) Push tractor (optional) Black ribbon cartridge SO15032 Life expectancy: 2 million characters at 48 dots/character 4000 - Epson ActionPrinter 3250 | User Manual - Page 75
printing in draft mode at 10 cpi) AC 1.5 kV rms, 1 second (between AC line and chassis) Note: Check the label on the back of the printer for the voltage of your - Epson ActionPrinter 3250 | User Manual - Page 76
IEC 950 (SEMKO, DEMKO, NEMKO, SETI) RFI: US model: FCC class B European model: VDE0871, CISPR PUB.22 Interface specifications Your printer is equipped with an S-bit parallel interface. Specifications and pin assignments The built-in parallel interface has the following characteristics: Data - Epson ActionPrinter 3250 | User Manual - Page 77
in the following cases: 1) During data entry (ea. char. time) 2) During printing 3) During an error state 12 30 PE OUT A HIGH signal indicates that the printer is in a paper-out state or in an error state. 13 - SLCT OUT Pulled up to 5V through 1 .O KQ resistance. 14 - AUTO FEED XT IN - Epson ActionPrinter 3250 | User Manual - Page 78
- 16 Signal Direction NC GND CHASSIS GND NC GND INIT IN ERROR OUT - GND - - NC - - OUT - NC Description Not used Logic ground level Printer's chassis ground, which is isolated from the logic ground Not used Twisted-pair return signal ground level When this level becomes LOW, the - Epson ActionPrinter 3250 | User Manual - Page 79
Interface timing The figure below shows the timing for the parallel interface. BUSY ACKNLG DATA STROBE Initialization The printer can be initialized (returned to a fixed set of conditions) in three ways: The printer receives an INIT signal from the parallel Software sends the ESC @ (initialize the - Epson ActionPrinter 3250 | User Manual - Page 80
shows the default settings that take effect when the printer is initialized. Item Top of form position Page length Left and right margins Line spacing Character size Horizontal tab positions Font selection Special printing effects Download character set Default setting Current paper position or - Epson ActionPrinter 3250 | User Manual - Page 81
indicated. ESC @ is a command with no parameters. ESC U l/O is a command that uses 1 to turn the feature on and 0 to turn it off. ESC $ nl n2 is ESC@ 64 40 ESCUl/O 85 55 ESCEMn 25 19 Description Initialize Printer Turn Unidirectional Mode On/Off Control Paper Loading/Ejecting n = "R" - Epson ActionPrinter 3250 | User Manual - Page 82
Command Summa y Page format ASCII Dec. ESC(cnn 40 99 Hex. 28 63 ESC(Cnn 40 67 28 43 ESCCn ESCCOn ESCNn ESCO ESCln ESCQn 67 43 67 43 78 4E 79 4F 108 6C 81 51 Description Set Page Format ESC(c4OmZm2nln2 m=ml + m2 x256 m: Top margin in defined units n=nl+n2x256 n: Bottom margin in - Epson ActionPrinter 3250 | User Manual - Page 83
Command Summary ASCII ESC \ nl n2 ESC(Vnn ESC ( v nn ESC D nn HT ESC B nn VT ESC J n Dec. Hex. 92 5C 40 86 28 56 40 118 28 76 68 44 9 09 66 42 11 OB 74 4A Description Set Relative Horizontal Print Position n = nl + n2 x 256 n: Moves current print position in defined units l Before - Epson ActionPrinter 3250 | User Manual - Page 84
Command Summa y Font enhancement ASCII Dec. Hex. Description SI 15 OF Select Condensed Printing DC2 18 12 Cancel Condensed Printing so 14 OE Select Double-Width Printing (one line) ESC W l/O 87 57 Turn Double-Width Printing On/Off DC4 20 14 Cancel Double-Width Printing (one - Epson ActionPrinter 3250 | User Manual - Page 85
Command Summa y Spacing ASCII ESC SP n ESC (U nn ESC c nl n2 Dec. 32 40 85 99 Hex. 20 28 55 63 Description Set Intercharacter Space n = Number of units of space added to the space between characters Units are l/120 inch (draft) and l/180 inch (LQ and proportional) Define Unit ESC(UlOn Define - Epson ActionPrinter 3250 | User Manual - Page 86
74 82 52 n Country Description Select Character Table Select character table n assigned by ESC ( t n = 0, 1, 2, 3, 48, 49, 50, or 51 n = 2: Remaps download characters from O-127 to 128-255 (unless a character table has been assigned to 2 with the ESC (+ command) Select an International Character - Epson ActionPrinter 3250 | User Manual - Page 87
Command Summa y ASCII ESC: 0 n 0 ESC % n ESC 6 ESC 7 ESC ( ˆ nn Dec. 58 37 54 55 40 94 Hex. 3A 25 36 37 28 5E Description Copy ROM to RAM n = 0, 1, 2, 3, 4, 5, 6, or 9 n: Typeface (see list in ESC k command description) Select User-Defined Set n = 0: Normal set 1: User-defined set Enable - Epson ActionPrinter 3250 | User Manual - Page 88
Command Summary m Horizontal Vertical Pins Adjacent t density (dpi) density (dpi) dots print 0 60 1 120 2 120 3 240 4 80 6 90 32 60 33 120 38 90 39 180 40 360 60 8 Yes 1 60 8 Yes 1 60 8 No 1 60 8 No 1 60 8 Yes 1 60 8 Yes 1 180 24 Yes 3 180 - Epson ActionPrinter 3250 | User Manual - Page 89
Character Tables These character tables are selected with the default-setting mode or by using a software command. All the tables are the same for hex codes 00 through 7F. Therefore, only first table is shown completely. The rest of the - Epson ActionPrinter 3250 | User Manual - Page 90
PC 850 (Multilingual) CODE 0 1 2 3 4 5 6 7 6 9 A B C D E F Character Tables PC 860 (Portuguese) CODE 0 1 2 89 AB C DF 3 4 5 6 7 8 9 A B C D E F PC 863 (Canadian-French) 0 1 2 3 4 5 6 7 8 9 PC 865 (Nordic) 0 1 2 3 4 5 6 7 8 9 A B C D E F Appendix A-23 - Epson ActionPrinter 3250 | User Manual - Page 91
Character Tables PC 437 Greek (Greek)" CODE 1 4 5 6 7 8 9 A B C D E F PC 852 (East Europe)" CODE 0 1 2 3 4 5 6 7 8 9 A B C D F PC 851 (Greek)* 0 1 2 3 4 5 6 7 8 9 A B C D E F PC 853 (Turkish)* 0 1 2 3 4 5 6 7 8 9 A B C D E F A-24 Appendix - Epson ActionPrinter 3250 | User Manual - Page 92
PC 855 (Cyrillic)" CODE 0 1 2 3 4 5 6 7 8 9 A B C D E F 89ABCDEF Character TablesCharacter Tables PC 857 (Turkish)* CODE 8 9 A B C D E F 0 1 2 3 4 5 6 7 8 9 A B C D E F PC 864 (Arabic)" 0 1 2 3 4 5 6 7 8 9 A B C D E F PC 866 (Russian)" 0 1 2 3 4 5 6 7 8 9 A B C D E F Appendix A-25 - Epson ActionPrinter 3250 | User Manual - Page 93
Character Tables PC 869 (Greek)" BSABCDEF 0 1 2 3 4 5 6 7 8 9 A B C D E F USSR GOST (Russian)* 89ABCDEF 0 1 2 3 4 5 6 7 8 9 A B C D E F Italic CODE 0 1 2 3 4 5 6 7 8 9 A B C D E F 89ABCDEF No character is available for hex code 15 in the italic character table. A-26 Appendix - Epson ActionPrinter 3250 | User Manual - Page 94
Character Tables Character available with ESC ( ˆ To print the characters in the table below, you must first send the ESC ( ˆ command. CODE 0 1 2 3 4 5 6 7 8 9 A B C D E F 01 7 010 The following characters are available with PC 864 (Arabic) only. Appendix A-27 - Epson ActionPrinter 3250 | User Manual - Page 95
Character Tables A-28 Appendix - Epson ActionPrinter 3250 | User Manual - Page 96
This increases the speed of printing. bit A binary digit (0 or l), which is the smallest unit of information used by a printer or computer. buffer The portion of the printer's memory used to store data before printing it. byte A unit of information consisting of eight bits. characters per inch (cpi - Epson ActionPrinter 3250 | User Manual - Page 97
. Draft uses a minimum number of dots per character for high-speed printing. See also LQ printing. ESC/P Abbreviation for Epson Standard Code for Printers. This system of commands gives you software control of your printer from your computer. It is standard for all Epson printers and supported by - Epson ActionPrinter 3250 | User Manual - Page 98
hex dump A troubleshooting feature that helps advanced users find the cause of communication problems between the printer and the computer. When the printer is in hex dump mode, it prints each code it receives in hexadecimal notation and ASCII characters. Also called data dump. initialization - Epson ActionPrinter 3250 | User Manual - Page 99
in one direction only. Unidirectional printing is useful for printing graphics because it allows more precise vertical alignment than bidirectional printing. user-defined characters Characters that are defined and stored in the printer by the user. Also called downloaded characters. GL-4 Glossary - Epson ActionPrinter 3250 | User Manual - Page 100
3-6, 3-13 Download, 3-6, 3-13, A-2 Draft, 3-5, A-2, A-3 E Envelopes, 2-16, A4 loading, 2-16 specifications, A-4 ESC/P 2, 1, 3-5, A-13-21 F Fonts, 3-2, button, 3-2, 3-3, 3-4-5 draft, 3-5, A-3 draft condensed, 3-5 Epson Courier, 3-5, A-3 Epson Prestige, 3-5, A-3 Epson Roman, 3-5, A-3 Epson Sans Serif - Epson ActionPrinter 3250 | User Manual - Page 101
lever, 2-5, 2-6, 2-12, 2-13, 2-14 Paper support, 1-9 Paper-thickness lever, 2-15 Parallel interface, 1-11-13, A-8-10 Plugging in the printer, l-8 Printable area, A-5-6 Print direction, 3-6, 3-12, A-2 Printer stand, 1-5 Problems, see Troubleshooting Protective materials replacing, 3-15 removing - Epson ActionPrinter 3250 | User Manual - Page 102
3-6, 3-12 Tractor, push, 2-5-14 installing, 2-5 loading paper, 2-7-9 Transporting the printer, 3-15 Troubleshooting, 3-16-23 Typestyles, 3-4-5, A-3 U Unidirectional printing, 3-6, 3-12, A-2 Unpacking the printer, 1-2-3 V Voltage, 1-2, A-7 power supply, A-7 w Weight, 1-5, A-6 Where USA users can get - Epson ActionPrinter 3250 | User Manual - Page 103
Epson America, Inc. 20770 Madrona Avenue Torrance, CA 90503 Printed in Japan 92.01-60
-
 1
1 -
 2
2 -
 3
3 -
 4
4 -
 5
5 -
 6
6 -
 7
7 -
8
-
9
-
10
-
11
-
12
-
13
-
14
-
15
-
16
-
17
-
18
-
19
-
20
-
21
-
22
-
23
-
24
-
25
-
26
-
27
-
28
-
29
-
30
-
31
-
32
-
33
-
34
-
35
-
36
-
37
-
38
-
39
-
40
-
41
-
42
-
43
-
44
-
45
-
46
-
47
-
48
-
49
-
50
-
51
-
52
-
53
-
54
-
55
-
56
-
57
-
58
-
59
-
60
-
61
-
62
-
63
-
64
-
65
-
66
-
67
-
68
-
69
-
70
-
71
-
72
-
73
-
74
-
75
-
76
-
77
-
78
-
79
-
80
-
81
-
82
-
83
-
84
-
85
-
86
-
87
-
88
-
89
-
90
-
91
-
92
-
93
-
94
-
95
-
96
-
97
-
98
-
99
-
100
-
101
-
102
-
103
 |
 |