Epson C11C484001 Product Information Guide - Page 4
Control Panel, Installing the First Ink Cartridges
 |
UPC - 010343843035
View all Epson C11C484001 manuals
Add to My Manuals
Save this manual to your list of manuals |
Page 4 highlights
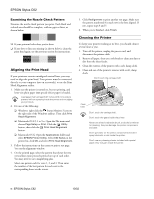
EPSON Stylus C62 Control Panel To diagnose some problems, check the printer's control panel, as described below, or run a printer check (see page 5). Lights Explanation Green P light flashes The printer is receiving a print job, charging ink, or cleaning the print head. Red b light is on Your paper ran out, ink ran out, or paper is jammed. You may also see a message on your screen. If paper is out, load more paper, then press the b button to resume printing. If paper is jammed, first press the b button to eject the paper. If that doesn't work, turn off the printer, open the cover, and remove all paper out from the front, including any torn pieces. Then turn on the printer, reload paper, and press the b button. If you see an ink out message on your screen, you need to replace one of your ink cartridges. Replace the cartridge as described on page 6. Red b light flashes One of the ink cartridges is low. Make sure you have a replacement cartridge. Green P light is Paper may be blocking movement of the print head. off and red b light Turn off the printer, open the cover, and remove any is on jammed paper or other foreign objects. Then turn the printer on again. If the light is still on, contact your dealer or EPSON. Green P light and red b light flash The printer may have an internal error. Turn off the printer, wait a few seconds, and turn it on again. If the lights are still flashing, contact your dealer or EPSON. Green P light and red b light are on after installing an ink cartridge One of your ink cartridges is installed incorrectly. Follow the instructions on page 6 to remove and install the cartridge. Installing the First Ink Cartridges 1. Turn on the printer. 2. Open the output tray and printer cover. 3. Lift up the ink cartridge clamps. 4. Unpack the ink cartridges that came with your printer and remove the yellow tape. Black cartridge Color cartridge Don't remove the seals from the bottom of the cartridges; ink will leak out. Install both cartridges or the printer won't work. Keep the cartridges out of the reach of children. 5. Tilt each cartridge toward you slightly as you insert it. Lower the cartridge so that the tabs rest on the hooks. Hooks Don't place the cartridge tabs under the hooks, or you may damage the clamp when you close it. 6. Lower the clamps until they click into place. 7. Press the e ink replacement button and close the printer cover. The green P power light flashes and you hear the ink charging. Don't turn off the printer or interrupt charging while the P power light is flashing or you'll use up more ink than necessary when you turn it back on. 4 - EPSON Stylus C62 10/02
-
 1
1 -
 2
2 -
 3
3 -
 4
4 -
 5
5 -
 6
6 -
 7
7 -
 8
8 -
 9
9
 |
 |
