Epson DS-1630 Users Guide - Page 49
Convert Scanned Documents to Editable Text (OCR), Scanning Using OCR - Windows - scanner specifications pdf
 |
View all Epson DS-1630 manuals
Add to My Manuals
Save this manual to your list of manuals |
Page 49 highlights
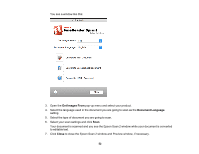
6. Click one of the Destination icons to choose where to send your scanned files. (If you cannot see all of the icons below, click the arrow next to the icons.) 7. Click File Name & Separation Settings. 8. Select Apply job separation and click Separation Settings. 9. Select the method you used to separate the originals, select a folder name specification and click OK. 10. Select any additional settings from the File Name Settings dialog and click OK. 11. Confirm your settings and click OK or Send. Your originals are saved into separate files and folders as specified by your settings. Parent topic: Scanning Special Projects Related topics Placing Originals on the Scanner Convert Scanned Documents to Editable Text (OCR) You can scan a document and convert the text into data that you can edit with a word processing, spreadsheet, or HTML-editing program. This process is called OCR (Optical Character Recognition). To scan and use OCR, you need to install an OCR program, such as ABBYY FineReader. Scanning Using OCR - Windows Scanning Using OCR - OS X Saving Scanned Documents as a Searchable PDF Parent topic: Scanning Special Projects Scanning Using OCR - Windows You can use the ABBYY FineReader OCR program to convert scanned documents to editable text. 1. Load your original in the scanner. 2. Do one of the following to open ABBYY FineReader: • Windows 10: Click and select All Apps > ABBYY FineReader 9.0 Sprint > ABBYY FineReader 9.0 Sprint. 49
-
 1
1 -
2
-
3
-
4
-
5
-
6
-
7
-
8
-
9
-
10
-
11
-
12
-
13
-
14
-
15
-
16
-
17
-
18
-
19
-
20
-
21
-
22
-
23
-
24
-
25
-
26
-
27
-
28
-
29
-
30
-
31
-
32
-
33
-
34
-
35
-
36
-
37
-
38
-
39
-
40
-
41
-
42
-
43
-
 44
44 -
 45
45 -
 46
46 -
 47
47 -
 48
48 -
 49
49 -
 50
50 -
 51
51 -
 52
52 -
 53
53 -
 54
54 -
55
-
56
-
57
-
58
-
59
-
60
-
61
-
62
-
63
-
64
-
65
-
66
-
67
-
68
-
69
-
70
-
71
-
72
-
73
-
74
-
75
-
76
-
77
-
78
-
79
-
80
-
81
-
82
-
83
-
84
-
85
-
86
-
87
-
88
-
89
-
90
-
91
-
92
-
93
-
94
-
95
-
96
-
97
 |
 |
