Epson ELP-7300 User Manual - Page 109
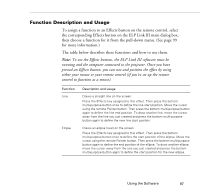
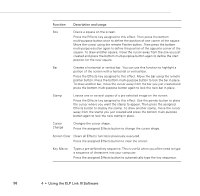
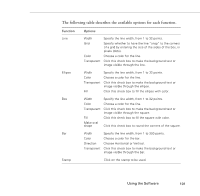
The following table describes the available options for each function., Function, Options
 |
UPC - 010343820203
View all Epson ELP-7300 manuals
Add to My Manuals
Save this manual to your list of manuals |
Page 109 highlights
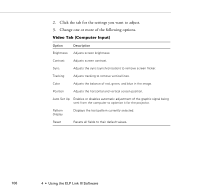
The following table describes the available options for each function. Function Line Options Width Specify the line width, from 1 to 32 points. Grid Specify whether to have the line "snap" to the corners of a grid by entering the size of the sides of the box, in pixels (dots). Color Choose a color for the line. Transparent Click this check box to make the background text or image visible through the line. Ellipse Width Specify the line width, from 1 to 32 points. Color Choose a color for the line. Transparent Click this check box to make the background text or image visible through the ellipse. Fill Click this check box to fill the ellipse with color. Box Width Specify the line width, from 1 to 32 points. Color Choose a color for the line. Transparent Click this check box to make the background text or image visible through the square. Fill Click this check box to fill the square with color. Make oval shape Click this check box to round the corners of the square. Bar Stamp Width Specify the line width, from 1 to 300 points. Color Choose a color for the bar. Direction Choose Horizontal or Vertical. Transparent Click this check box to make the background text or image visible through the bar. Click on the stamp to be used. Using the Software 101
-
 1
1 -
2
-
3
-
4
-
5
-
6
-
7
-
8
-
9
-
10
-
11
-
12
-
13
-
14
-
15
-
16
-
17
-
18
-
19
-
20
-
21
-
22
-
23
-
24
-
25
-
26
-
27
-
28
-
29
-
30
-
31
-
32
-
33
-
34
-
35
-
36
-
37
-
38
-
39
-
40
-
41
-
42
-
43
-
44
-
45
-
46
-
47
-
48
-
49
-
50
-
51
-
52
-
53
-
54
-
55
-
56
-
57
-
58
-
59
-
60
-
61
-
62
-
63
-
64
-
65
-
66
-
67
-
68
-
69
-
70
-
71
-
72
-
73
-
74
-
75
-
76
-
77
-
78
-
79
-
80
-
81
-
82
-
83
-
84
-
85
-
86
-
87
-
88
-
89
-
90
-
91
-
92
-
93
-
94
-
95
-
96
-
97
-
98
-
99
-
100
-
101
-
102
-
103
-
 104
104 -
 105
105 -
 106
106 -
 107
107 -
 108
108 -
 109
109 -
 110
110 -
 111
111 -
 112
112 -
 113
113 -
 114
114 -
115
-
116
-
117
-
118
-
119
-
120
-
121
-
122
-
123
-
124
-
125
-
126
-
127
-
128
-
129
-
130
-
131
-
132
-
133
-
134
-
135
-
136
-
137
-
138
-
139
-
140
-
141
-
142
-
143
-
144
-
145
-
146
-
147
-
148
-
149
-
150
-
151
-
152
-
153
-
154
 |
 |