Epson Expression 1680 Start Here Card - Page 1
Epson Expression 1680 Manual
 |
View all Epson Expression 1680 manuals
Add to My Manuals
Save this manual to your list of manuals |
Page 1 highlights
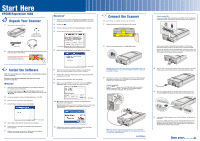
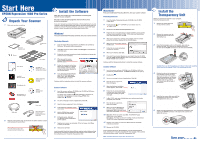
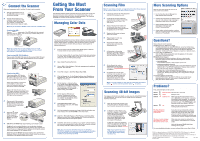
Start Here EPSON Expression® 1680 1 Unpack Your Scanner 1 Make sure you have everything: Scanner CD-ROM with EPSON® Scan driver and electronic manual Macintosh® 1 Insert the scanner software CD-ROM in the CD-ROM or DVD drive. (If necessary, double-click the EPSON CD-ROM icon to open it.) 2 Double-click . 3 You see a message to close all running applications. Click OK. 4 Read the license agreement, then click Agree. 3 Connect the Scanner After your software is installed, it's time to get connected. 1 Remove the yellow tape from the back of the scanner. STOP: Be sure to install your scanner software first BEFORE you connect the scanner! See your Start Here sheet for details. If you're using SCSI... If you have another SCSI device that uses SCSI ID 2, turn the SCSI ID switch on the back of the scanner to a new number. Do not use 0 or 7. Power cord USB cable 2 Remove all the packing tape, but leave the two yellow stickers in place until instructed to remove them. IMPORTANT! Leave the stickers in place until you are instructed to remove them. STOP: Be sure to install your scanner software first BEFORE you connect the scanner! See your Start Here sheet for details. 2 Install the Software Wait! You must install your software before connecting the scanner to your computer. Be sure to close all open programs and turn off any virus protection programs. Windows® 1 Insert the scanner software CD-ROM in the CD-ROM or DVD drive. The installer starts automatically. If it doesn't start, double-click My Computer (in Windows XP, click Start > My Computer), double-click EPSON, then double-click EPSON. 2 You see a message to close all running applications. Click OK. 3 Read the license agreement, then click Agree. 4 At the Software Installation screen, click Install. Click Agree 5 When the Software Installation screen appears, click Install. Click Install 6 Follow the on-screen instructions to install your User's Guide. When you're done installing the User's Guide, click Quit. 7 In Mac® OS X, enter your Administrator name and password when prompted and click OK. 8 Read the license agreement, then click Accept. 9 When you see the EPSON Scan Installer screen, select EPSON Expression 1680 in the Easy Install menu and click Install. Click Install 10 Mac OS X: At the last screen, click Exit. The EPSON Product Registration screen appears. Mac OS 8.6-9.x: When you're done installing, restart your Macintosh. The EPSON Product Registration screen appears when your system restarts. 2 Slide the transportation lock to the UNLOCK position. Caution: Your scanner won't work unless the transportation lock is in the UNLOCK position. Also, you may damage the scanner if you leave it on while it's locked. 3 Connect the scanner to your computer. Use either the USB cable that came with your scanner or a SCSI cable, if your computer has SCSI support. Don't connect both cables. If you're using USB... Plug the square end of the USB cable into the scanner's USB port. Plug the flat end into any available USB port on your computer or USB hub. Then go to step 4. Unless your scanner is connected in the middle of a SCSI chain, leave the terminator switch on the back of the scanner turned ON. Squeeze the lock releases on your SCSI cable, and plug the cable into either SCSI connector on the back of the scanner. Connect the pin end of the cable to the SCSI port on your computer. 4 Plug one end of the scanner's power cord into the AC inlet at the back of the scanner, and the other end into a grounded electrical outlet. 5 Press the power button on the front of the scanner to turn it on. The green READY light begins to flash. Wait for the flashing to stop. Click Install 5 Wait for Epson Scan and the User's Guide to be installed. 6 At the last screen, click Exit. The EPSON Product Registration screen appears. 7 Register your scanner as instructed. When finished, click Done or close your browser. Remove your CD-ROM. 11 Register your scanner as instructed. When finished, click Done or close your browser. Remove the CD-ROM. Note: Your scanner may not work correctly if you use a USB cable other than the one supplied by EPSON, of if you connect your scanner to a multi-level USB hub system. continue 6 If you have a USB connection, go to "Your First Scan" on the back of this sheet. If you have a SCSI connection, start the Add Hardware Wizard in the Windows Control Panel and follow the on-screen instructions to let Windows detect your scanner. Then continue with the instructions on the back of this sheet to begin scanning. Turn over
-
 1
1 -
 2
2 -
 3
3 -
 4
4
 |
 |
