Epson LX-86 User Manual - Page 124
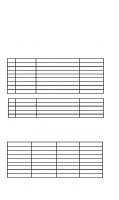
Table D-I. DIP switch functions, Table D-2. International DIP switch settings, Switch 1
 |
View all Epson LX-86 manuals
Add to My Manuals
Save this manual to your list of manuals |
Page 124 highlights
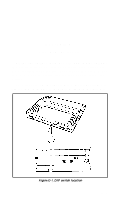
Always turn the power OFF (with the switch on the right side of the printer) before you change the setting of any of these switches. Any changes made while the power is on will be ignored until you turn the printer off and back on. So set all switches with the power off. In Table D-l we show you the functions of all the switches. Then we explain each of them. Table D-I. DIP switch functions Switch 1 No. O N Functions 1-8 ON International character set 1-7 ON 1-6 ON International character set International character set 1-5 Inactive Paper-out sensor 1-4 12-inch Form length 1-3 Active 1-2 Char. graphics 1-1 Condensed Cut-sheet feeder Character set Print width No. O N 2-4 Mute 2 - 3 CR + LF 2-2 Active 2-1 0 Switch 2 Functions Beeper Automatic line feed Printer-select Slashed zero Note: The shaded boxes show the factory settings. OFF OFF OFF OFF Active 11-inch Inactive Italics Pica OFF Sounds CR only Inactive 0 Switches l-6, l-7, and l-8 determine the active international character set as shown in Table D-2. Table D-2. International DIP switch settings Country USA France Germany United Kingdom Denmark Sweden Italy Spain Switch 1-6 On On On On Off Off Off Off Switch 1-7 On On Off Off On On Off Off Switch 1-8 On On On Off On Off On Off The use of international sets is discussed in Chapter 6. D-2
-
 1
1 -
2
-
3
-
4
-
5
-
6
-
7
-
8
-
9
-
10
-
11
-
12
-
13
-
14
-
15
-
16
-
17
-
18
-
19
-
20
-
21
-
22
-
23
-
24
-
25
-
26
-
27
-
28
-
29
-
30
-
31
-
32
-
33
-
34
-
35
-
36
-
37
-
38
-
39
-
40
-
41
-
42
-
43
-
44
-
45
-
46
-
47
-
48
-
49
-
50
-
51
-
52
-
53
-
54
-
55
-
56
-
57
-
58
-
59
-
60
-
61
-
62
-
63
-
64
-
65
-
66
-
67
-
68
-
69
-
70
-
71
-
72
-
73
-
74
-
75
-
76
-
77
-
78
-
79
-
80
-
81
-
82
-
83
-
84
-
85
-
86
-
87
-
88
-
89
-
90
-
91
-
92
-
93
-
94
-
95
-
96
-
97
-
98
-
99
-
100
-
101
-
102
-
103
-
104
-
105
-
106
-
107
-
108
-
109
-
110
-
111
-
112
-
113
-
114
-
115
-
116
-
117
-
118
-
 119
119 -
 120
120 -
 121
121 -
 122
122 -
 123
123 -
 124
124 -
 125
125 -
 126
126 -
 127
127 -
 128
128 -
 129
129 -
130
-
131
-
132
-
133
-
134
-
135
-
136
-
137
-
138
-
139
-
140
-
141
-
142
-
143
-
144
-
145
-
146
 |
 |
