Epson MovieMate 85HD User's Guide - Page 52
Signal Menu, Closed Caption, Power Consumption, Info, Resolution. By pressing the button,
 |
View all Epson MovieMate 85HD manuals
Add to My Manuals
Save this manual to your list of manuals |
Page 52 highlights
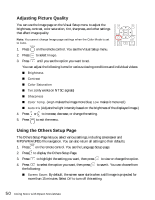
You can adjust the following items: ■ Mic Input Volume: Adjust this setting if the microphone level is too low or too high. ■ Closed Caption: Turn this setting on to display closed captioning for content that provides it. ■ User Button: You can assign one of the following four items to the User button: Closed Caption, Power Consumption, Info, Resolution. By pressing the button, the assigned menu item selection/adjustment screen is displayed, allowing you to make one-touch settings/adjustments. ■ Child Lock: Turn this setting on to lock the page 48 for more information. button on the control panel. See ■ High Altitude Mode: Turn this setting on if you use the projector at an altitude above 4900 feet (1500 meters), to ensure that the projector does not overheat. 4. Press or to adjust the setting. 5. Press to exit the menu. Signal Menu 1. Press 2. Press 3. Press on the remote control. You see the Visual Setup menu. to highlight Signal, then press to select it. until you see the option you want to set. You can adjust the following items: ■ Keystone: Adjust this setting to correct the shape of the image if the projector has been tilted upward. ■ Auto Keystone: Select On to have the projector automatically adjust the shape of the image when the projector has been tilted upward or downward. ■ Power Consumption: Select ECO if the images being projected are too bright (such as when projecting images in a dark room or onto a small screen). You cannot select a Power Consumption setting when the Color Mode is set to Auto. ■ Resolution: Set to Auto to have the projector automatically identify the resolution of the input signal. If necessary (because some of the image is missing, for example), adjust to Wide or Normal. ■ Video Signal: Normally, you can leave this set to Auto when using external equipment. If no image appears or you see interference, select the appropriate signal. 4. Press or to adjust the setting. 5. Press to exit the menu. 52 Doing More with Epson MovieMate
-
 1
1 -
2
-
3
-
4
-
5
-
6
-
7
-
8
-
9
-
10
-
11
-
12
-
13
-
14
-
15
-
16
-
17
-
18
-
19
-
20
-
21
-
22
-
23
-
24
-
25
-
26
-
27
-
28
-
29
-
30
-
31
-
32
-
33
-
34
-
35
-
36
-
37
-
38
-
39
-
40
-
41
-
42
-
43
-
44
-
45
-
46
-
 47
47 -
 48
48 -
 49
49 -
 50
50 -
 51
51 -
 52
52 -
 53
53 -
 54
54 -
 55
55 -
 56
56 -
 57
57 -
58
-
59
-
60
-
61
-
62
-
63
-
64
-
65
-
66
-
67
-
68
-
69
-
70
-
71
-
72
-
73
-
74
-
75
-
76
-
77
-
78
-
79
-
80
 |
 |
