Epson Perfection 3200 Photo Color Management Workbook
Epson Perfection 3200 Photo Manual
 |
View all Epson Perfection 3200 Photo manuals
Add to My Manuals
Save this manual to your list of manuals |
Epson Perfection 3200 Photo manual content summary:
- Epson Perfection 3200 Photo | Color Management Workbook - Page 1
Color Managed Workflow for EPSON Scanners and Printers PMA Preview Edition - Epson Perfection 3200 Photo | Color Management Workbook - Page 2
Color Managed Workflow f o r E P S O N® S c a n n e r s a n d P r i n t e r s PMA Preview Edition - Epson Perfection 3200 Photo | Color Management Workbook - Page 3
resulting from the use of the information contained in this booklet. Trademarks EPSON and EPSON Stylus are registered trademarks of SEIKO EPSON CORPORATION. EPSON Perfection is a registered trademark of Epson America, Inc. General Notice: Other product names used herein are for identification - Epson Perfection 3200 Photo | Color Management Workbook - Page 4
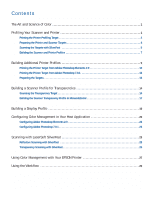
Color 1 Profiling Your Scanner and Printer 1 Printing the Printer Profiling Target 2 Preparing the Printer and Scanner Targets 4 Scanning the Targets with SilverFast 5 Building the Scanner Scanning with SilverFast 25 Using Color Management with Your EPSON Printer 27 Using the Workflow 29 - Epson Perfection 3200 Photo | Color Management Workbook - Page 5
. By following the instructions in this booklet, you can achieve effective color reproduction using your EPSON Perfection 3200 scanner and EPSON photo printer. All the components you need to build a colormanaged workflow are included in the EPSON Perfection 3200 Pro software bundle: MonacoEZcolor - Epson Perfection 3200 Photo | Color Management Workbook - Page 6
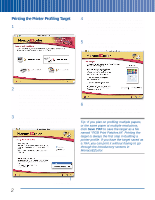
Model/Technology pop-up menu, choose Other for any EPSON printer, or choose EPSON Stylus Photo 2000P if this is the printer you're using. , click Save TIFF to save the target as a file named "RGB Print Patches.tif". Printing the target is always the first step in building a printer profile - Epson Perfection 3200 Photo | Color Management Workbook - Page 7
the settings you'll make in the printer driver, so you can apply them when you use the profile. When you click OK, the print window appears: 9 Once you've made your selections, choose Color Management from the Options menu. The color management settings appear: 7 Choose Print Settings from the - Epson Perfection 3200 Photo | Color Management Workbook - Page 8
you must scan the scanner and printer targets using SilverFast, as described in the following section. Note: If you use tape to attach the target, make sure the tape doesn't cover any of the color patches on the IT8. 3 Click the right arrow to proceed. Follow the on-screen instructions to place the - Epson Perfection 3200 Photo | Color Management Workbook - Page 9
You must scan the profiling target with all color management and color correction features turned off, following the instructions in this section. 2 On the main the SilverFast (Epson) plug-in, as shown. You can find the plug-in inside the SilverFast application folder. Note: Your scanner must be - Epson Perfection 3200 Photo | Color Management Workbook - Page 10
Scan Type to 48-bit HDR Color, and set the resolution slider to 150 dpi, as shown: 5 Turn off all the color management options for the target this whenever you scan a profiling target. In the Color Management section, set Scanner->Internal and Internal->Monitor to , and set scanner window: 6 - Epson Perfection 3200 Photo | Color Management Workbook - Page 11
, using the dotted line surrounding the target as a rough guide. Don't worry if the scan is slightly skewed. But if a location, file format, and file name for the scan, as shown: Building the Scanner and Printer Profiles The final part of the profile-building process is loading the target scan - Epson Perfection 3200 Photo | Color Management Workbook - Page 12
which contains color measurements of the IT8 scanner target that Scanner Profile area, and enter a name for your scanner profile. Tip: Use descriptive profile names rather than the default names suggested by MonacoEZcolor. For example, you might name the profile for an EPSON Stylus® Photo - Epson Perfection 3200 Photo | Color Management Workbook - Page 13
shown: You've now successfully built profiles for both your scanner (for reflective copy) and your printer (for the paper you color management features in both the host application and printer driver do not alter the color values in the target. The following sections offer step-by-step instructions - Epson Perfection 3200 Photo | Color Management Workbook - Page 14
Printing the Printer Target from Adobe Photoshop Elements 2.0 1 Launch Adobe Photoshop Elements 2.0. 2 Choose Color Settings from the Edit menu (Mac OS 9, Windows) or the Photoshop Elements menu (Mac OS X). The Color Settings dialog box appears: 5 Choose Print Preview from the File menu. The Print - Epson Perfection 3200 Photo | Color Management Workbook - Page 15
save changes to the RGB Print Patches.tif file, click Don't Save. Once you've printed the target, you're ready to proceed to the next part of the process: using SilverFast to scan both the scanner and printer targets. See pages 4 to 9 for step-bystep instructions. 8 Choose the paper type you want - Epson Perfection 3200 Photo | Color Management Workbook - Page 16
Photoshop 7.0.1 1 Launch Adobe Photoshop 7.0.1. 2 Choose Color Settings from the Edit menu (Mac OS 9, Windows) or the Photoshop menu (Mac OS X). The Color Settings dialog box appears: 5 Choose Leave as is (don't color manage), then click OK. The RGB Print Patches.tif file appears. 6 Choose Print - Epson Perfection 3200 Photo | Color Management Workbook - Page 17
color patches, and avoid touching the color patches when you handle the target. Once you've prepared the targets, you're ready to scan them with SilverFast and use MonacoEZcolor to build your profiles. Follow the instructions on pages 4 to 9. 11 Click No Color Adjustment to ensure that the driver - Epson Perfection 3200 Photo | Color Management Workbook - Page 18
-step instructions for building a scanner transparency color patches. Then place the holder on the scanner glass, with the large arrow on the holder pointing to the right rear of the scanner Epson) plug-in, as shown. You can find the plug-in inside the SilverFast application folder. Note: Your scanner - Epson Perfection 3200 Photo | Color Management Workbook - Page 19
scan. You need to do this whenever you scan a profiling target. In the Color Management section, set Scanner->Internal and Internal->Monitor to , and set Internal->Output to RGB. In the Frame tab. Set the Scan Type to 48-bit HDR Color, and set the resolution slider to 300 dpi, as shown: 15 - Epson Perfection 3200 Photo | Color Management Workbook - Page 20
your settings, click 10 Click Scan RGB to make the final target Prescan. The prescan appears in SilverFast's scan. SilverFast prompts you to choose a scanner window: location, file format, and file name for the scan, as shown: 11 Save the scan in TIFF format. We recommend that you include the - Epson Perfection 3200 Photo | Color Management Workbook - Page 21
Transparency Profile in MonacoEZcolor Once you've scanned the target, you have everything you need to build the scanner profile in MonacoEZcolor, as described in this section. 3 Choose 4x5 Transparency. Then click the right arrow twice to proceed to Input the Target, as shown. ( - Epson Perfection 3200 Photo | Color Management Workbook - Page 22
ve already built a scanner profile, so you can leave the Scanner Profile box unchecked. Tip: Use descriptive profile names rather than the default name suggested by MonacoEZcolor. For example, you might name the profile for scanning transparencies on the EPSON Perfection 3200 "Epson 3200 ( T )." 18 - Epson Perfection 3200 Photo | Color Management Workbook - Page 23
the scanner profile. Once the profile is built, MonacoEZcolor displays the Finished screen, as shown: 1 Launch MonacoEZcolor. You've now successfully built a profile for scanning transparencies. In the next section, we provide instructions for building a display profile to provide accurate color - Epson Perfection 3200 Photo | Color Management Workbook - Page 24
The Set Monitor White Point screen appears: 6 Click the right arrow to proceed. If you chose CRT as your monitor type, the following screen appears. If you chose LCD as your monitor type, skip to step 8 on page 21. 5 Choose 6500K as the Desired White Point. If your monitor has adjustable white - Epson Perfection 3200 Photo | Color Management Workbook - Page 25
to proceed. The following screen appears: When you've adjusted the color to your satisfaction, click the right arrow to proceed. The until the gray desktop appears neutral. 10 Select the desired gamma. Typically, Macintosh users should select 1.8, and Windows users should select 2.2. Then - Epson Perfection 3200 Photo | Color Management Workbook - Page 26
offers simple but effective color management. To configure Adobe Photoshop Elements for the EPSON scan-to-print workflow, follow these simple steps: 1 Choose Color Settings from the Edit menu (Mac OS 9, Windows), or the Photoshop Elements menu (Mac OS X). The Color Settings window appears: 22 - Epson Perfection 3200 Photo | Color Management Workbook - Page 27
Adobe Photoshop for the EPSON Scanto-Print workflow, follow these simple steps. 1 Choose Color Settings from the Edit menu (Mac OS 9, Windows), or the Photoshop Elements menu (Mac OS X). The Color Settings window appears: Scanning with LaserSoft SilverFast The instructions given for configuring - Epson Perfection 3200 Photo | Color Management Workbook - Page 28
The SilverFast Defaults screen appears: 4 Make the following settings so that SilverFast can communicate color correctly to your host application. In the Color Management Section, set Scanner->Internal to ColorSync, set Internal->Monitor to Automatic, and set Internal->Output to RGB. When you see - Epson Perfection 3200 Photo | Color Management Workbook - Page 29
screen, click the Frame tab. Set the Scan Type to 48->24-bit Color, as shown: Transparency Scanning with SilverFast 1 Launch the SilverFast application, or open the File menu and choose Import>SilverFast (Epson) in Photoshop or Photoshop Elements. SilverFast appears: You're ready to scan - Epson Perfection 3200 Photo | Color Management Workbook - Page 30
, click the Frame tab. Set the Scan Type to 48->24-bit Color, as shown: 4 Verify that the Gamma-Gradation value is set enter the profile you created for transparency scanning under Scanner (Transparent). 26 You're ready to scan! 8 features, see the SilverFast manual. Once you've configured - Epson Perfection 3200 Photo | Color Management Workbook - Page 31
Management with Your EPSON Printer Once you have a scanned and corrected image ready to print, you'll configure your host application to translate the color to your printer profile. Then you'll turn off the color management features in the printer driver to prevent a second, unnecessary conversion - Epson Perfection 3200 Photo | Color Management Workbook - Page 32
your settings, click the Print button. The Print window appears: 6 Make sure the settings for Media Type you've made your settings, choose Color Management. The Color Management settings appear: 5 Choose Print Click No Color Adjustment. (If you don't do this, the printer driver will perform an - Epson Perfection 3200 Photo | Color Management Workbook - Page 33
to change most of the settings. SilverFast will automatically use the correct profiles for transparency and reflective scanning and will automatically deliver the color in Adobe RGB (1998). The only profile setting you need to change regularly is the printer profile. You need to match the profile - Epson Perfection 3200 Photo | Color Management Workbook - Page 34
CPD-16082 Printed in USA
-
 1
1 -
 2
2 -
 3
3 -
 4
4 -
 5
5 -
 6
6 -
 7
7 -
8
-
9
-
10
-
11
-
12
-
13
-
14
-
15
-
16
-
17
-
18
-
19
-
20
-
21
-
22
-
23
-
24
-
25
-
26
-
27
-
28
-
29
-
30
-
31
-
32
-
33
-
34
 |
 |
PMA Preview Edition
for EPSON Scanners and Printers
Color Managed Workflow