Epson PictureMate Deluxe Product Information Guide - Page 6
You see the Print Confirmation., crop it and adjust the picture area. Press - viewer edition
 |
View all Epson PictureMate Deluxe manuals
Add to My Manuals
Save this manual to your list of manuals |
Page 6 highlights
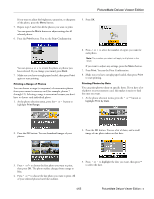
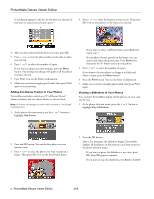
PictureMate Deluxe Viewer Edition A checkmark appears in the box for the date you selected. If you want to cancel your selection, press . 4. Press or to select the frame you want to use. Then press OK. You see your photo in the frame you selected: 4. After you have selected all the dates you want, press OK. 5. Press or to view the photos taken on the date or dates you selected. 6. Press or to select the number of copies. If you want to adjust any other settings, press the Menu button. Any settings you change will apply to all the photos you have selected. 7. Press Print. You see the Print Confirmation. 8. Make sure you have enough paper loaded, then press Print again to start printing. Adding Fun Disney Frames to Your Photos PictureMate includes a selection of 15 different Disney® character frames and two classic frames to choose from. Note: All frames are designed to work with horizontal or "landscape" oriented photos. 1. At the photo selection menu, press the or button to highlight Add Frame. ❏ If you want to select a different frame, press Back and repeat step 3. ❏ If your photo doesn't quite fit in the frame, you can crop it and adjust the picture area. Press Back twice, then press the button and crop your photo. 5. Press or to select the number of copies. If you want to fix your photo or change it to black and white or sepia, press the Menu button. 6. Press the Print button. You see the Print Confirmation. 7. Make sure you have enough paper loaded, then press Print again. Viewing a Slideshow of Your Photos You can have PictureMate display all the photos on your card one by one. 1. At the photo selection menu, press the or button to highlight Play Slideshow. 2. Press the OK button. You see the first photo on your memory card. 3. Press or to select the photo you want to print in a frame. Then press OK. You see the first Disney frame: 2. Press the OK button. After a few moments, the slideshow begins. PictureMate displays all the photos on the memory card, then returns to the photo selection menu. ❏ If you want to pause the slideshow at any time, press OK. Press OK again to continue. ❏ If you want to stop the slideshow, press Back or Cancel. 6 - PictureMate Deluxe Viewer Edition 4/05
-
 1
1 -
 2
2 -
 3
3 -
 4
4 -
 5
5 -
 6
6 -
 7
7 -
 8
8 -
 9
9 -
 10
10
 |
 |
