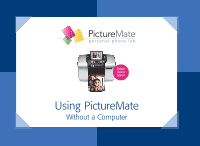
Epson PictureMate Deluxe Using PictureMate Without a Computer
Epson PictureMate Deluxe Manual
 |
View all Epson PictureMate Deluxe manuals
Add to My Manuals
Save this manual to your list of manuals |
Epson PictureMate Deluxe manual content summary:
- Epson PictureMate Deluxe | Using PictureMate Without a Computer - Page 1
Using PictureMate Without a Computer - Epson PictureMate Deluxe | Using PictureMate Without a Computer - Page 2
8 Do More With Your Photos 17 Save Your Photos to a Computer or an External Device 26 Print From a Computer or an External Device 29 Replace Ink and Paper 34 Take Your PictureMate With You 39 Set PictureMate Preferences 43 Printer Care and Troubleshooting 49 Notices 59 Index 69 - Epson PictureMate Deluxe | Using PictureMate Without a Computer - Page 3
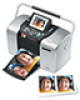
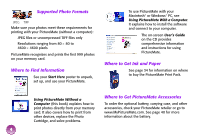
! PictureMate® Deluxe Viewer Edition is your easy-touse, personal photo lab. Just insert a digital camera memory card and you're ready to print brilliant, longlasting photos. Because PictureMate is light and portable, you can print whenever and wherever you take pictures. Plus, your PictureMate - Epson PictureMate Deluxe | Using PictureMate Without a Computer - Page 4
. You just need the optional Epson® Bluetooth Photo Print Adapter. (See page 32.) If you want to print outdoors or in other places without convenient electrical outlets, you can buy the optional PictureMate battery. (See page 40.) Note: PictureMate also supports P.I.M. (PRINT Image MatchingTM) and - Epson PictureMate Deluxe | Using PictureMate Without a Computer - Page 5
with your Macintosh® or Windows® PC, see Using PictureMate With a Computer. It explains how to install the software and connect to your computer. The on-screen User's Guide on the CD provides comprehensive information and instructions for using PictureMate. Where to Get Ink and Paper See page 34 for - Epson PictureMate Deluxe | Using PictureMate Without a Computer - Page 6
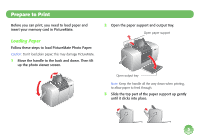
Photo Paper: Caution: Don't load plain paper; this may damage PictureMate. 1 Move the handle to the back and down. Then tilt up the photo viewer screen. 2 Open the paper support and output tray. Open paper support Open output tray Note: Keep the handle all the way down when printing, to allow - Epson PictureMate Deluxe | Using PictureMate Without a Computer - Page 7
4 Place your paper against the right edge, with the glossy side up. Load glossy side up Edge guide Inserting Your Memory Card 1 Press the On button to turn on PictureMate. 2 Open the memory card door. On button Note: Make sure paper is glossy side up to prevent smearing. 5 Slide the left edge - Epson PictureMate Deluxe | Using PictureMate Without a Computer - Page 8
may lose photos on your card. Saving Power If you are not using PictureMate, the screen goes dark after 13 minutes. Press any button to turn it back on. If you are running PictureMate with the optional battery, the printer turns off automatically after 15 minutes if it is not being used. Press the - Epson PictureMate Deluxe | Using PictureMate Without a Computer - Page 9
PictureMate's photo viewer supports DPOF (Digital Print Order Format), you can use it to pre-select which photos and how many copies you want to print. PictureMate about these features. Note: When you press the Print button, PictureMate shows you a screen confirming the number of copies and layout. - Epson PictureMate Deluxe | Using PictureMate Without a Computer - Page 10
Printing All Photos When you turn on PictureMate, you see the photo selection menu on the photo viewer screen. The red or orange bar : 1 Make sure Print All is highlighted, then press OK. You can press or to review your photos. If you change your mind, press the Back button. 4 Make sure you have - Epson PictureMate Deluxe | Using PictureMate Without a Computer - Page 11
Note: If your card has more than 20 photos, you will need to reload paper while printing. Load a maximum of 20 sheets at a time. When you see a message that paper is out, load more paper and press OK to continue printing. If you need to cancel printing, press Cancel. Printing Individual Photos You - Epson PictureMate Deluxe | Using PictureMate Without a Computer - Page 12
settings for all selected photos. See page 17 for more information. 6 Press the Print button. You see the Print Confirmation: You can press or to review the photo or photos you have selected. If you change your mind, press Back. 7 Make sure you have enough paper loaded, then press Print again - Epson PictureMate Deluxe | Using PictureMate Without a Computer - Page 13
2 Press the OK button. You see small thumbnail images of your photos: 5 Make sure the photos you want to print are outlined in blue, then press OK. 3 Press or to choose the first photo you want to print. Then press OK. The photo outline changes from orange to blue. 4 Press or to choose the last - Epson PictureMate Deluxe | Using PictureMate Without a Computer - Page 14
Printing Photos by Date You can print photos taken on specific dates. If you have a lot of photos on your memory card, this makes it easier to find the ones you want. 1 At the photo selection menu, press the or button to highlight Print by Date. You see one of the photos taken on each date next to - Epson PictureMate Deluxe | Using PictureMate Without a Computer - Page 15
"landscape" oriented photos. 3 Press or to select the photo you want to print in a frame. Then press OK. You see the first Disney frame: PictureMate includes 15 different Disney character frames and two classic frames to choose from. 1 At the photo selection menu, press the or button to highlight - Epson PictureMate Deluxe | Using PictureMate Without a Computer - Page 16
picture area. Press Back twice, then press the button and follow the instructions on page 18. 6 Press or to select the number of copies. . 2 Press the OK button. After a few moments, the slideshow begins. PictureMate displays all the photos on your memory card, then returns to the photo selection - Epson PictureMate Deluxe | Using PictureMate Without a Computer - Page 17
If your camera supports DPOF (Digital Print Order Format), you can use it to pre-select which photos and how many copies you want to print. See your camera's manual to choose photos for printing with DPOF, then insert your memory card in PictureMate. PictureMate automatically reads your preselected - Epson PictureMate Deluxe | Using PictureMate Without a Computer - Page 18
only the print(s) you make at that time. Getting Help If you need help with cropping, adjusting colors, or other PictureMate actions, you can get instructions right on the photo viewer screen. 1 Press the Menu button. 2 Press the or button to highlight Help, then press the button to open the menu - Epson PictureMate Deluxe | Using PictureMate Without a Computer - Page 19
Note: You can use the arrow buttons to move the box up or down and select the exact portion of your image that will be printed. 3 Set the area you want to print (or view) as follows: ● Press the button to zoom in and crop out more of the photo. ● Press the button to zoom out and crop less of the - Epson PictureMate Deluxe | Using PictureMate Without a Computer - Page 20
edges. This may cause part of your image to be cut off. You can control the amount of expansion and cropping; see page 44 for instructions. 1 After selecting the photo(s) and number of copies you want, press the Menu button. 2 Press the or button to highlight Layout, then press the button - Epson PictureMate Deluxe | Using PictureMate Without a Computer - Page 21
For example, if you want 3 mini wallet photos of one image and 4 of another, select 3 copies for photo A and 4 copies for photo B. Then choose Mini Wallets as the layout setting. Your photos will be printed on 2 sheets of paper as shown: 4 Press OK again. You see your photo (or one of your photos) - Epson PictureMate Deluxe | Using PictureMate Without a Computer - Page 22
your photo was originally taken to the bottom right corner of your print. Note: The date and time come from your camera, not from the printer. If this information is incorrect, adjust the time and/or date setting on your camera. 1 After selecting the photo(s) and number of copies you want - Epson PictureMate Deluxe | Using PictureMate Without a Computer - Page 23
3 Press or to choose one of the following settings: ● mmm.dd.yyyy (Sep.01.2005) ● dd.mmm.yyyy (01.Sep.2005) ● yyyy.mm.dd (2005.09.01) 4 Press OK. 5 To print the time, press to highlight Time Stamp, then press to open the menu. 6 Press or to choose one of the following settings: ● 12-hour system (03: - Epson PictureMate Deluxe | Using PictureMate Without a Computer - Page 24
Fixing Photos PictureMate lets you correct the color and improve the image quality of your photos without using a computer. Two types of adjustments are available: ● Automatic adjustments If your camera supports PRINT Image Matching (P.I.M.) or Exif Print, the printer's P.I.M./Exif setting - Epson PictureMate Deluxe | Using PictureMate Without a Computer - Page 25
Print button. You see the Print Confirmation. 8 Make sure you have enough paper loaded, then press Print again to start printing. Manually Fixing Your Photos Manual corrections apply only to individual photos. You can select different settings for each photo in a print job. 1 After selecting the - Epson PictureMate Deluxe | Using PictureMate Without a Computer - Page 26
6 Repeat steps 3 and 4 for the other settings if necessary. Press OK again to close the menu. You see your photo with your chosen settings applied. 7 Press the Print button. You see the Print Confirmation: 8 Make sure you have enough paper loaded, then press Print again to start printing. 25 - Epson PictureMate Deluxe | Using PictureMate Without a Computer - Page 27
card. See Using PictureMate With a Computer for setup instructions and the on-screen User's Guide to save your photos Epson cannot guarantee the compatibility of any drives. If you're not sure about a drive, check www.mypicturemate.com/support for a list of compatible drives. 1 Make sure PictureMate - Epson PictureMate Deluxe | Using PictureMate Without a Computer - Page 28
in the drive. ● For a flash memory drive, plug it into the EXT/IF port on the back of PictureMate. Note: If you insert a blank CD-R in the drive before inserting a memory card in PictureMate, you may see an error message. Eject the CD-R from the drive to clear the error, insert your - Epson PictureMate Deluxe | Using PictureMate Without a Computer - Page 29
first folder is named 001, the second folder is named 002, and so on. If you save on a CD-R, PictureMate names the CD-R Photo. 8 Press OK to start saving your photos. Note: PictureMate checks to make sure there is enough free space for your photos. If not, insert a new CD-R or Zip - Epson PictureMate Deluxe | Using PictureMate Without a Computer - Page 30
your computer with a USB cable, then print photos that are stored on your computer. See Using PictureMate With a Computer and the on-screen User's Guide for details. Printing From an External Device PictureMate can print stored photos: ● From a data storage device, such as a CD, Zip disk, or flash - Epson PictureMate Deluxe | Using PictureMate Without a Computer - Page 31
's memory card slots. The memory card light should be off. Note: If a memory card is inserted, the printer will read photos from the card, not from an external drive. 3 If PictureMate is connected to a computer, disconnect it or turn off the computer. 4 Connect your CD or Zip drive's USB cable - Epson PictureMate Deluxe | Using PictureMate Without a Computer - Page 32
control printing. (Check your camera manual to see if it supports the PictBridge standard or USB DP.) 1 Make sure PictureMate is on. 2 Make sure there are no memory cards in PictureMate's slots. The card light should be off. Note: If a memory card is inserted, the printer will read photos from the - Epson PictureMate Deluxe | Using PictureMate Without a Computer - Page 33
camera's controls to select and print photos on PictureMate. (See your camera manual.) Printing Wirelessly From a Bluetooth Device You can print photos wirelessly from your Bluetoothenabled PDA, cell phone, or computer when you use the optional Epson Bluetooth Photo Print Adapter. The Adapter (part - Epson PictureMate Deluxe | Using PictureMate Without a Computer - Page 34
your product's documentation for instructions on setting up Bluetooth file sharing and sending files. Printing starts automatically. Note: For more information on PictureMate's Bluetooth features, see the on-screen User's Guide. Disconnecting the Adapter Make sure PictureMate isn't printing, then - Epson PictureMate Deluxe | Using PictureMate Without a Computer - Page 35
to PictureMate from ink spills. Buying a PictureMate Print Pack The PictureMate Print Pack has everything you need to print in one box: PictureMate Photo Paper and a new PictureMate Photo Cartridge. You can buy a Print Pack wherever PictureMate is sold or from retailers that sell printer supplies - Epson PictureMate Deluxe | Using PictureMate Without a Computer - Page 36
: Before you replace the cartridge, read the "Photo Cartridge Safety Instructions" on page 61. 1 Make sure PictureMate is on, but not printing. 2 Close the paper support. 3 Lift up the handle. 4 Open the cartridge door on the back of PictureMate. 5 Move the photo cartridge lever to the Release - Epson PictureMate Deluxe | Using PictureMate Without a Computer - Page 37
. Then unwrap the cartridge. Warning: Keep ink cartridges out of the reach of children and do not drink the ink. If ink gets on your hands, wash them thoroughly with soap and water. If ink gets in your eyes, flush them thoroughly with water. If discomfort or vision problems continue after flushing - Epson PictureMate Deluxe | Using PictureMate Without a Computer - Page 38
the way. You need to use the photo cartridge lever to lock it in place. If either side is sticking out, remove the cartridge and reinsert it so it is straight. Caution: If the cartridge is not inserted correctly, ink may leak out. 5 Close the cartridge door. Make sure it snaps shut. Right Wrong - Epson PictureMate Deluxe | Using PictureMate Without a Computer - Page 39
to open the menu. 3 Press the or button to select Cartridge Status, then press . You can see the approximate ink level displayed on the photo viewer screen. Note: If the status (ink level) is down to only one bar, you should buy a new PictureMate Print Pack. See page 34 for more information. 38 - Epson PictureMate Deluxe | Using PictureMate Without a Computer - Page 40
the On button to turn it off. 2 Wait until the photo viewer screen goes blank, then unplug the power cord from the electrical outlet. 3 Remove all paper and printed photos. 4 Push down the top of the paper support and close it against PictureMate. Then close the output tray and lower the screen - Epson PictureMate Deluxe | Using PictureMate Without a Computer - Page 41
photo cartridge before transporting. Don't place PictureMate on its side or upside down, or ink may leak. Note: If your prints don't look as good after PictureMate has been moved, try aligning the print head (see page 51). Tip: You can order an optional PictureMate Carrying Case from the Epson Store - Epson PictureMate Deluxe | Using PictureMate Without a Computer - Page 42
that it locks into place as shown: Charging the Battery After you install the battery, you need to charge it by connecting the AC adapter and plugging in the printer. 6 Close the battery cover. The power light flashes during charging when PictureMate is off. It takes about 2 hours to fully charge - Epson PictureMate Deluxe | Using PictureMate Without a Computer - Page 43
from 50 to 80 photos. Note: When you run PictureMate on the battery, the printer turns off automatically after 15 minutes if it is not being used. Press the On button to turn it back on. Removing the Battery If there is a problem with your battery, or you want to replace it with one that is - Epson PictureMate Deluxe | Using PictureMate Without a Computer - Page 44
Preferences You can change the way PictureMate works by using the Setup menu. You can set the page 45) ● Determine whether to keep your selections after printing (see page 46) ● Adjust the photo viewer screen contrast (see page 46) ● Select your personal settings (see page 47) ● Return the settings - Epson PictureMate Deluxe | Using PictureMate Without a Computer - Page 45
3 Press or to select Display Preference, then press . 4 Choose the setting you prefer, then press OK. 5 Continue pressing OK to exit the menu. Adjusting Borderless Expansion and Cropping When you print borderless pictures, your images are automatically expanded and cropped. If your pictures are cut - Epson PictureMate Deluxe | Using PictureMate Without a Computer - Page 46
settings. Then you press Print again to start printing. For example, you might see a Print Confirmation like this: When Print Confirmation is Off, PictureMate does not display this screen before printing. You need to press Print just once to start printing. Follow these steps to change the Print - Epson PictureMate Deluxe | Using PictureMate Without a Computer - Page 47
selections each time you print. ● Never Keep: Return to your personal default settings after printing. 5 Continue pressing OK to exit the menu. Adjusting the Photo Viewer Screen If the screen is too light or too dark, you can adjust it. 1 At the photo selection menu, press the Menu button. 2 Press - Epson PictureMate Deluxe | Using PictureMate Without a Computer - Page 48
You see the Photo Viewer Adjustment screen: 1 At the photo selection menu, press the Menu OK. 5 Continue pressing OK to exit the menu. Selecting Your Personal Settings You can reset the PictureMate settings to the ones you prefer. The settings you choose will become your "defaults," but you will - Epson PictureMate Deluxe | Using PictureMate Without a Computer - Page 49
which selection mode (such as Print All or Print Some) is highlighted when you first turn on PictureMate. Returning to Factory Settings You can return your personal settings to the PictureMate original default settings. 1 At the photo selection menu, press the Menu button. 2 Press or to highlight - Epson PictureMate Deluxe | Using PictureMate Without a Computer - Page 50
Printer Care and Troubleshooting If you have problems with your PictureMate, or you want to improve print quality, read these sections: ● Cleaning the print head (on the right) ● Aligning the print head (on page 51) ● Error messages and warnings (on page 52) ● Printing and operation problems (on - Epson PictureMate Deluxe | Using PictureMate Without a Computer - Page 51
button to begin cleaning the print head. Cleaning takes about 40 seconds. PictureMate makes some noise, and you see the following message on the screen: When nozzles are cleared. You can also turn PictureMate off and wait overnight to allow any dried ink to soften. Then try cleaning the print head - Epson PictureMate Deluxe | Using PictureMate Without a Computer - Page 52
-for example, your prints look fuzzy, or have light or dark lines running through them-you may need to align the print head. Make sure PictureMate is turned on but not printing, and several sheets of paper are loaded. 1 Press the Menu button. 2 Press or to highlight Maintenance, then press to - Epson PictureMate Deluxe | Using PictureMate Without a Computer - Page 53
. Reinstall the PictureMate Photo Cartridge. The printer needs service. See your printer manual for help. What to Do Load or remove and reload paper in the paper support, and press the OK button to clear this message. The printer resumes printing. See page 5 for loading instructions. Carefully pull - Epson PictureMate Deluxe | Using PictureMate Without a Computer - Page 54
temperature decreases. Code: P What to Do Turn off PictureMate and wait 5 to 10 minutes until the battery cools before turning it back on. The PictureMate Photo Cartridge is out of ink. Purchase a PictureMate Print Pack and replace the photo cartridge with a new one. See page 34. Backup Error - Epson PictureMate Deluxe | Using PictureMate Without a Computer - Page 55
. The first time you install the photo cartridge, PictureMate will charge its print head for about three minutes. Wait until charging finishes before you turn it off, or it may charge improperly and use more ink the next time you turn it on. The photo viewer screen is blank. ● The screen shuts off - Epson PictureMate Deluxe | Using PictureMate Without a Computer - Page 56
printer base in all directions. ● Make sure paper is not jammed and is loaded correctly so it can feed into PictureMate. Make sure the handle is not resting on the paper. See page 5 for paper loading instructions PictureMate cannot read progressive-scan JPEG files or RAW files. ● PictureMate Problems - Epson PictureMate Deluxe | Using PictureMate Without a Computer - Page 57
; see page 49. ● The photo cartridge may be old or low on ink. To replace the cartridge, see page 34. ● Try turning on or off Enhance under the Auto Correct setting. Or, try manually adjusting the brightness, saturation, or sharpness. See page 23. Problems With Paper Feeding Paper doesn't eject - Epson PictureMate Deluxe | Using PictureMate Without a Computer - Page 58
PictureMate. ● Make sure you are using only PictureMate Photo Paper or Epson Premium photo paper (see page 34). Store paper flat to help prevent curling. Miscellaneous Printout Problems PictureMate correctly in the paper support, all the way to the right. Slide the edge guide against the paper. ● - Epson PictureMate Deluxe | Using PictureMate Without a Computer - Page 59
: ● Product name (PictureMate Deluxe Viewer Edition) ● Product serial number (located on the bottom of the printer) ● Proof of purchase (such as a store receipt) and date of purchase ● Computer configuration (if using a computer) ● Description of the problem You can purchase a PictureMate Print Pack - Epson PictureMate Deluxe | Using PictureMate Without a Computer - Page 60
Important Safety Instructions Before using your PictureMate, read the following safety instructions to make sure you use it safely and effectively: ● Be sure to follow all warnings and instructions marked on the printer. ● If you use the printer in places where the use of printers is restricted - Epson PictureMate Deluxe | Using PictureMate Without a Computer - Page 61
, and options by yourself except as specifically explained in the printer's guides. ● Unplug the printer and the AC adapter, remove the optional battery from the printer, and refer servicing to qualified service personnel under the following conditions: The power cord or plug is damaged; liquid - Epson PictureMate Deluxe | Using PictureMate Without a Computer - Page 62
with Proposition 65 in Cal. Health & Safety Code §25249.5 et seq.) Photo Cartridge Safety Instructions ● Keep photo cartridges out of the reach of children and do not drink the ink. ● Do not shake the photo cartridge after removing it from the bag; this can cause leakage. ● Be careful when - Epson PictureMate Deluxe | Using PictureMate Without a Computer - Page 63
with water. If discomfort or vision problems remain after a thorough flushing, see a doctor immediately. ● The lamp in the photo viewer screen contains mercury. Dispose of it according to local, state, or federal laws. Battery Safety Instructions ● If battery acid gets into your eyes or on - Epson PictureMate Deluxe | Using PictureMate Without a Computer - Page 64
Will Do To Correct Problems: Should your Epson printer prove defective during the warranty period, please call the Epson ConnectionSM at (562) 276-7282 (U.S.) or (905) 709-2567 (Canada) for warranty repair instructions and return authorization. An Epson service technician will provide telephone - Epson PictureMate Deluxe | Using PictureMate Without a Computer - Page 65
, damage caused by disasters such as fire, flood, and lightning, improper electrical current, software problems, interaction with non-Epson products, or service other than by an Epson Authorized Servicer. If a claimed defect cannot be identified or reproduced, you will be held responsible for - Epson PictureMate Deluxe | Using PictureMate Without a Computer - Page 66
end user claims in the US and Canada. It does not cover use of any non-Epson ink or paper, commercial use of the printer or paper consumed by proofs or printing errors. Please follow the following refund procedure: 1) Print out the PictureMate Print Pack Satisfaction Guarantee Form, available at www - Epson PictureMate Deluxe | Using PictureMate Without a Computer - Page 67
and, if not installed and used in accordance with the instructions, may cause harmful interference to radio or television reception. However and/or CPU Boards and Power Supplies used with Class B Personal Computers: We: Epson America, Inc. Located at: MS: 3-13 3840 Kilroy Airport Way Long Beach, - Epson PictureMate Deluxe | Using PictureMate Without a Computer - Page 68
for any damages or problems arising from the use of any options or any consumable products other than those designated as Original Epson Products or Epson Approved Products by Seiko Epson Corporation. A Note Concerning the Responsible Use of Copyrighted Materials Ink jet printers, like photocopiers - Epson PictureMate Deluxe | Using PictureMate Without a Computer - Page 69
Trademarks Epson and PictureMate are registered trademarks and PRINT Image Matching and the PRINT Image Matching logo are trademarks of Seiko Epson Corporation. Epson Store, SoundAdvice, and Epson Connection are service marks of Epson America, Inc. Disney scenes and characters © Disney. Winnie the - Epson PictureMate Deluxe | Using PictureMate Without a Computer - Page 70
shutoff, 7, 42 B Backing up photos, 26 to 28, 53 to 54 Banding, fixing, 55 Battery, 3, 40 to 42, 62 to 63 Black and white printing, 20 to 21 Blank pages, , 6 Card, memory, 6 Care of PictureMate, 49 to 52 Carrying PictureMate, 39 Cartridge door, 35 to 38 Cartridge Status, 38 Case, optional, 40 69 - Epson PictureMate Deluxe | Using PictureMate Without a Computer - Page 71
to, 26 to 28 software, 4, 26, 29 Cell phone, printing from, 32 to 33 Charging battery, 41 to 42 Charging ink, 38, 54 Choosing photos, 8 to 16 Cleaning print head, 49 to 50 Clogged nozzles, 49 to 50 Closeup, viewing, 18 Color effects, 20 to 21 fixing, 23 to 25 problems, 56 CompactFlash card - Epson PictureMate Deluxe | Using PictureMate Without a Computer - Page 72
Epson accessories, 32, 34, 40, 58 Store, 32, 34, 40, 58 technical support, 58 Error messages, 52 to 17, 58 I Image formats, 4 quality, 23 to 25, 55 to 56 Incorrect colors, 56 Ink, see Photo cartridge Installing battery, 40 to 41 Instructions, 17 J Jams, paper, 52, 56 to 57 JPEG, 4 L Layout, 19 to 20 - Epson PictureMate Deluxe | Using PictureMate Without a Computer - Page 73
72 N Nine photos, displaying, 10, 43 to 44 Noise, PictureMate, 54 Nozzle check, 50 Nozzles, cleaning, 49 to 50 O On button, 6 Output tray, 5 P Packing PictureMate, 39 Paper buying, 34 feeding problems, 56 to 57 jam, 52, 56 to 57 loading, 5 storing, 16 support, 5 tray, 5 PDA, printing from, 32 to 33 - Epson PictureMate Deluxe | Using PictureMate Without a Computer - Page 74
, 15 storing, 16 Photo cartridge buying, 34 ink level, 38 inserting, 36 to 38 release lever, 35 to 37 removing, 35 to 36 replacing, 34 to 38 safety instructions, 61 Photo selection menu, 9 Photo viewer screen contrast, 46 to 47 instructions on, 17 problems, 54 safety instructions, 62 using, 8 to 25 - Epson PictureMate Deluxe | Using PictureMate Without a Computer - Page 75
R Range of photos, 11 to 12 Release lever, 35 to 37 74 Removing battery, 42 memory card, 7 photo cartridge, 35 to 36 Replacing photo cartridge, 34 to 38 Resetting Preferences, 47 to 48 Resolution, 4 S Safety instructions, 59 to 63 Saturation, adjusting, 24 Saving photo files, 26 to 28 Saving power - Epson PictureMate Deluxe | Using PictureMate Without a Computer - Page 76
, 58 T Technical support, 58 Thumb drive printing from, 29 to 31 saving files to, 26 to 28 TIFF, 4 Time stamp, 21 to 22 Transporting PictureMate, 39 Traveling, 39 Troubleshooting, 49 to 57 Turning on printer, 6 U USB cable, 30 to 32, 39 USB DP (USB Direct Print), 3, 29, 31 User's Guide, 4 W Wallet - Epson PictureMate Deluxe | Using PictureMate Without a Computer - Page 77
76 - Epson PictureMate Deluxe | Using PictureMate Without a Computer - Page 78
light Turn PictureMate on or off Set print options Return to previous menu Move through menu options Paper support EXT/IF (USB) port for camera or external drive Zoom in and crop Zoom out/display 9 photos Stop printing or cancel settings Memory card light Start printing AC inlet Battery cover - Epson PictureMate Deluxe | Using PictureMate Without a Computer - Page 79
PictureMate Photo Paper and a PictureMate Photo Cartridge. You can also purchase these accessories for PictureMate: • The PictureMate rechargeable battery ( enabled cell phone, PDA, or computer to PictureMate Visit your local retailer, or go to the Epson Store at www.epsonstore.com (U.S. sales only
-
 1
1 -
 2
2 -
 3
3 -
 4
4 -
 5
5 -
 6
6 -
 7
7 -
8
-
9
-
10
-
11
-
12
-
13
-
14
-
15
-
16
-
17
-
18
-
19
-
20
-
21
-
22
-
23
-
24
-
25
-
26
-
27
-
28
-
29
-
30
-
31
-
32
-
33
-
34
-
35
-
36
-
37
-
38
-
39
-
40
-
41
-
42
-
43
-
44
-
45
-
46
-
47
-
48
-
49
-
50
-
51
-
52
-
53
-
54
-
55
-
56
-
57
-
58
-
59
-
60
-
61
-
62
-
63
-
64
-
65
-
66
-
67
-
68
-
69
-
70
-
71
-
72
-
73
-
74
-
75
-
76
-
77
-
78
-
79
 |
 |

Using PictureMate
Without a Computer