Epson PictureMate PM-400 Quick Guide and Warranty - Page 11
Cleaning the Paper Path, Checking Ink Levels
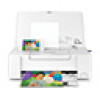 |
View all Epson PictureMate PM-400 manuals
Add to My Manuals
Save this manual to your list of manuals |
Page 11 highlights
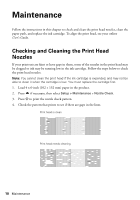
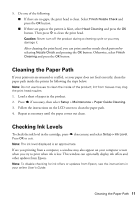
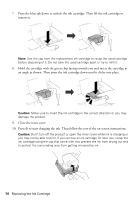
5. Do one of the following: ■ If there are no gaps, the print head is clean. Select Finish Nozzle Check and press the OK button. ■ If there are gaps or the pattern is faint, select Head Cleaning and press the OK button. Then press x to clean the print head. Caution: Never turn off the product during a cleaning cycle or you may damage it. After cleaning the print head, you can print another nozzle check pattern by selecting Nozzle Check and pressing the OK button. Otherwise, select Finish Cleaning and press the OK button. Cleaning the Paper Path If your printouts are smeared or scuffed, or your paper does not feed correctly, clean the paper path inside the printer by following the steps below. Note: Do not use tissues to clean the inside of the product; lint from tissues may clog the print head nozzles. 1. Load a sheet of paper in the product. 2. Press if necessary, then select Setup > Maintenance > Paper Guide Cleaning. 3. Follow the instructions on the LCD screen to clean the paper path. 4. Repeat as necessary until the paper comes out clean. Checking Ink Levels To check the ink level in the cartridge, press if necessary, and select Setup > Ink Level. Press OK to exit. Note: The ink level displayed is an approximate. If are you printing from a computer, a window may also appear on your computer screen when you try to print when ink is low. This window can optionally display ink offers and other updates from Epson. Note: To disable checking for ink offers or updates from Epson, see the instructions in your online User's Guide. Cleaning the Paper Path 11
-
 1
1 -
2
-
3
-
4
-
5
-
 6
6 -
 7
7 -
 8
8 -
 9
9 -
 10
10 -
 11
11 -
 12
12 -
 13
13 -
 14
14 -
 15
15 -
 16
16 -
17
-
18
-
19
-
20
-
21
-
22
-
23
-
24
-
25
-
26
-
27
-
28
-
29
-
30
-
31
-
32
-
33
-
34
-
35
-
36
-
37
-
38
-
39
-
40
-
41
-
42
-
43
-
44
-
45
-
46
-
47
-
48
-
49
-
50
-
51
-
52
 |
 |
