Epson PictureMate Show - PM 300 Start Here - Page 5
View and Print
 |
View all Epson PictureMate Show - PM 300 manuals
Add to My Manuals
Save this manual to your list of manuals |
Page 5 highlights
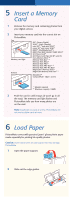
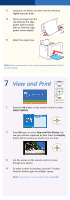
3 Load up to 20 sheets at a time. Fan the sheets to slightly separate them. 4 Place your paper into the slot between the edge guides with the glossy side up. Slide the edge guides inward slightly. 5 Attach the output tray. Note: Keep unused paper in the original package and store it flat to prevent curling. 7 View and Print 1 Press the OK button on the remote control to select PRINT PHOTOS. 2 Press OK again to select View and Print Photos. You see your pictures organized by date. Press the Display button twice to view your photos one at a time. 3 Use the arrows on the remote control to move through your photos. 4 To select a photo for printing, press the button. Press the button again for multiple copies. Note: If you want to crop or edit a photo, press OK.
-
 1
1 -
 2
2 -
 3
3 -
 4
4 -
 5
5 -
 6
6
 |
 |
