Epson PictureMate Snap - PM 240 Product Information Guide
Epson PictureMate Snap - PM 240 Manual
 |
View all Epson PictureMate Snap - PM 240 manuals
Add to My Manuals
Save this manual to your list of manuals |
Epson PictureMate Snap - PM 240 manual content summary:
- Epson PictureMate Snap - PM 240 | Product Information Guide - Page 1
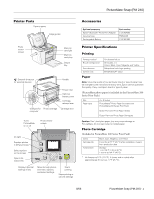
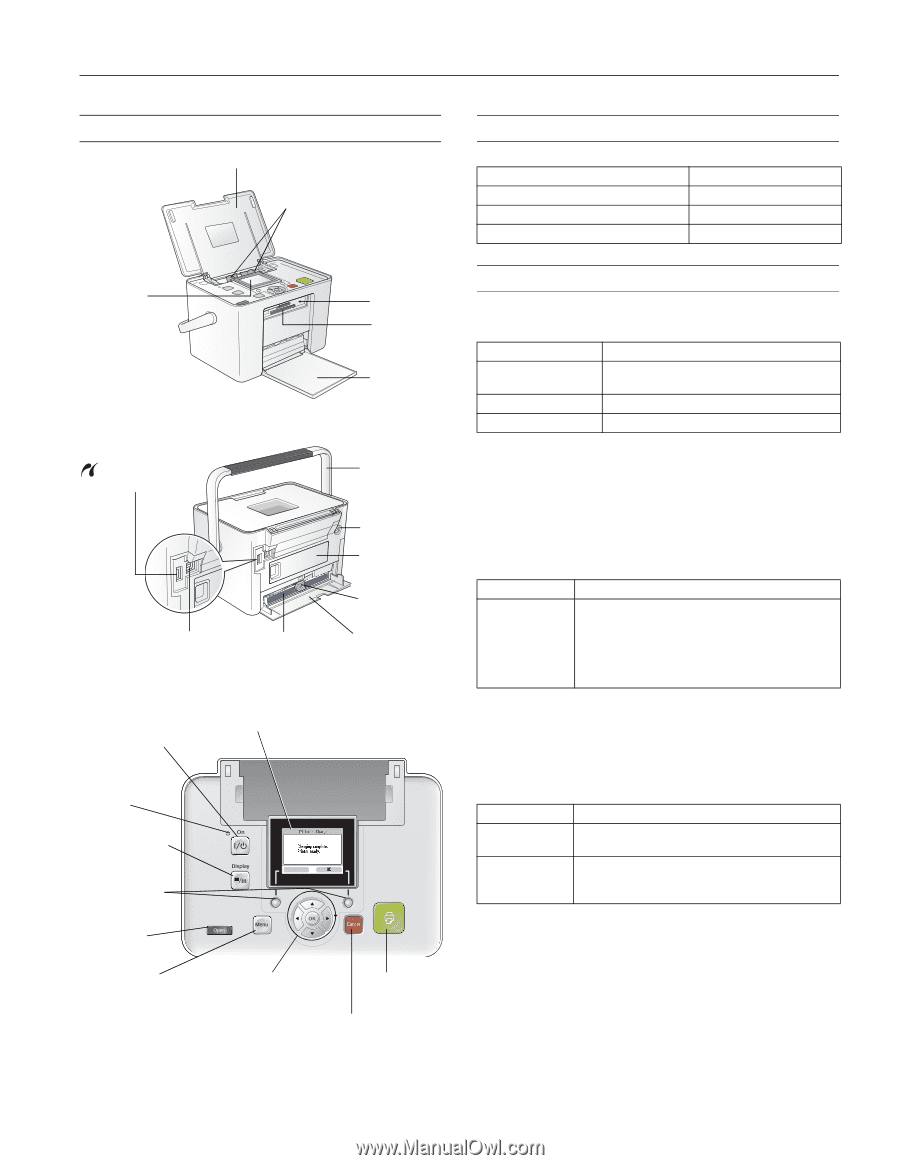
Snap (PM 240) Printer Parts Paper support Edge guides Photo viewer screen Memory card light Memory card slots Output tray External drive port for external devices Handle Power inlet Optional battery cover Cartridge release lever USB port for Photo cartridge Cartridge door computer Turns - Epson PictureMate Snap - PM 240 | Product Information Guide - Page 2
6.0 inches (152 mm) Height: 5.7 inches (145 mm) Printing (with paper support and output tray open) Width: 8.5 inches (215 mm) Depth: 13.3 inches (339 mm) Height: 10.3 inches (261 mm) 5.3 lb (2.4 kg) without photo cartridge, AC adapter, or optional battery Border printing: 0.12 inch (3 mm) margin on - Epson PictureMate Snap - PM 240 | Product Information Guide - Page 3
damage PictureMate. 1. Move the handle to the back. 2. Open the paper support. 3. Press the Open button to open the output tray. PictureMate Snap (PM your paper into the slot between the edge guides with the glossy or whiter side up. Slide the edge guides inward slightly. Load glossy or whiter side - Epson PictureMate Snap - PM 240 | Product Information Guide - Page 4
memory card light is flashing; you may lose photos on your card. Layout icon Guide to available options Left selection button (selects current option on angle of the photo viewer screen by raising or lowering the top of the screen. Be sure to lower the screen before closing the printer lid. 4 - - Epson PictureMate Snap - PM 240 | Product Information Guide - Page 5
Bluetooth-enabled device (requires an optional Epson Bluetooth Photo Print adapter, part number C12C824383) ❏ Your computer ❏ An external CD drive, Zip disk, or flash memory (thumb) drive See the Basics book or the on-screen User's Guide for instructions on printing from connected devices. Make sure - Epson PictureMate Snap - PM 240 | Product Information Guide - Page 6
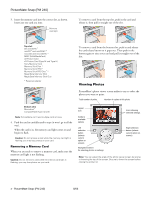
OK to select it. Repeat step 3 to select more copies, if necessary. 5. To preview your photos, press Print Preview. (Or skip directly to step 8 to print your photos.) 6. Press or to review your selected photos. If you change your mind, press the Back button. 7. Press Layout to select the layout of - Epson PictureMate Snap - PM 240 | Product Information Guide - Page 7
Photos If your camera supports DPOF (Digital Print Order Format), you can use it to pre-select which photos and how many copies you want to print. See your camera's manual to choose photos the photo viewer screen). Your photos are previewed on the screen. Press or to review your selected photos 2. - Epson PictureMate Snap - PM 240 | Product Information Guide - Page 8
can control the amount of expansion and cropping; see the Basics book for instructions. 4. At the photo selection screen, press OK to select the current photo for printing. Or you can print all photos or a range of photos (as described on page 6). For the US Passport, ID (portrait package), and 10 - Epson PictureMate Snap - PM 240 | Product Information Guide - Page 9
reduction whenever you print, see the Basics book. 1. Select a photo with the red-eye problem. 2. Press Menu. 3. Press or to highlight Edit, then press date your photos were originally taken to the bottom right corner of each photo. Note: The date comes from your camera, not from the printer. If - Epson PictureMate Snap - PM 240 | Product Information Guide - Page 10
are available: ❏ Automatic adjustments If your camera supports PRINT Image Matching (P.I.M.) or Exif Print, the printer's P.I.M. setting automatically adjusts your photos for the best results. The PhotoEnhance setting improves your photos' colors and increases contrast and sharpness. It may - Epson PictureMate Snap - PM 240 | Product Information Guide - Page 11
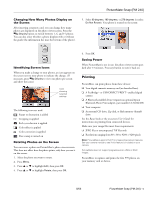
Your Prints ❏ Do not rub the printed side of the photo. ❏ Do not stack photos with the printed sides touching. Displaying Your Prints ❏ Let prints 3. Release the latch and remove the battery cover from the back of the printer. 4. Insert the battery as shown until it clicks into place. Charging the - Epson PictureMate Snap - PM 240 | Product Information Guide - Page 12
's warranty. To ensure good results, use a genuine PictureMate 200 Series photo cartridge and do not refill it. Other products may cause ink spills or other damage to your printer not covered by Epson's warranty. Buying a PictureMate 200 Series Print Pack The PictureMate 200 Series Print Pack has - Epson PictureMate Snap - PM 240 | Product Information Guide - Page 13
gets on your hands, wash them thoroughly with soap and water. If ink gets in your eyes, flush them thoroughly with water. If discomfort or vision problems continue after flushing, see a doctor immediately. 5. Remove the new photo cartridge from its package. Don't touch the green chip 3. Slide the - Epson PictureMate Snap - PM 240 | Product Information Guide - Page 14
not be able to print. 8. Close the cartridge door all the way. Cleaning the Print Head If your print quality is not as good as it used to be-if photos are too light, are missing colors, or improvement after cleaning three times, refer to the on-screen User's Guide for additional solutions. 8/06 - Epson PictureMate Snap - PM 240 | Product Information Guide - Page 15
and printed photos. 6. Unplug the power cable and any connected USB cables or device from PictureMate. 7. Close the paper support and output tray the photo cartridge is installed. Do not remove the photo cartridge before transporting. Don't place PictureMate on its side or upside down, or ink may - Epson PictureMate Snap - PM 240 | Product Information Guide - Page 16
PictureMate Snap (PM 240) Related Documentation CPD-22153 CPD-22154 CPD-22155 PictureMate Snap/PictureMate Flash Start Here PictureMate Snap/PictureMate Flash Basics book PictureMate Snap (PM 240) CD-ROM with HTML User's Guide 16 - PictureMate Snap (PM 240) 8/06
-
 1
1 -
 2
2 -
 3
3 -
 4
4 -
 5
5 -
 6
6 -
 7
7 -
8
-
9
-
10
-
11
-
12
-
13
-
14
-
15
-
16
 |
 |
PictureMate Snap (PM 240)
8/06
PictureMate Snap (PM 240)
- 1
Printer Parts
Accessories
Printer Specifications
Printing
Paper
Note:
Since the quality of any particular brand or type of paper may
be changed by the manufacturer at any time, Epson cannot guarantee
the quality of any non-Epson brand or type of paper.
(PictureMate photo paper is included in the PictureMate 200
Series Print Pack.)
Caution:
Don’t load plain paper; this may cause damage to
PictureMate. Do not load curled or folded paper.
Photo Cartridge
(Included in PictureMate 200 Series Print Pack)
*
Ink freezes at 5 °F (–15 °C). It thaws and is usable after
approximately 3 hours at 77 °F (25 °C).
Paper support
Output
tray
External drive port
for external devices
USB port for
computer
Cartridge door
Memory
card light
Photo
viewer
screen
Handle
Photo cartridge
Power inlet
Memory
card slots
Cartridge
release lever
Edge guides
Turns
PictureMate
on or off
Stops printing or
cancels settings
Displays optional
settings menu
Starts
printing
On light
Move through photos
and menu options,
and select settings
Photo viewer
screen
Opens the
output tray
Displays photos
in different sizes
Select options
on the screen
Optional
battery cover
Optional accessory
Part number
Epson
®
Bluetooth
®
Photo Print Adapter
C12C824383
Carrying Case
PMBAG06
Rechargeable Battery
C12C831082
Printing method
On-demand ink jet
Nozzle configuration
90 nozzles × 4
Colors: Black, Cyan, Magenta, and Yellow
Print direction
Bidirectional with logic seeking
Control code
EPSON ESC/P
®
raster
Size
4 × 6 inches
Paper type
PictureMate
®
Photo Paper (included with
PictureMate 200 Series Print Pack)
Epson Premium Photo Paper Glossy
Epson Premium Photo Paper Semigloss
Colors
Black, Cyan, Magenta, and Yellow
Cartridge life
6 months at 77 °F (25 °C) after installation; 2 years
from production date
Temperature
Storage:
–4 to 104 °F (–20 to 40 °C)
1 month at 104 °F (40 °C)