Epson PowerLite 1770W Quick Setup - Page 2
Adjust the image, Using the remote control, Project wirelessly - powerlite 1770 w projector
 |
View all Epson PowerLite 1770W manuals
Add to My Manuals
Save this manual to your list of manuals |
Page 2 highlights
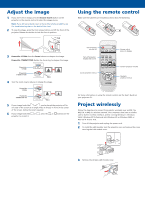
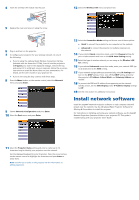
Adjust the image 1 If you don't see an image, press the Source Search button on the projector or the remote control to select the image source. Note: If you still see a blank screen or have other display problems, see the troubleshooting tips on the back of this sheet. 2 To raise the image, press the foot release button and lift the front of the projector. Release the button to lock the foot in position. Using the remote control Make sure the batteries are installed as shown (two AA batteries). 3 PowerLite 1775W: Press the Focus buttons to sharpen the image. PowerLite 1760W/1770W: Rotate the focus ring to sharpen the image. PowerLite 1775W PowerLite 1760W/1770W 4 Turn the zoom ring to reduce or enlarge the image. PowerLite 1775W PowerLite 1760W/1770 W 5 If your image looks like or , you've placed the projector off to one side of the screen at an angle. Place it directly in front of the center of the screen, facing the screen squarely. 6 If your image looks like or , press the or buttons on the projector to correct it. Turn projector on and off Turn off projector display and sound Access projector menus Choose which source to display Control projector volume Navigate projector menus For more information on using the remote control, see the User's Guide on your projector CD. Project wirelessly Follow the steps here to connect the projector wirelessly over an 802.11g, 802.11b, or 802.11n wireless network. Your computer must have a wireless card or built-in wireless interface, and be running Windows 7, Windows Vista®, Windows XP Professional x64, Windows XP, or Windows 2000, or Mac OS® X 10.3 to 10.6. 1 Turn off the projector and unplug the power cord. 2 To install the LAN module, turn the projector over and remove the screw securing the LAN module cover. 3 Remove the wireless LAN module cover.
-
 1
1 -
 2
2 -
 3
3 -
 4
4
 |
 |
