Epson PowerLite 715c Product Support Bulletin(s) - Page 8
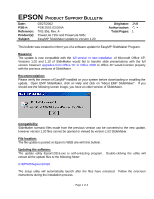
Click on the EPSON ELP/EMP-715 icon.
 |
View all Epson PowerLite 715c manuals
Add to My Manuals
Save this manual to your list of manuals |
Page 8 highlights
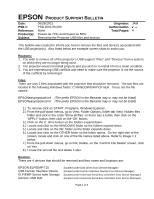
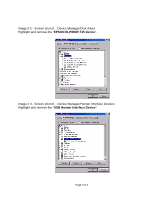
1.) To remove the devices click on START, Settings, Control Panel, double click on the SYSTEM icon. 2.) On the System Properties screen, click on the tab Device Manager. Double click on the DISK DRIVES icon. Refer to Image # 2 below. 3.) Click on the EPSON ELP/EMP-715 icon. Click on the REMOVE button on the bottom of current screen. On the 'Confirm Device Removal' screen, click on the OK button. 4.) On the System Properties screen, click on the tab Device Manager. Double click on the Human Interface Devices icon. Refer to Image # 3 below. 5.) Click on the USB Human Interface Device icon. Click on the REMOVE button on the bottom of current screen. On the 'Confirm Device Removal' screen, click on the OK button. 6.) On the System Properties screen, click on the tab Device Manager. Double click on the Universal Serial Bus Controllers icon. Refer to Image # 4 below. 7.) Click on the ELP/EMP-Series wdm Storage icon. Click on the REMOVE button on the bottom of current screen. On the 'Confirm Device Removal' screen, click on the OK button. 8.) Click on the Generic USB HUB icon. Click on the REMOVE button on the bottom of current screen. On the 'Confirm Device Removal' screen, click on the OK button. 9.) After doing so, restart the system and USB projector support will be completely removed from the system. Screen Shots: Image # 1 - Windows Explorer screen shot of... C:\WINDOWS\INF\OTHER folder Highlight and delete the "easympstusb.inf" and "easmpstvxd.inf" files. Page 2 of 4
-
 1
1 -
2
-
 3
3 -
 4
4 -
 5
5 -
 6
6 -
 7
7 -
 8
8 -
 9
9 -
 10
10 -
 11
11
 |
 |
