Epson RX700 Start Here Card
Epson RX700 - Stylus Photo Color Inkjet Manual
 |
UPC - 010343853775
View all Epson RX700 manuals
Add to My Manuals
Save this manual to your list of manuals |
Epson RX700 manual content summary:
- Epson RX700 | Start Here Card - Page 1
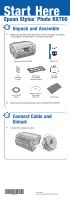
sure you have all the parts shown here. If any parts are missing, contact Epson® as described on the back of this sheet. Epson Stylus Photo RX700 Basics book Ink cartridges (6 total) Film holder (in protective cardboard sleeve) Software CD-ROM 8-cm CD/DVD adapter Blank cardboard CD printing - Epson RX700 | Start Here Card - Page 2
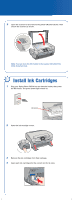
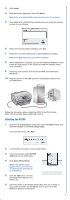
lid and remove the yellow UNLOCK sticker. Then unlock the scanner as shown. Note: You can store the film holder in the scanner lid behind the white document mat. 3 Install Ink Cartridges 1 Plug your Stylus Photo RX700 into an electrical outlet, then press the On button. The green power light comes - Epson RX700 | Start Here Card - Page 3
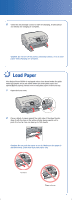
5 Close the ink cartridge covers to start ink charging. It takes about 31/2 minutes for charging to complete. Caution: Do not turn off the printer, press any buttons, or try to load paper while charging is in progress. 4 Load Paper Your Stylus Photo RX700 is equipped with a front sheet feeder (for - Epson RX700 | Start Here Card - Page 4
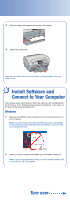
edge guide against the left side of the paper. 4 Extend the output tray. Note: See your Basics book for instructions on loading paper in the rear sheet feeder. 5 Install Software and Connect to Your Computer The software works with Windows® 98SE, Me, 2000, and XP, and Macintosh® OS X 10.2.x to 10 - Epson RX700 | Start Here Card - Page 5
copy, scan, and print. See the Basics book or your on-screen Reference Guide for instructions. Macintosh 1 Insert your RX700 software CD-ROM into your CD-ROM or DVD drive. 2 Double-click the Epson CD-ROM icon, if necessary. Then double- click the Epson installer icon. You see this screen: continue - Epson RX700 | Start Here Card - Page 6
on and securely connected to your Macintosh. 5 Click the Add button. You see the Stylus Photo RX700 in the Printer List. 6 Quit Print Center or the Printer Setup Utility. Now you're ready to copy, scan, and print. See the Basics book or your on-screen Reference Guide for instructions. continue - Epson RX700 | Start Here Card - Page 7
. Make sure you have unlocked the scanner, as described in section 2. Turn the RX700 off and then on again. Make sure the ink cartridges are pushed all the way in and the covers are closed. Make sure your RX700 software is installed correctly. The Stylus Photo RX700 makes noise after you turn it - Epson RX700 | Start Here Card - Page 8
Magenta Ink Cartridge T559420 Yellow Ink Cartridge T559520 Light Cyan Ink Cartridge T559620 Light Magenta Ink Cartridge Premium Glossy Photo Paper Heavyweight paper with a high gloss finish that lets you create borderless photos with no perforated edges. Available in 4 x 6, 5 x 7, 8 x 10, and
-
 1
1 -
 2
2 -
 3
3 -
 4
4 -
 5
5 -
 6
6 -
 7
7 -
8
 |
 |

Epson Stylus
®
Photo RX700
Start Here
1
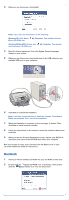
Make sure you have all the parts shown here. If any parts are missing,
contact Epson
®
as described on the back of this sheet.
2
Remove all the blue packing tape from the Stylus Photo RX700.
Unpack and Assemble
1
CD/DVD tray
Software
CD-ROM
Basics
book
Epson Stylus Photo RX700
8-cm CD/DVD
adapter
Film holder
(in protective
cardboard sleeve)
CPD-19735
Printed in XXXXXX XX-XX.XX XXX
Blank cardboard
CD printing
check disk
1
Connect the scanner lid cable.
Connect Cable and
Unlock
2
Ink
cartridges
(6 total)