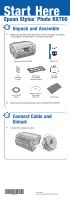
Epson RX700 Start Here Card - Page 2
Install Ink Cartridges - stylus photo ink
 |
UPC - 010343853775
View all Epson RX700 manuals
Add to My Manuals
Save this manual to your list of manuals |
Page 2 highlights
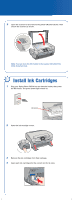
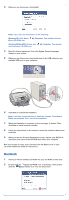
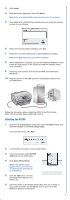
2 Open the scanner lid and remove the yellow UNLOCK sticker. Then unlock the scanner as shown. Note: You can store the film holder in the scanner lid behind the white document mat. 3 Install Ink Cartridges 1 Plug your Stylus Photo RX700 into an electrical outlet, then press the On button. The green power light comes on. On button 2 Open the ink cartridge covers. 3 Remove the ink cartridges from their package. 4 Insert each ink cartridge into the correct slot for its color.
-
 1
1 -
 2
2 -
 3
3 -
 4
4 -
 5
5 -
 6
6 -
 7
7 -
 8
8
 |
 |

1
Plug your Stylus Photo RX700 into an electrical outlet, then press
the
On
button. The green power light comes on.
2
Open the ink cartridge covers.
3
Remove the ink cartridges from their package.
4
Insert each ink cartridge into the correct slot for its color.
Install Ink Cartridges
3
On
button
2
Open the scanner lid and remove the yellow UNLOCK sticker. Then
unlock the scanner as shown.
Note
: You can store the film holder in the scanner lid behind the
white document mat.