Epson Stylus C80WN Quick Start
Epson Stylus C80WN - Ink Jet Printer Manual
 |
View all Epson Stylus C80WN manuals
Add to My Manuals
Save this manual to your list of manuals |
Epson Stylus C80WN manual content summary:
- Epson Stylus C80WN | Quick Start - Page 1
view the address by running ipconfig (Windows XP/2000/NT) or winipcfg (Windows Me/98/95). If you need instructions, see page 52 in Setup and Installation. 3 Insert your printer CD-ROM. 4 Double-click Install EPSON Stylus C80WN Printer Driver and follow the instructions on the screen. 5 When you see - Epson Stylus C80WN | Quick Start - Page 2
Properties window. If it doesn't print, try the suggestions on page 33 in Setup and Installation. Congratulations! You're ready for wireless printing. See Printer Basics for more information. For Mac OS X sypport, go to the EPSON web site at support.epson.com. EPSON and EPSON Stylus are registered
-
 1
1 -
 2
2
 |
 |
1
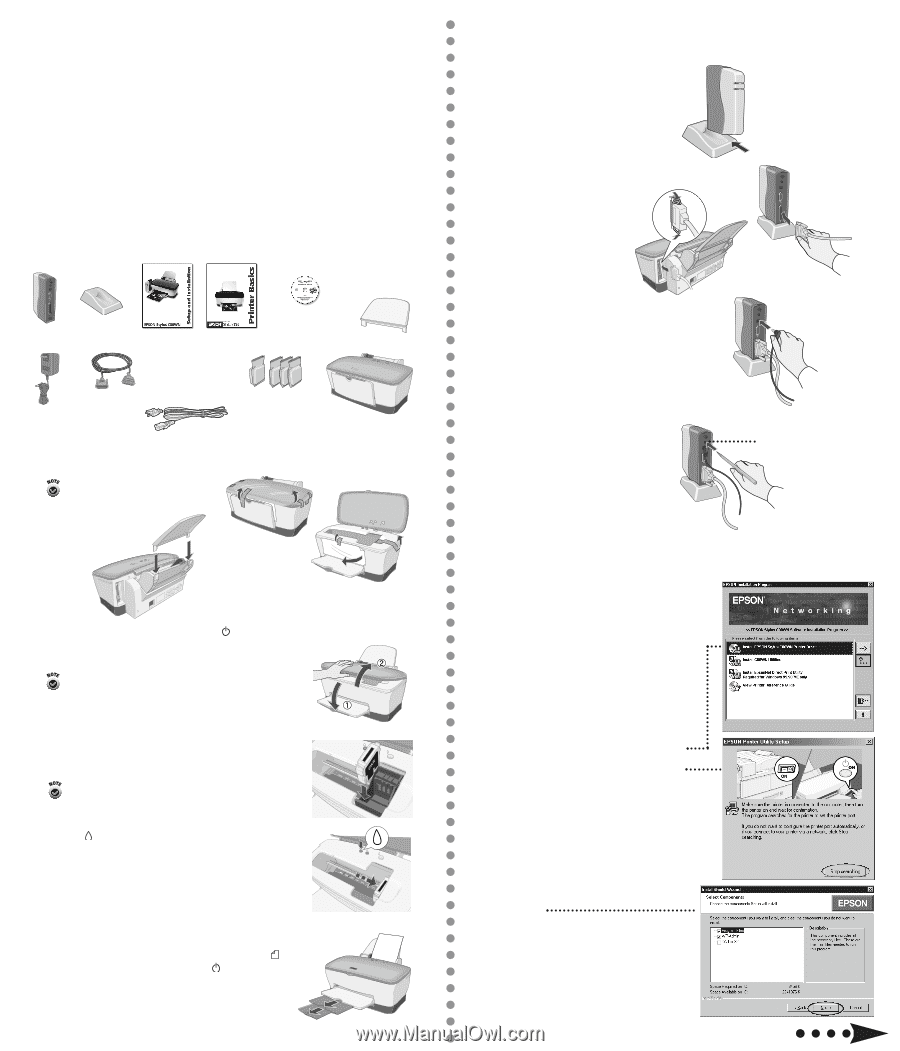
Take everything out of the box.
2
Remove all the tape and packing material from the printer, as shown.
3
Insert the paper support.
4
Plug in the printer and turn it on. The green
power light flashes.
5
Lower the output tray and open the cover.
6
Shake each ink cartridge, then unwrap it.
7
Insert each cartridge into its holder until the cartridge clicks
into place.
8
Press the
ink button and close the printer cover.
Wait while the ink charges.
9
Load paper and pull out the output tray extensions.
To check the printer, first turn it off. Then hold down the
paper button as you press and release the
power button to
turn it back on. The test page prints.
If the test page doesn’t print, see the Problem Solving
chapter in
Printer Basics
.
2
Connect the Print Server
1
Slide the print server into the base and press firmly.
2
Turn off the printer. Then connect the parallel cable
to the printer and print server.
3
Connect the power supply to the print server and
plug in the AC adapter. Both the green and yellow
lights come on and then go out.
4
Turn on the printer.
5
To test the connection, press the test
button for one second and release it.
The status page prints.
If the status page doesn’t print,
see page 41 in
Setup and Installation
.
Quick Start
1
Unpack and Set Up the Printer
EPSON Stylus
®
C80WN
Quick Start
Turn over
Make sure you follow all the
Safety Instructions in
Printer Basics
and
Setup and Installation
.
Keep ink cartridges out of the reach of children.
If ink gets on your skin, wash the area thoroughly
with soap and water. If ink gets in your eyes, flush
them immediately with water.
Don’t remove the cartridge labels, or ink may leak.
3
Install the Software
1
Make sure the wireless mode for your computer
is set to Infrastructure and WEP encryption is disabled.
For instructions, see the documentation for your
wireless adapter.
2
Note your computer’s IP address. You can view the
address by running
ipconfig
(Windows XP/2000/NT)
or
winipcfg
(Windows Me/98/95). If you need
instructions, see page 52 in
Setup and Installation
.
3
Insert your printer CD-ROM.
4
Double-click
Install EPSON Stylus C80WN Printer
Driver
and follow the instructions on the screen.
5
When you see this window, click
Stop searching
.
Then follow the instructions on the screen
to register your printer.
6
Double-click
Install C80WN Utilities
on the
EPSON Installation Program screen.
7
If you see a message about installing the Java
Runtime Environment click
Continue
and
follow the instructions on the screen.
8
When you see this window, click
Next
.
Then follow the instructions on the back
of this sheet.
Follow these instructions if you’re an advanced Windows user and your network has a wireless access
point without WEP encryption. This includes wired networks that have wireless access points. For
more detailed instructions and other types of networks (including Macintosh
®
) see your
Setup and
Installation
book.
test button
paper support
printer
ink cartridges
print server
power supply
printer power cord
parallel cable
print server base
print server
Printer Basics
printer software
CD-ROM
Setup and
Installation