Epson Stylus C80WN Quick Start - Page 2
Set Up a Network Port, Con the Print Server
 |
View all Epson Stylus C80WN manuals
Add to My Manuals
Save this manual to your list of manuals |
Page 2 highlights
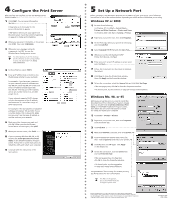
4 Configure the Print Server After the files are installed, you see the Wireless Server Search window: 1 Click START. You see server information like this: It may take up to 2 minutes for the server information to appear. If WP-Admin doesn't pick up a signal from the print server, check the solutions beginning on page 41 in Setup and Installation. 2 When you see server information on the screen, click STOP. Then click CONFIGURE. 3 When you see a message asking for a password, click OK. You see the Wireless Server Configuration screen. For descriptions of all the settings on the Wireless Server Configuration screen, see Appendix A in Setup and Installation. 4 For Boot Method, select STATIC. 5 Enter an IP address that conforms to the IP addressing scheme for your network. For example, if you have two computers on your network whose IP addresses are 192.189.207.3 and 192.189.207.4, the print server's IP address should begin with 192.189.207. The last part of the address can be any number between 2 and 254 except 3 or 4. If your network supports DHCP, change only the last segment of the IP address, and make sure it is out of the range of DHCP assignments. For example, if the last segment of assigned addresses is between 100 and 200, choose a number below 100 or above 200. Make sure you don't use the same IP address as another node on your network. 6 Make any other changes you want and click OK. When you see the Wireless Server Search window again, click QUIT. 7 When you see this screen, click Finish. 8 If you're running Windows Me, 98, or 95, double-click Install EpsonNet Direct Print Utility on the EPSON Installation Program screen. Follow the on-screen instructions to install the utility and restart your computer. 9 Continue with the instructions in the next section. 5 Set Up a Network Port Before you begin, run WP-Admin and note the IP address of your print server. Then follow the instructions in one of the sections below, depending on which version of Windows you're using. Windows XP or 2000 1 Do one of the following: In Windows XP: click Start > Control Panel > Printers and Other Hardware > Printers and Faxes. In Windows 2000: click Start > Settings > Printers. 2 Right-click your printer icon, then click Properties. 3 On the Ports tab, select your printer (if necessary), and click Add Port. 4 Select Standard TCP/IP Port and click New Port. 5 When you see the Add Standard TCP/IP Printer Port Wizard, click Next. 6 Enter your print server's IP address or server name and click Next. 7 Follow the instructions on the screen to complete the wizard. 8 Click Close to close the Printer Ports window, then click Apply on the Properties window. 9 To test the connection, select the General tab and click Print Test Page. If the test page prints, click OK to close the Properties window. If it doesn't print, try the solutions on page 30 in Setup and Installation. Windows Me, 98, or 95 Before you set up the port, you need to install the EpsonNet Direct Print Utility (if you haven't already done so). Double-click Install EpsonNet Direct Print Utility on the EPSON Installation Program screen, then follow the on-screen instructions to install the utility and restart your computer. 1 Click Start > Settings > Printers. 2 Right-click your printer icon, then click Properties. Click the Details tab. 3 Click Add Port. 4 Make sure Network is selected, then click Browse. 5 Click to expand the network path, then click the + next to Epson-Ipr and select your printer. 6 Click OK, then click OK again. Click Apply on the Details tab. 7 To test the connection, click the General tab and click Print Test Page. If the test page prints, click Yes, then click OK to close the Properties window. If it doesn't print, try the suggestions on page 33 in Setup and Installation. Congratulations! You're ready for wireless printing. See Printer Basics for more information. For Mac OS X sypport, go to the EPSON web site at support.epson.com. EPSON and EPSON Stylus are registered trademarks of SEIKO EPSON CORPORATION. General Notice: Other product names used herein are for identification purposes only and may be trademarks of their respective owners. EPSON disclaims any and all rights in those marks. Copyright © 2002 by Epson America, Inc. Printed on recycled paper. 3/02 Printed in USA CPD-13805
-
 1
1 -
 2
2
 |
 |
