Epson Stylus NX430 Start Here - Page 2
Load paper - all in one printer
 |
View all Epson Stylus NX430 manuals
Add to My Manuals
Save this manual to your list of manuals |
Page 2 highlights
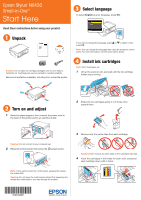
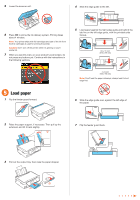
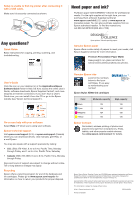
5 Lower the scanner unit. 4 Slide the edge guide to the left. 6 Press OK to prime the ink delivery system. Priming takes about 4 minutes. Note: Your printer ships with full cartridges and part of the ink from the first cartridges is used for priming the printer. Caution: Don't turn off the printer while it is priming or you'll waste ink. 7 When you see this menu on your product's LCD screen, do not press any buttons yet. Continue with the instructions in the following sections. 5 Load paper against the right edge guide and behind the tab line on the left edge guide, with the printable side faceup. 8½ × 11 inch (216 × 279 mm) 5 Load paper 1 Flip the feeder guard forward. 4 × 6 inch (102 × 152 mm) Note: Don't load the paper sideways; always load it short edge first. 6 Slide the edge guide over, against the left edge of the paper. 2 Raise the paper support, if necessary. Then pull up the extension and tilt it back slightly. 7 Flip the feeder guard back. 3 Pull out the output tray, then raise the paper stopper.
-
 1
1 -
 2
2 -
 3
3 -
 4
4
 |
 |
