Epson Stylus Photo R3000 Start Here
Epson Stylus Photo R3000 - Ink Jet Printer Manual
 |
View all Epson Stylus Photo R3000 manuals
Add to My Manuals
Save this manual to your list of manuals |
Epson Stylus Photo R3000 manual content summary:
- Epson Stylus Photo R3000 | Start Here - Page 1
Here Epson Stylus® Photo R3000 Read these instructions before using your product. 1 Unpack 2 Turn on 1 Connect the power cable. Caution: Do not connect to your computer yet. 2 Press the power button. Caution: Do not open ink cartridge packages until you are ready to install the ink. Cartridges are - Epson Stylus Photo R3000 | Start Here - Page 2
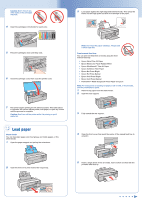
Scrapbook Photo Paper for Epson Note: For instructions on loading roll paper, a CD or DVD, or thick media, see the printed Basics guide. 1 Remove any paper from the sheet feeder. 2 Open the rear support. 3 Fully extend the rear support. 4 Open the front cover, then push the center of the manual feed - Epson Stylus Photo R3000 | Start Here - Page 3
your printer's output in both color and black-and-white. Any questions? Network Setup Follow the on-screen instructions when you insert your product CD. If you need additional help, see the printed Basics guide. You can also watch a video tutorial at: epson.com/support/wireless. Basics Guide Basic - Epson Stylus Photo R3000 | Start Here - Page 4
prints. Its semigloss "E" surface and 10 mil thickness provide a true photographic look and feel. Genuine Epson Inks 157 Look for the numbers below to find your cartridges. It's as easy as remembering your Photo Black number! Photo Noir ® Epson Stylus Photo R3000 Series Ink Cartridges Color
-
 1
1 -
 2
2 -
 3
3 -
 4
4
 |
 |

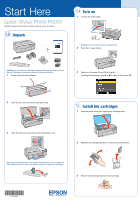
Unpack
Caution:
Do not open ink cartridge packages until you are ready to install
the ink. Cartridges are vacuum packed to maintain reliability.
1
Remove all protective materials.
2
Open the top cover and remove any tape inside.
3
Open the front cover and remove the transportation lock.
Tip:
Keep the transportation lock in the accessories box. You can also use
the accessories box to store your printer manual and spare ink cartridges.
1
Turn on
1
Connect the power cable.
Caution:
Do not connect to your computer yet.
2
Press the
power button.
3
Select your language. (Press
OK
for English.)
To change the language, press
or
to select it, then press
OK
.
2
*412036900*
*412036900*
3
Start Here
Epson Stylus
®
Photo R3000
Read these instructions before using your product.
Install ink cartridges
1
Open the printer cover, then open the ink cartridge cover.
2
Shake the ink cartridges gently 4 or 5 times, then unpack them.
3
Remove only the yellow tape from each cartridge.