Epson Stylus Photo R3000 Start Here - Page 1
Epson Stylus Photo R3000 - Ink Jet Printer Manual
 |
View all Epson Stylus Photo R3000 manuals
Add to My Manuals
Save this manual to your list of manuals |
Page 1 highlights
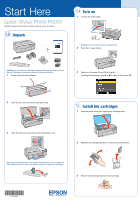
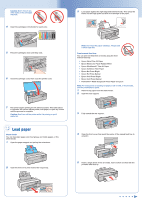
Start Here Epson Stylus® Photo R3000 Read these instructions before using your product. 1 Unpack 2 Turn on 1 Connect the power cable. Caution: Do not connect to your computer yet. 2 Press the power button. Caution: Do not open ink cartridge packages until you are ready to install the ink. Cartridges are vacuum packed to maintain reliability. 1 Remove all protective materials. 3 Select your language. (Press OK for English.) To change the language, press or to select it, then press OK. 2 Open the top cover and remove any tape inside. 3 Install ink cartridges 1 Open the printer cover, then open the ink cartridge cover. 3 Open the front cover and remove the transportation lock. 2 Shake the ink cartridges gently 4 or 5 times, then unpack them. Tip: Keep the transportation lock in the accessories box. You can also use the accessories box to store your printer manual and spare ink cartridges. 3 Remove only the yellow tape from each cartridge. *412036900* *412036900*
-
 1
1 -
 2
2 -
 3
3 -
 4
4
 |
 |
