Epson Stylus Photo Product Information Guide
Epson Stylus Photo - Ink Jet Printer Manual
 |
View all Epson Stylus Photo manuals
Add to My Manuals
Save this manual to your list of manuals |
Epson Stylus Photo manual content summary:
- Epson Stylus Photo | Product Information Guide - Page 1
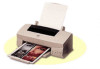
EPSON Stylus Photo edge guides paper support extension paper support printer cover control panel output tray output tray extensions ink cartridge clamp thickness lever paper light load/eject button black ink out light color ink out light cleaning button power button Printer Specifications - Epson Stylus Photo | Product Information Guide - Page 2
. If you encounter problems, switch to a higher grade of paper. Do not load curled or folded paper. EPSON ink jet papers and other special media are only usable under normal conditions: Temperature: 59 to 77°F (15 to 25°C) Humidity: 40 to 60% RH Printouts on EPSON Photo Quality Glossy Film - Epson Stylus Photo | Product Information Guide - Page 3
× 1.5 (H) inches 51.4 (W) × 52.7 (D) × 38.5 (H) mm Caution: To ensure good results, use genuine EPSON ink cartridges. Other products may cause damage to your printer not covered by EPSON's warranty. Don't use an ink cartridge if the date on the package has expired. 3/97 EPSON Stylus Photo - 3 - Epson Stylus Photo | Product Information Guide - Page 4
without the ink cartridges Electrical printer's built-in serial interface is based on the RS-423 standard. This interface has the following characteristics: Standard: Based on RS-423 Synchronization: Synchronous Bit rate: Approx. 900 Kbps Handshaking: X-ON/X-OFF, DTR protocol 4 - EPSON Stylus Photo - Epson Stylus Photo | Product Information Guide - Page 5
the load/eject button and press the power 2 button. Hold down the buttons until the power light starts to flash. Then release both buttons. The printer prints one page containing a nozzle check pattern, the printer's ROM version, ink counter code, and character table. 3/97 EPSON Stylus Photo - 5 - Epson Stylus Photo | Product Information Guide - Page 6
, available only if you're using Windows 95, displays automatically when you send a job to the printer. However, you can use it at any time to see how much ink you have left. Follow these steps: 1. Access the Main printer settings dialog box. 2. Click the Utility tab. 6 - EPSON Stylus Photo 3/97 - Epson Stylus Photo | Product Information Guide - Page 7
EPSON Stylus Photo You see the Utility menu: 3. Click the EPSON Status Monitor icon.You see the Despooler window with the Status Monitor at the bottom. t The Status Monitor alerts you to any problems that occur during printing. You can also use it at any time to see how much ink you have left. - Epson Stylus Photo | Product Information Guide - Page 8
level of ink in your printer and to control the way your software warns you about printer problems. Follow these steps: 1. Choose Print from the File menu or click the print icon in your application. You see the printer settings dialog box. 2. Click the Utility button. 8 - EPSON Stylus Photo 3/97 - Epson Stylus Photo | Product Information Guide - Page 9
ink level 4. If you want to change printer messages and warnings, click the Configuration button. You see the following dialog box: Printing stops when these messages appear. Printing continues when these messages appear. 5. Choose the options you want and click OK. EPSON Stylus Photo Network - Epson Stylus Photo | Product Information Guide - Page 10
: Don't use the cleaning sheets that may be included with your special media; they may damage the printer. You can load paper up to the arrow mark on the left edge guide. If you use legal-size ink jet paper, don't load it more than half way to the arrow mark. 10 - EPSON Stylus Photo 3/97 - Epson Stylus Photo | Product Information Guide - Page 11
to 20 sheets of Photo paper at a time. Make sure you place the included support sheet beneath the stack, but don't print on it. 2. Slide the left edge guide so it fits snugly the correct Media Type setting in your printer software, following the guidelines on page 10. 3/97 EPSON Stylus Photo - 11 - Epson Stylus Photo | Product Information Guide - Page 12
your printer not covered by EPSON's warranty. * ) When a black or color ink out light flashes, the indicated cartridge is low on ink. This is a good time to make sure you have a new cartridge. When the light stays on, the cartridge is empty and you need to replace it. 12 - EPSON Stylus Photo 3/97 - Epson Stylus Photo | Product Information Guide - Page 13
the clamp or remove a cartridge except to replace it with a new one. Once you remove a cartridge, you can't reuse it. Even if the cartridge contains ink, reusing it may damage the print head. 6. Lift the cartridge out of the printer and dispose of it carefully. 3/97 EPSON Stylus Photo - 13 - Epson Stylus Photo | Product Information Guide - Page 14
unclogs the nozzles so they can deliver ink properly. Cleaning the print heads uses ink, so clean them only if print instructions on the screen to clean the print 2 heads. Cleaning takes about two minutes, during which the printer makes some noise and the power light flashes. 14 - EPSON Stylus Photo - Epson Stylus Photo | Product Information Guide - Page 15
Clean ink out of the printer's interior with a damp cloth. Information Reference List Engineering Change Notices None Product Support Bulletins None Technical Information Bulletins None Related Documentation TM-STYPHOTO EPSON Stylus Photo Service Manual PL-STYPHOTO EPSON Stylus Photo Parts
-
 1
1 -
 2
2 -
 3
3 -
 4
4 -
 5
5 -
 6
6 -
 7
7 -
8
-
9
-
10
-
11
-
12
-
13
-
14
-
15
 |
 |

EPSON Stylus Photo
3/97
EPSON Stylus Photo - 1
Printer Specifications
Printing
Printing method
EPSON’
s exclusive drop-on-demand Micro Piezo ink jet
technology
Nozzle configuration
32 nozzles
×
6 (black, cyan, magenta, yellow, light cyan,
light magenta)
Printable columns and printing speeds
20 inches per second (printable area 8.26 inches)
Resolution
Maximum 720 dpi
×
720 dpi
Print direction
Bidirectional with logic seeking
Control code
ESC/P Raster
™
Line spacing
1/6 inch, programmable in 1/360-inch increments
Paper feed speed
66.6 milliseconds per 1/6-inch line
Input buffer
64KB
Character tables
The characters for PC437 (US, Standard Europe) and
PC850 (Multilingual) can be selected using the following
procedure:
When the printer is off, hold down the
cleaning button
and press the
power button. Then release both buttons.
This changes the character table to PC850. Repeat the
procedure to change it back to PC437. You can run a printer
check as described on page 5 to verify the current character
table.
ink cartridge
clamp
printer cover
edge
guides
paper support extension
paper support
control
panel
output tray
extensions
cleaning
button
paper
light
power
button
load/eject
button
black ink
out light
color ink
out light
output tray
thickness lever
Print quality
Available dots
180 dpi
1488
360 dpi
2976
720 dpi
5952