Epson Stylus Pro 10600 - UltraChrome Ink Product Support Bulletin - Page 41
PAPER CIONFIGURATION DESCRIPTION, Paper Configuration Number, Paper Thickness
 |
View all Epson Stylus Pro 10600 - UltraChrome Ink manuals
Add to My Manuals
Save this manual to your list of manuals |
Page 41 highlights
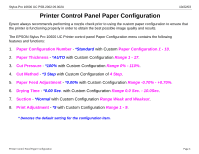
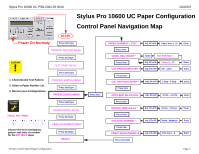
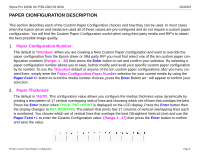
Stylus Pro 10600 UC PSB.2002.09.002A PAPER CIONFIGURATION DESCRIPTION 10/22/03 This section describes each of the Custom Paper Configuration choices and how they can be used. In most cases when the Epson driver and media are used all of these values are pre-configured and do not require a custom paper configuration. You will find the Custom Paper Configuration useful when using third party media and RIP's to obtain the best possible image quality. 1. Paper Configuration Number: The default is *Standard. When you are creating a New Custom Paper Configuration and want to override the paper configuration from the Epson driver or 3Rd party RIP you must first select one of the ten custom paper configuration numbers (Range: 1 - 10) then press the Enter button to set and confirm your selection. By selecting a paper configuration number allows you to save, further modify and recall your specific custom paper configuration by its number. To use the *Standard default or anyone of the ten custom paper configurations after you have created them, simply enter the Paper Configuration Paper Number selection for your current media by using the Paper Feed +/- button to scroll the media number choices, press the Enter Button an * will appear to confirm your selection. 2. Paper Thickness: The default is *AUTO. This configuration value allows you configure the medias thickness value dynamically by printing a test pattern of 17 vertical overlapping sets of lines and choosing which set of lines that overlaps the best. Press the Enter button when THICK. PAT.=PRINT is displayed on the LCD display. Press the Enter button then the display changes to PAT. PRINTING. The pattern that prints has 17 columns of vertical overlapping lines each is numbered. You choose which set of vertical lines that overlaps the best (Straightest Vertical Line) and use the Paper Feed +/- to enter the Custom Configuration value. (Range 1 - 17) then press the Enter button to confirm and save the value. Printer Control Panel Paper Configuration Page 4.
-
 1
1 -
2
-
3
-
4
-
5
-
6
-
7
-
8
-
9
-
10
-
11
-
12
-
13
-
14
-
15
-
16
-
17
-
18
-
19
-
20
-
21
-
22
-
23
-
24
-
25
-
26
-
27
-
28
-
29
-
30
-
31
-
32
-
33
-
34
-
35
-
 36
36 -
 37
37 -
 38
38 -
 39
39 -
 40
40 -
 41
41 -
 42
42 -
 43
43 -
 44
44
 |
 |