Epson Stylus Pro 9500 User Manual - Page 139
For the EPSON Stylus Pro 9500, click, and then choose one of the print job types from
 |
View all Epson Stylus Pro 9500 manuals
Add to My Manuals
Save this manual to your list of manuals |
Page 139 highlights
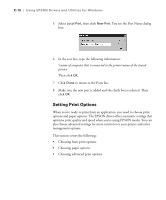
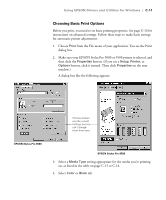
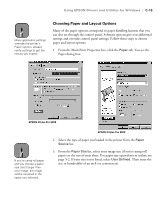
C-12 | Using EPSON Drivers and Utilities for Windows Note You can also create your own settings and add them to this list. See page C-19 for more information. 5. Set the Mode option as follows: • Click Automatic to have the printer driver analyze the contents of your image or file and make the appropriate printing adjustments. If a Quality/Speed slider appears in the Mode box, set it according to the priorities of your print job. (Depending on the Media Type setting, this slider may not appear.) • For the EPSON Stylus Pro 9500, click PhotoEnhance to choose from a number of settings designed for low-resolution photographs: Standard, People, Nature, Soft Focus, and Sepia. You can also select Digital Camera Correction to correct noise and other flaws common to digital camera images. (For the EPSON Stylus Pro 9000, these options are available from the Custom settings list on the Advanced settings window.) • Click Custom and then choose one of the print job types from the custom settings list, as described below. Custom print job settings Setting Usage Text/Graph Intensifies colors and lightens the midtones and highlights. Best for print jobs with non-photographic images. ICM Adjusts colors based on your printer's ICC profile, using the Image Color Matching system (effective in Windows 98/2000 only). If you're using an ICM-compatible monitor, adjusts printed colors to closely match screen colors. sRGB Adjusts colors using the small-gamut sRGB (standard red green blue) color space. Best for color matching with other sRGB devices, or for images designed for the Web. 6. When you're finished choosing print options, click the Paper tab and follow the instructions on page C-15 for choosing paper and layout options. C-12
-
 1
1 -
2
-
3
-
4
-
5
-
6
-
7
-
8
-
9
-
10
-
11
-
12
-
13
-
14
-
15
-
16
-
17
-
18
-
19
-
20
-
21
-
22
-
23
-
24
-
25
-
26
-
27
-
28
-
29
-
30
-
31
-
32
-
33
-
34
-
35
-
36
-
37
-
38
-
39
-
40
-
41
-
42
-
43
-
44
-
45
-
46
-
47
-
48
-
49
-
50
-
51
-
52
-
53
-
54
-
55
-
56
-
57
-
58
-
59
-
60
-
61
-
62
-
63
-
64
-
65
-
66
-
67
-
68
-
69
-
70
-
71
-
72
-
73
-
74
-
75
-
76
-
77
-
78
-
79
-
80
-
81
-
82
-
83
-
84
-
85
-
86
-
87
-
88
-
89
-
90
-
91
-
92
-
93
-
94
-
95
-
96
-
97
-
98
-
99
-
100
-
101
-
102
-
103
-
104
-
105
-
106
-
107
-
108
-
109
-
110
-
111
-
112
-
113
-
114
-
115
-
116
-
117
-
118
-
119
-
120
-
121
-
122
-
123
-
124
-
125
-
126
-
127
-
128
-
129
-
130
-
131
-
132
-
133
-
 134
134 -
 135
135 -
 136
136 -
 137
137 -
 138
138 -
 139
139 -
 140
140 -
 141
141 -
 142
142 -
 143
143 -
 144
144 -
145
-
146
-
147
-
148
-
149
-
150
-
151
-
152
-
153
-
154
-
155
-
156
-
157
-
158
-
159
-
160
-
161
-
162
-
163
-
164
-
165
 |
 |