Epson WorkForce 40 Start Here
Epson WorkForce 40 - Ink Jet Printer Manual
 |
View all Epson WorkForce 40 manuals
Add to My Manuals
Save this manual to your list of manuals |
Epson WorkForce 40 manual content summary:
- Epson WorkForce 40 | Start Here - Page 1
read these instructions before using the printer. 1 Unpack Ethernet cable Caution: Do not open ink cartridge packages until you are ready to install the ink. Cartridges are vacuum packed to maintain reliability. Remove all protective materials. If anything is missing, contact Epson as described - Epson WorkForce 40 | Start Here - Page 2
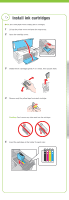
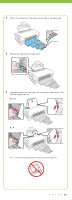
the printer cover and open the output tray. 2 Open the cartridge cover. 3 Shake the ink cartridges gently 4 or 5 times, then unpack them. 4 Remove only the yellow tape from each cartridge. Caution: Don't remove any other seals from the cartridges. 5 Insert the cartridges in the holder for each color - Epson WorkForce 40 | Start Here - Page 3
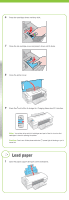
about 2.5 minutes. Note: Your printer ships with full cartridges and part of the ink from the first cartridges is used for priming the printer. Caution: Don't turn off the printer while the power light is flashing or you'll waste ink. 4 Load paper 1 Open the paper support and pull out the extensions - Epson WorkForce 40 | Start Here - Page 4
out the extensions on the output tray and flip up the paper stop. 3 Squeeze the edge guide and slide it left. 4 Load paper against the right edge, with the printable side face up. Then slide the edge guide over. 8½ x 11 4 x 6 Note: Don't load the paper sideways; always load it short edge first - Epson WorkForce 40 | Start Here - Page 5
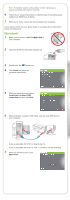
. 2 Insert the WorkForce 40 Series software CD. With Windows Vista, if you see the AutoPlay window, click Run EPSETUP.EXE. When you see the User Account Control screen, click Continue. 3 Click Install and follow the on-screen instructions. 4 When you see this screen, select Install driver for direct - Epson WorkForce 40 | Start Here - Page 6
computer. You're ready to print! See your Quick Guide or on-screen Epson Information Center for instructions. Macintosh® 1 Make sure the printer is NOT CONNECTED to your computer. 2 Insert the WorkForce 40 Series software CD. 3 Double-click the Epson icon. 4 Click Install and follow the on-screen - Epson WorkForce 40 | Start Here - Page 7
your WorkForce 40 Series. 11 When you're done, eject the CD. You're ready to print! See your Quick Guide or on-screen Epson Information Center for instructions. Solving problems The printer makes noise after ink cartridge installation. • The first time you install ink cartridges, the printer must - Epson WorkForce 40 | Start Here - Page 8
40 Series Ink Cartridges Color Standard Capacity High Capacity Extra High Capacity Black 69 68 97 Cyan 69 68 -- Magenta 69 68 -- Yellow 69 68 -- The 68 High Capacity color ink cartridges are available only online; visit www.epson.com/highcapacity (U.S. sales) or www.epson
-
 1
1 -
 2
2 -
 3
3 -
 4
4 -
 5
5 -
 6
6 -
 7
7 -
8
 |
 |

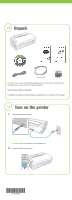
Caution:
Do not open ink cartridge packages until you are ready to install the ink.
Cartridges are vacuum packed to maintain reliability.
Remove all protective materials.
If anything is missing, contact Epson as described on the back of this sheet.
Unpack
1
Start Here
Please read these instructions before using the printer.
1
Connect the power cable.
Caution:
Do not connect to your computer yet.
2
Press the
power button.
Turn on the printer
2
Ethernet cable