Fisher and Paykel GWL11 User Guide
Fisher and Paykel GWL11 Manual
 |
View all Fisher and Paykel GWL11 manuals
Add to My Manuals
Save this manual to your list of manuals |
Fisher and Paykel GWL11 manual content summary:
- Fisher and Paykel GWL11 | User Guide - Page 1
GWL11 Clothes Washer Installation instructions and User guide EN Lave-linge Instructions d'installation et mode d'emploi FR New Zealand Australia USA Canada Europe Asia Pacific - Fisher and Paykel GWL11 | User Guide - Page 2
Read and follow the IMPORTANT SAFETY INSTRUCTIONS outlined in this User Guide before operating this appliance, pages 11-13. Failure to do so can result in death, electric shock, fire or injury to persons. Please Note: To obtain maximum efficiency, your Ecosmart washer has the ability to learn and - Fisher and Paykel GWL11 | User Guide - Page 3
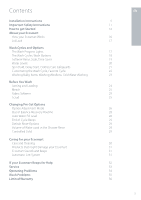
of Water used in the Shower Rinse 29 Controlled Cold 29 Caring for your Ecosmart Care and Cleaning 30 Products that might Damage your Ecosmart 31 Ecosmart Sounds and Beeps 31 Automatic Lint System 31 If your Ecosmart Beeps for Help 32 Service 33 Operating Problems 34 Wash Problems - Fisher and Paykel GWL11 | User Guide - Page 4
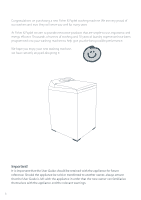
on purchasing a new Fisher & Paykel washing machine. We are very proud of our washers and trust they will serve you well for many years. At Fisher & Paykel we aim to provide innovative products that are simple to use, ergonomic and energy efficient. Thousands of tonnes of washing and 70 years of - Fisher and Paykel GWL11 | User Guide - Page 5
Your cold water should not exceed 95˚F (35˚C) or your hot water exceed 150˚F (65˚C). Temperatures above this may damage your washer. Shut Off Valves Both hot and cold shut-off valves (faucets) should be available in the laundry area. Drain Water may be drained into a standpipe or set tub. The - Fisher and Paykel GWL11 | User Guide - Page 6
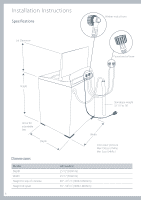
Installation Instructions Specifications Lid Clearance Washer end of hose Faucet end of hose Height Standpipe Height 33 1/2" to 78" Allow for adjustable feet Depth Dimensions Model Depth Width Height to top of console Height lid open 6 Width Inlet water pressure Max 150 psi (1MPa) Min 5 psi ( - Fisher and Paykel GWL11 | User Guide - Page 7
inserts for the leveling feet 1 drain hose guide Basket packer Step 3 Drain Hose 1. Carefully pull the drain hose out from the back of the washer by pulling the exposed part of the hose downwards and then out. 2. The hose guide is used to guide the drain hose over the tub or standpipe. It MUST be - Fisher and Paykel GWL11 | User Guide - Page 8
onto washing machine (inlet valves are marked on the back of the machine H=hot, C=cold) Note: If there is a cold water supply only, an inlet valve cap (available from Fisher & Paykel) MUST be connected to the hot valve. The cap prevents water leaking from the hot valve. Step 5 Leveling the Washer - Fisher and Paykel GWL11 | User Guide - Page 9
and proper operation in spin. Check that the lid locks during spin. 2. Turn hot and cold water faucets off when washer is not in use. Special Instructions 1. The washer may give warning signals when low water pressure, or drain problems are encountered. See 'If your Ecosmart beeps for help' (page 32 - Fisher and Paykel GWL11 | User Guide - Page 10
washer and adjacent walls or other surfaces is: 1" (25mm) minimum either side and front 3" (75mm) minimum rear Consideration must be given to providing adequate clearance for installation and servicing Grounding Instructions This appliance codes Specification subject to change without notice. 10 - Fisher and Paykel GWL11 | User Guide - Page 11
Important Safety Instructions EN Read all safety information before using Many washers are located near a gas dryer or a water heater in the home. WARNING Fire Hazard For your safety the information in this manual must be followed to minimize the risk of fire or explosion or to prevent property - Fisher and Paykel GWL11 | User Guide - Page 12
the Installation Instructions. Turn off water faucets when the washer is not in use to relieve pressure on hoses and valves and to minimize leakages if a hose or valve should break or rupture. Do not repair or replace any part of the appliance or attempt any servicing unless specifically recommended - Fisher and Paykel GWL11 | User Guide - Page 13
supply or disconnect the washer at the household distribution panel by removing the fuse or switching off the circuit breaker before attempting any maintenance or cleaning. Note: Pressing the POWER button does NOT disconnect the appliance from the power supply, even though the lights are out. Do not - Fisher and Paykel GWL11 | User Guide - Page 14
Remove the fabric softener dispenser. Place load evenly around the agitator. A. Detergent Follow the instructions on the detergent package. Use the mark on the agitator, nearest to the top of the clothes, as a guide pour carefully down the inner surface of the agitator stem, in-line with the fins. ( - Fisher and Paykel GWL11 | User Guide - Page 15
it in the dispenser on the top of the agitator. Select the Softener Rinse option so that the softener will be dispensed correctly into the final rinse. (Refer to fabric softener page 19 and 25). D. Power Turn your Ecosmart on by pressing the POWER button. E. Wash Cycle Close the lid and press - Fisher and Paykel GWL11 | User Guide - Page 16
About Your Ecosmart How Ecosmart Works The Fisher & Paykel Ecosmart's '2 in 1' wash system gives you the best of both worlds. Using a combination of front loader and top loader wash systems, the Ecosmart gives exceptional wash results while using up to 50% less hot water*, and, at the same time, - Fisher and Paykel GWL11 | User Guide - Page 17
from the machine during the fill and agitate stage of the cycle, especially when using hot water, as the lid can be opened and the machine will not stop. If the lid is left open, the machine will be unable to lock and the cycle will be halted. The machine will beep and the lid lock light will flash - Fisher and Paykel GWL11 | User Guide - Page 18
following diagrams: ( ) = light is on ( ) = light is off To select Wash Options 1. Select wash cycle. 2. Use the up or down arrows, or the options button, to select the wash options you want to use. 3. Press START/PAUSE. 18 Note: Two lights are used to show warm/hot and warm/cold wash temperatures - Fisher and Paykel GWL11 | User Guide - Page 19
before completing the rinse and spin. During soak your washer will agitate for a few seconds every minute. Time Saver TIME SAVER allows you to shorten the wash cycle for lightly soiled clothes. Selecting this option reduces the wash and spin times. Time Saver can be turned on or off at any time - Fisher and Paykel GWL11 | User Guide - Page 20
Options Water Levels Auto Water Level Your Ecosmart can automatically select the appropriate water level for the load. 1. Place your clothes in the machine, and press Power. 2. Select wash cycle (select Auto water level if not automatically selected) 3. Press START/PAUSE During fill the machine will - Fisher and Paykel GWL11 | User Guide - Page 21
the wash goes into spin. Minimize wrinkling that is caused when clothes are left sitting in the machine at the end of the cycle. When SPIN HOLD is selected, your Ecosmart will pause at the end of rinse, beep and the spin light will flash to tell you that it is waiting for another instruction. Press - Fisher and Paykel GWL11 | User Guide - Page 22
two quick beeps and the Favorite light flashes. 3. Select your favorite cycle (eg Regular or Delicate). 4. Select the wash options (eg soak, time saver). Use Advance if you want part of a cycle (eg spin only). 5. Press FAVORITE again to store your favorite cycle. Note: Your Ecosmart will remember - Fisher and Paykel GWL11 | User Guide - Page 23
Ecosmart. To dry woollens lay them flat on a towel and pat into shape. Dry out of direct sunlight. Some wool underlays and sheepskin products can be washed in a washing machine but may produce excessive amounts of lint that may cause pump blockages. Cold Water Washing If you always use cold water - Fisher and Paykel GWL11 | User Guide - Page 24
or Loose Buttons Tears or holes may become larger during washing. Remove any loose bra wires as they can damage your washing machine and/or dryer. Pretreat any Stains Make sure the Water Level suits the Load Size Ensure that the load does not extend above the fabric softener dispenser as splashing - Fisher and Paykel GWL11 | User Guide - Page 25
washer. If you wish to use fabric softener we recommend: Using fabric softener sparingly. When filling the dispenser, do not splash or overfill. Clean the dispenser as soon as the cycle is finished, (refer page 30). Clean your machine regularly (refer page 30). Cold water washing increases - Fisher and Paykel GWL11 | User Guide - Page 26
START / PAUSE and hold down, then press POWER. 2. You will hear three quick beeps and the machine will show an unusual pattern of lights. In this mode the lights are used to indicate the different options available. The diagram on page 27 shows how the lights relate to the options you can change - Fisher and Paykel GWL11 | User Guide - Page 27
down. Press POWER. 2. The diagram below shows how the lights relate to the options you can change. It also shows which lights will be on when you first enter the Option Adjustment Mode. Controlled Cold 15 5 None More More Standard 2 Deep Spra y & Deep Less Water More Water Aut omatic W ater - Fisher and Paykel GWL11 | User Guide - Page 28
to automatically correct the out of balance load. It will fill with water and agitate to redistribute the load before trying to spin up again. Machine Stops Option: Your Ecosmart will stop, giving a short burst of beeps every five seconds and the RINSE or SPIN light will flash. You must redistribute - Fisher and Paykel GWL11 | User Guide - Page 29
to be used in the shower rinse. 3. Press POWER to store your selection. Shower Rinse Volume Light on HIGH = more water MED = more water LOW = FACTORY SETTING Controlled Cold Ecosmart is designed for installations that have both hot and cold water. To ensure optimum performance even in very - Fisher and Paykel GWL11 | User Guide - Page 30
quick beeps and the Favorite light flashes. 3. Select the Permanent Press cycle. Push cup through dispenser with thumb 4. Select a hot wash. 5. Press Favorite again to store the selection. 6. The Ecosmart will then fill with hot water and do a hot wash. It's a good idea to clean the machine 30 - Fisher and Paykel GWL11 | User Guide - Page 31
hear the pump of your machine turn on and off quickly about every 10 seconds. This is part of your Ecosmart's automatic lint removal system. While draining your machine may give several low thuds. Your machine is checking that the water has drained before spinning. Your Ecosmart will beep at the - Fisher and Paykel GWL11 | User Guide - Page 32
telling you what is wrong. If Your Ecosmart Beeps For Help Musical series of beeps* every 5 seconds and... * The beeps are the same sound your washer makes when you plug your machine in. HOT water temperature light is flashing. Hot faucet has not been turned on. Inlet hose screens may be blocked - Fisher and Paykel GWL11 | User Guide - Page 33
If your Ecosmart Beeps For Help EN First RINSE or SPIN light is flashing as well as the SPIN SPEED light. Wash load is out of balance. Ensure the machine is stationary. Manually redistribute the load. Check machine is level. (Refer to Installation Instructions pages 8 - 9). Lid Lock light is - Fisher and Paykel GWL11 | User Guide - Page 34
does not start the fill. Are both hot and cold faucets turned on? Are the inlet hose screens blocked? Is Delay Start on? FILLING continuously. Check that the machine is not siphoning. Check the black hose guide is installed. NOT SPINNING properly. Is the load out of balance? (refer pages 23 and - Fisher and Paykel GWL11 | User Guide - Page 35
slower spin speed. Do not leave wet clothes to sit in the washer or laundry basket. POOR SOIL REMOVAL. Not enough detergent for load size or amount of soil. White clothes are better washed separately. Separate light and heavily soiled items, as clothes can pick up soil from dirty wash water. Select - Fisher and Paykel GWL11 | User Guide - Page 36
, boat or mobile facility containing the Product to the service shop at your expense or pay the service technician's travel to the location of the Product. Fisher & Paykel undertakes to: Repair without cost to the owner either for material or labor any part of the Product, the serial number of which - Fisher and Paykel GWL11 | User Guide - Page 37
Please read your User Guide. If you then have any questions about operating the Product, need the name of your local Fisher & Paykel Authorized Service Agent, or believe the Product is defective and wish service under this Limited Warranty, please contact your dealer or call us at: TOLL FREE 1-888 - Fisher and Paykel GWL11 | User Guide - Page 38
between you and Fisher & Paykel regarding any defect in the Product. None of our employees (or our Authorized Service Agents) are please call us at the above number, or write to: Fisher & Paykel Appliances, Inc. 27 Hubble, Irvine, CA 92618 This Limited Warranty gives you specific legal rights, - Fisher and Paykel GWL11 | User Guide - Page 39
- Fisher and Paykel GWL11 | User Guide - Page 40
Entretien et nettoyage 59 Produits susceptibles d'endommager votre machine Ecosmart 60 Signaux et bips sonores du lave-linge Ecosmart 60 Système anti-peluche automatique 60 En cas de signal sonore d'appel à l'aide 61 Service à la clientèle 62 Problèmes de fonctionnement 63 Probl - Fisher and Paykel GWL11 | User Guide - Page 41
commencer, lisez ces instructions attentivement et dans .blessures.décès. FR Important! Respectez tous les codes et règlements en vigueur. Conditions d'installation préférable, mais une base en bois est suffisante tant que le support du sol est conforme aux normes nationales. Il est recommandé de - Fisher and Paykel GWL11 | User Guide - Page 42
Instructions d'installation Spécifications Espace de dégagement du couvercle Extrémité du tuyau du côté laveuse Extrémité du tuyau du côté robinet Hauteur Laisser de l'espace pour - Fisher and Paykel GWL11 | User Guide - Page 43
Instructions d'installation Étape 1 Enlever l'emballage du bas 1. Enlever l'emballage extérieur. 2. Basculez la machine vers l'arrière et faites-la pivoter sur un coin pour la dégager de l'emballage plastique du bas. Celui-ci peut alors être enlever. ATTENTION! Mettre la machine machine 1 guide de - Fisher and Paykel GWL11 | User Guide - Page 44
extrémités en coude sur la laveuse (les valves d'arrivée sont indiquées au dos de la machine H=chaud, C=froid). Note: S'il n'y a qu'un robinet d'eau froide, un bouchon de valve d'arrivée (disponible auprès de Fisher & Paykel) DOIT être fixé à la valve d'arrivée d'eau chaude. Le bouchon empêche les - Fisher and Paykel GWL11 | User Guide - Page 45
Instructions d'installation 8. Fermez le couvercle. Vérifiez de vue que le couvercle et le haut de la machine s'alignent. Si le couvercle et le haut de la machine ne sont pas alignés comme l'indique toute aide supplémentaire concernant cet appareil, référez-vous au paragraphe Service, page 62. 45 - Fisher and Paykel GWL11 | User Guide - Page 46
ères, cabinets etc. situés au-dessus de la machine, est de 15cm (59"). Le placard doit être DE SÉCURITÉ DES MAISONS MOBILES DE 1974 (PL93-383). Instructions de mise à la terre Cet appareil doit être branché et mise à la terre conformément aux codes et règlements locaux. DANGER! Le branchement - Fisher and Paykel GWL11 | User Guide - Page 47
les personnes de la pièce, du bâtiment. Prendre immédiatement contact avec la compagnie de gaz en utilisant le téléphone d'un voisin. Suivre les instructions de la compagnie de gaz. Si vous ne pouvez pas contacter la compagnie de gaz, appeler les pompiers. Sécurité - chauffe-eau Il est possible dans - Fisher and Paykel GWL11 | User Guide - Page 48
la terre conformément à tous les codes et réglementations. Suivre les conseils donnés dans les instructions d'utilisation. Ne pas installer ou utilisé pour limiter la pression sur les tuyaux et valves et minimiser les fuites dans le cas où une valve ou un tuyau viendrait à casser ou rompre. Ne - Fisher and Paykel GWL11 | User Guide - Page 49
la touche MARCHE/PAUSE et attendre que la machine soit complètement arrêtée avant de soulever le au rebut un lave-linge ou de le mettre hors service, retirer le couvercle du lave-linge. Ne pas laisser Pour éviter un tel résultat, les instructions de nettoyage du fabriquant du vêtement devront ê - Fisher and Paykel GWL11 | User Guide - Page 50
de manière égale la charge autour de l'agitateur. A. Detergent Suivre les instructions sur la charge de lessive. Utiliser le repère sur l'agitateur, se rapprochant le plus du haut du niveau de la charge, comme guide pour déterminer et verser la quantité de détergent à utiliser. Verser le détergent - Fisher and Paykel GWL11 | User Guide - Page 51
). FR G F G. Mise en marche Appuyer sur la touche MARCHE/PAUSE pour mettre en marche la machine. Si vous voulez arrêter votre lave-linge Ecosmart Appuyer sur la touche MARCHE/PAUSE. Attendre que la machine soit complètement arrêtée et que le témoin de sécurité du couvercle soit éteint avant d'ouvrir - Fisher and Paykel GWL11 | User Guide - Page 52
Votre lave-linge Ecosmart est équipé à l'écart du lave-linge pendant la phase de remplissage et d'agitation du cycle, notamment lorsque vous utilisez de l'eau chaude, car linge ne pourra pas se verrouiller et le cycle sera arrêté. La machine émettra un bip sonore et le témoin de sécurité du couvercle - Fisher and Paykel GWL11 | User Guide - Page 53
de lavage Sales Lavage Eco Actif 4 min Durée d'agitation 12 min Mouvement de lavage Fort Temp de lavage Tiè cialement adapté aux articles de laine normalement sales et aux vêtements de laine lavables en machine. Cycle de lavage plus traditionnel pour les synthétiques, les mélanges et/ou les - Fisher and Paykel GWL11 | User Guide - Page 54
correctement et à ce que le carter de la machine soit complètement nettoyé de toute eau de vous sélectionnez l'option TREMPER, votre lave-linge Ecosmart s'arrêtera à la fin du lavage et tremper, votre lave-linge déclenchera un mouvement d'agitation de quelques secondes toutes les minutes. Gain de - Fisher and Paykel GWL11 | User Guide - Page 55
manuellement le niveau d'eau s'il y a déjà de l'eau dans la machine. Lors du lavage d'une charge volumineuse ou d'un seul article volumineux é au niveau d'eau. Votre lave-linge Ecosmart pourra de temps à autre rajouter de l'eau pendant la phase d'agitation afin de maintenir le niveau d'eau à cause - Fisher and Paykel GWL11 | User Guide - Page 56
machine à la fin du cycle. Lorsque l'option EN ATTENTE est sélectionnée, votre lavelinge Ecosmart fera une pause à la fin du rinçage, émettra un bip sonore et le témoin d'essorage clignotera pour vous indiquer qu'il attend d'autres instructions sur Départ différé, votre lavelinge Ecosmart commence la - Fisher and Paykel GWL11 | User Guide - Page 57
vêtements. Réparer tout vêtement déchirés et recoudre les boutons lâches Les trous et les déchirures pourront s'agrandir pendant le lavage. Retirer tous les supports lâches dans les soutiens-gorge car ils risquent d'endommager votre lave-linge et/ou le sèche-linge. Détacher au préalable toute tache - Fisher and Paykel GWL11 | User Guide - Page 58
à adoucissant située en haut de l'agitateur. La ligne tracée sur le dispensateur à adoucissant sert de guide pour déterminer la quantité d'adoucissant à ajouter à une machine pleine. Les charges plus petites nécessiteront moins d'adoucissant. Rinçage avec adoucissant Si vous voulez utiliser de - Fisher and Paykel GWL11 | User Guide - Page 59
en poussant à la base de la coupelle. Nettoyer l'intérieur du lave-linge Ecosmart Vous pouvez programmer un cycle de lavage à l'eau chaude à votre cycle de lavage préféré pour nettoyer complètement votre machine. 1. Appuyer sur la touche PUISSANCE. 2. Appuyer et maintenir enfoncée la touche du - Fisher and Paykel GWL11 | User Guide - Page 60
secondes environ. Cela fait partie du système de retrait automatique des peluches du lave-linge Ecosmart. Pendant l'évacuation de l'eau votre machine émettra plusieurs courts bruits sourds. Votre machine vérifie tout simplement que l'eau a été évacuée avant de procéder à l'essorage. Votre lave-linge - Fisher and Paykel GWL11 | User Guide - Page 61
service d'entretien. Vous pouvez remédier à un grand nombre de problèmes par vous-même en suivant les instructions décrites dans les pages suivantes. Votre machine d'eau ELEVÉ clignote. La machine est surchargée et ne peut pas être agitée. Vérifier que la machine ne bouge pas. Retirer des articles - Fisher and Paykel GWL11 | User Guide - Page 62
le numéro de série de votre laveuse situé au coin arrière gauche de la machine). Service à la clientèle Pour contacter votre plus proche agent agréé de service à la clientèle Fisher & Paykel, appelez LE NUMERO GRATUIT 888 9FNP USA (888 936 7872), depuis le Canada également, ou contacteznous - Fisher and Paykel GWL11 | User Guide - Page 63
PART DIFFÉRÉ n'a pas été enclenchée. REMPLISSAGE en continu Vérifier que la machine ne siphonne pas. Vérifier que le guide Ecosmart compense en réduisant la vitesse d'essorage. La machine est en permanence DÉSÉQUILIBRÉE Vérifier l'équilibrage de la machine contactez votre service d'entretien le - Fisher and Paykel GWL11 | User Guide - Page 64
FROISSÉ Machine ou sèche-linge trop chargé. Sélectionner un cycle Fragiles ou Synthétiques dans la mesure où ces cycles ont été conçus pour limiter ératures ambiantes froides, les lavages à l'eau froide et les temps d'agitation réduits ne permettent pas au détergent de se dissoudre complètement. - Fisher and Paykel GWL11 | User Guide - Page 65
propriétaire successeur du Produit pour les Produits achetés pour toute utilisation ménagère par une seule famille. Le service en vertu de cette Garantie limitée devra être assuré par Fisher & Paykel ou par son agent agréé pendant les heures normales de bureau. Durée de cette Garantie limitée Notre - Fisher and Paykel GWL11 | User Guide - Page 66
Garantie limitee Cette garantie ne couvre pas les points suivants : A Les déplacements d'un technicien de maintenance jusqu'à votre domicile pour tout problème non lié à un défaut dans le Produit. Les frais du déplacement vous seront facturés si le problème s'avère ne pas être un défaut du Produit. - Fisher and Paykel GWL11 | User Guide - Page 67
vous rembourser intégralement le prix d'achat du Produit (frais d'installation et autres frais étant exclus). Le service en vertu de cette Garantie limitée devra être assuré par Fisher & Paykel ou par son agent agréé pendant les heures normales de bureau. Aucune autre garantie Cette Garantie limit - Fisher and Paykel GWL11 | User Guide - Page 68
Fisher & Paykel 2004. The product specifications in this booklet apply to the specific products and models described at the date of issue. Under our policy of continuous product improvement, these specifications donc vérifier auprès de votre centre de service à la clientèle que ce livret décrit
-
 1
1 -
 2
2 -
 3
3 -
 4
4 -
 5
5 -
 6
6 -
 7
7 -
8
-
9
-
10
-
11
-
12
-
13
-
14
-
15
-
16
-
17
-
18
-
19
-
20
-
21
-
22
-
23
-
24
-
25
-
26
-
27
-
28
-
29
-
30
-
31
-
32
-
33
-
34
-
35
-
36
-
37
-
38
-
39
-
40
-
41
-
42
-
43
-
44
-
45
-
46
-
47
-
48
-
49
-
50
-
51
-
52
-
53
-
54
-
55
-
56
-
57
-
58
-
59
-
60
-
61
-
62
-
63
-
64
-
65
-
66
-
67
-
68
 |
 |

New Zealand
Australia
USA
Canada
Europe
Asia
Pacific
GWL11
Installation instructions and
User guide
EN
Clothes Washer
Instructions d’installation
et mode d’emploi
FR
Lave-linge