Fluke 66 FE 63-66-68 Users Manual - Page 22
Setting the High Alarm, Low Alarm, and Emissivity (66/68)
 |
View all Fluke 66 manuals
Add to My Manuals
Save this manual to your list of manuals |
Page 22 highlights
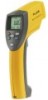
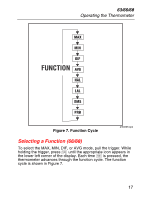
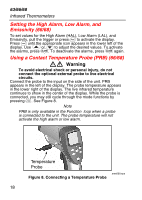
63/66/68 Infrared Thermometers Setting the High Alarm, Low Alarm, and Emissivity (66/68) To set values for the High Alarm (HAL), Low Alarm (LAL), and Emissivity, pull the trigger or press to activate the display. Press until the appropriate icon appears in the lower left of the display. Use or to adjust the desired values. To activate the alarms, press . To deactivate the alarms, press again. Using a Contact Temperature Probe (PRB) (66/68) XW Warning To avoid electrical shock or personal injury, do not connect the optional external probe to live electrical circuits. Connect the probe to the input on the side of the unit. PRB appears in the left of the display. The probe temperature appears in the lower right of the display. The live infrared temperature continues to show in the center of the display. While the probe is connected, you may still cycle through the mode functions by pressing . See Figure 8. Note PRB is only available in the Function loop when a probe is connected to the unit. The probe temperature will not activate the high alarm or low alarm. Temperature Probe Figure 8. Connecting a Temperature Probe ame009.eps 18
-
 1
1 -
2
-
3
-
4
-
5
-
6
-
7
-
8
-
9
-
10
-
11
-
12
-
13
-
14
-
15
-
16
-
 17
17 -
 18
18 -
 19
19 -
 20
20 -
 21
21 -
 22
22 -
 23
23 -
 24
24 -
 25
25 -
 26
26 -
 27
27 -
28
 |
 |