Fluke 8808A User Manual - Page 32
Turning Power On, Adjusting the Bail, Installing the Meter into an Equipment Rack
 |
View all Fluke 8808A manuals
Add to My Manuals
Save this manual to your list of manuals |
Page 32 highlights
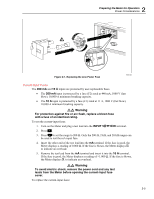
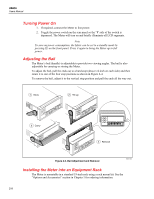
8808A Users Manual Turning Power On 1. If required, connect the Meter to line power. 2. Toggle the power switch on the rear panel so the "I" side of the switch is depressed. The Meter will turn on and briefly illuminate all LCD segments. Note To save on power consumption, the Meter can be set to a standby mode by pressing P on the front panel. Press it again to bring the Meter up to full power. Adjusting the Bail The Meter's bail (handle) is adjustable to provide two viewing angles. The bail is also adjustable for carrying or storing the Meter. To adjust the bail, pull the ends out to a hard stop (about 1/4-inch on each side) and then rotate it to one of the four stop positions as shown in Figure 2-4. To remove the bail, adjust it to the vertical stop position and pull the ends all the way out. 1 Store 2 Tilt up 3 Carry 4 Remove Figure 2-4. Bail Adjustment and Removal eue21.eps Installing the Meter into an Equipment Rack The Meter is mountable in a standard 19-inch rack using a rack mount kit. See the "Options and Accessories" section in Chapter 1 for ordering information. 2-8
-
 1
1 -
2
-
3
-
4
-
5
-
6
-
7
-
8
-
9
-
10
-
11
-
12
-
13
-
14
-
15
-
16
-
17
-
18
-
19
-
20
-
21
-
22
-
23
-
24
-
25
-
26
-
 27
27 -
 28
28 -
 29
29 -
 30
30 -
 31
31 -
 32
32 -
 33
33 -
 34
34 -
 35
35 -
 36
36 -
 37
37 -
38
-
39
-
40
-
41
-
42
-
43
-
44
-
45
-
46
-
47
-
48
-
49
-
50
-
51
-
52
-
53
-
54
-
55
-
56
-
57
-
58
-
59
-
60
-
61
-
62
-
63
-
64
-
65
-
66
-
67
-
68
-
69
-
70
-
71
-
72
-
73
-
74
-
75
-
76
-
77
-
78
-
79
-
80
-
81
-
82
-
83
-
84
-
85
-
86
-
87
-
88
-
89
-
90
-
91
-
92
-
93
-
94
-
95
-
96
-
97
-
98
-
99
-
100
 |
 |
