Foxconn A9DA-S English Manual. - Page 93
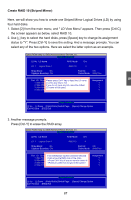
Press any key to use the maximum capacity., size of the three hard drives.
 |
View all Foxconn A9DA-S manuals
Add to My Manuals
Save this manual to your list of manuals |
Page 93 highlights
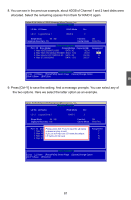
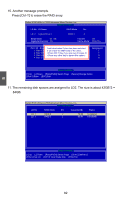
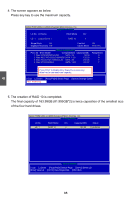
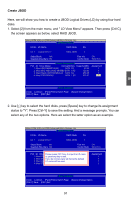
5 4. The screen appears as below. Press any key to use the maximum capacity. Option ROM Utility (c) 2008 Advanced Micro Devices, Inc. [ Define LD Menu ] LD No LD Name RAID Mode Drv LD 1 Logical Drive 1 RAID 5 3 Stripe Block: NA Gigabyte Boundary: ON Fast Init: ON Cache Mode: WriteThru [ Drives Assignment ] Port :ID Drive Model Compatibilities Capacity(GB) Assignment 1 :Mas HDS728090PLA380 SATA 3G 82.34 N 2 :Mas WDC WD1200JD-98HBB0 SATA 1.5G 120.03 N 3 :Mas Hitachi HDT725025VLA3 SATA 3G 250.05 Y 4 :Mas ST3320620AS SATA 1.5G 320.07 Y Press Ctrl-Y to Modify Array Capacity or press any other key to use maximum capacity... [↑] Up [↓] Down [PaUp/PaDn] Switch Page [Space] Change Option Fast Initializing... 5. The creation of RAID 5 is completed. The final capacity of 239.99GB (119.995GB*2) is twice capacities of the smallest size of the three hard drives. Option ROM Utility (c) 2008 Advanced Micro Devices, Inc. [ DLDefiVniewLDMMeneunu] ] LD No RAID Mode Drv Capacity(GB) LLDD 11 RRAAIIDD 50 3 2 224399.9.999 Status FFuunnccttiioonnaall [ Keys Available ] [↑] Up [↓] Down [PaUp/PaDn] Switch Page [Ctrl+C] Define LD [Enter] View LD [Ctrl+V] View Single Disk [ESC] Exit 86
-
 1
1 -
2
-
3
-
4
-
5
-
6
-
7
-
8
-
9
-
10
-
11
-
12
-
13
-
14
-
15
-
16
-
17
-
18
-
19
-
20
-
21
-
22
-
23
-
24
-
25
-
26
-
27
-
28
-
29
-
30
-
31
-
32
-
33
-
34
-
35
-
36
-
37
-
38
-
39
-
40
-
41
-
42
-
43
-
44
-
45
-
46
-
47
-
48
-
49
-
50
-
51
-
52
-
53
-
54
-
55
-
56
-
57
-
58
-
59
-
60
-
61
-
62
-
63
-
64
-
65
-
66
-
67
-
68
-
69
-
70
-
71
-
72
-
73
-
74
-
75
-
76
-
77
-
78
-
79
-
80
-
81
-
82
-
83
-
84
-
85
-
86
-
87
-
 88
88 -
 89
89 -
 90
90 -
 91
91 -
 92
92 -
 93
93 -
 94
94 -
 95
95 -
 96
96 -
 97
97 -
 98
98 -
99
-
100
-
101
-
102
-
103
-
104
-
105
-
106
-
107
-
108
-
109
-
110
-
111
-
112
-
113
-
114
-
115
 |
 |
