Foxconn H77M User manual - Page 96
Reset Disks to Non-RAID, Example 1. Reset a RAID0 system.
 |
View all Foxconn H77M manuals
Add to My Manuals
Save this manual to your list of manuals |
Page 96 highlights
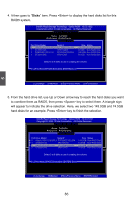
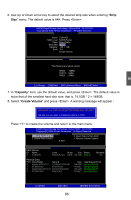
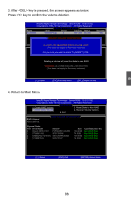
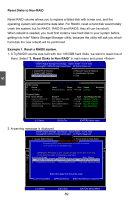
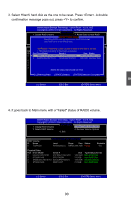
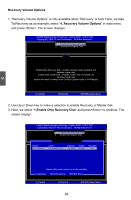
Reset Disks to Non-RAID Reset RAID volume allows you to replace a failed disk with a new one, and the operating system will rebuild the data later. For RAID0, reset a hard disk would totally crash the system, but for RAID1, RAID10 and RAID5, they all can be rebuilt. When rebuild is needed, you must first install a new hard disk in your system before getting into Intel® Matrix Storage Manager utility, because the utility will ask you which hard disk the new rebuild will be performed. Example 1. Reset a RAID0 system. 1. A TryRAID0 volume was built with two 149.0GB hard disks, we want to reset one of them. Select "3. Reset Disks to Non-RAID" in main menu and press . Intel(R) Rapid Storage Technology - Option ROM - 10.0.0.1032 Intel(CRIno) tpMeyla(rRitgr)ihxRt(SCatp)oir2da0gS0et3o-Mr1aa0gneIanTgteeelcrChonoportpiloongrayRt-iOoOnM.ptviAo5nl.l0RR.0iOg.1hM0ts1-1R1I0eC.s0He.9r0vR.e1d0w.3R2AID5 1. CreCaCtooeppRyyrrAiiggIDhhtt((VCCo))lu22m0000e33 --0094 IInntt[ee[MllMCCAAooINIrrNppMooMrrEaaENttiNiooUnUn.]A]4lAl. lRRl RiegcihgothsvtesRrReVseoeslruevmrevdee.dO. ptions 2.1D. CelreetaeteRRAIADIDVoVloulmume e 54. A. RcceecloevraetrioVnolOumpteionOsptions 32. .RDeeseletteDiRskAsIDtoVNoolunm-ReA ID 65. .EAxcitceleration Options 3. Reset Disks to Non-RAID 6. Exit [ DISK/V OLUM E INFO RMATION ] RAID Volume : [ DISK/VOL UME INFO RMATION ] NRoAnIeDDVeofliunmede. : ID Name Level Stripe Size Status Bootable P0hysicaTlrDyRevAiIcDe5s : RAID5(Parity) 64KB 149.1GB Normal Yes ID Device Model 0PhysSicTa3l 3D2is0k4s1:8AS 1Port SDT3ri1v6e0M81o5dAeSl 0 Hitachi HDS72161 Serial # 9VM8Y4D8 5SReXr4iaMl 0#4N PVF904Z21G2JZM Size Type/Status(Vol ID) 298.0GB Non-RAID Disk 149.0SGizBe NToynp-eR/ASItDatuDsis(Vkol ID) 149.0GB Member Disk(0) 1 ST380811AS 5PS1TAGW 74.5GB Member Disk(0) 2 SAMSUNG HD161HJ S0V3J9APA30524 149.0GB Member Disk(0) 3 ST380815AS 5RW1CA37 74.5GB Non-RAID Disk 5 S-Seelelecct t [E[ESSCC]-]E-Exxitit [E[ENNTTEERR]-]S-Seelelecct tMMeennuu 2. A warning message is displayed. Intel(RIn) tMela(Rtr)ixRSatpoirdagSetoMraagneaTgeecrhonpotilongyR-OOMptvio5n.0R.0O.1M01-11I0C.0H.90R.10w3R2AID5 CCooppyyrriigghhtt((CC)) 22000033--1004 IInntteell CCoorrppoorraattiioonn.AlAl lRl RigihgthstsRReseesrevrevde.d. [ MAIN MENU ] 1. Create RAID Volume 3. Reset Disks to Non-RAID 2. Delete RAID Volume [ RESET RAID DA5T. Ac]celeration Options 3. Reset DiskRsetsoeNttionng-RRAAIIDD d isk will remove its6.REAxIiDt structures and revert it to a non-RAID disk. [ DISK/ VOLUM E INF ORMATION ] WARNING: Resetting a disk causes all data on the disk to be lost. RAI D Volum(eT:his does not apply to R ecovery volume s) ID NPaomrt eD rive Model Level Serial # Stripe Size SSizteatuSstatus Bootable 0 0Tr yRAHIiDta0c hi HDS72161R6APILDA0(PSVtrFip9e0)4Z12218GK2BJZ2M98.1G14B9.0NGoBrmMMaeel mmbbeerr DDiisskkYes 2 SAMSUNG HD161HJ S0V3J9APA30524 149.0GB Member Disk 0 Hitachi HDS72161 PVF904Z21G2JZM 149.0GB Member Disk(0) 1 ST380811AS 5PS1TAGW 2 SAMSUNG HD161HJ S0V3J9APA30524 74.5GB Non-RAID Disk 149.0GB Member Disk(0) 3 ST380815AS 5RW1CA37 74.5GB Non-RAID Disk Select the disks that should be reset. [↑↓]-Previous/Next [SPACE]-Selects [ENTER]-Selection Complete [↑↓]-Select [ESC]-Exit 89 [ENTER]-Select Menu
-
 1
1 -
2
-
3
-
4
-
5
-
6
-
7
-
8
-
9
-
10
-
11
-
12
-
13
-
14
-
15
-
16
-
17
-
18
-
19
-
20
-
21
-
22
-
23
-
24
-
25
-
26
-
27
-
28
-
29
-
30
-
31
-
32
-
33
-
34
-
35
-
36
-
37
-
38
-
39
-
40
-
41
-
42
-
43
-
44
-
45
-
46
-
47
-
48
-
49
-
50
-
51
-
52
-
53
-
54
-
55
-
56
-
57
-
58
-
59
-
60
-
61
-
62
-
63
-
64
-
65
-
66
-
67
-
68
-
69
-
70
-
71
-
72
-
73
-
74
-
75
-
76
-
77
-
78
-
79
-
80
-
81
-
82
-
83
-
84
-
85
-
86
-
87
-
88
-
89
-
90
-
 91
91 -
 92
92 -
 93
93 -
 94
94 -
 95
95 -
 96
96 -
 97
97 -
 98
98 -
 99
99 -
 100
100 -
 101
101 -
102
-
103
-
104
-
105
-
106
 |
 |