Frigidaire FCGM201RFB User Manual - Page 4
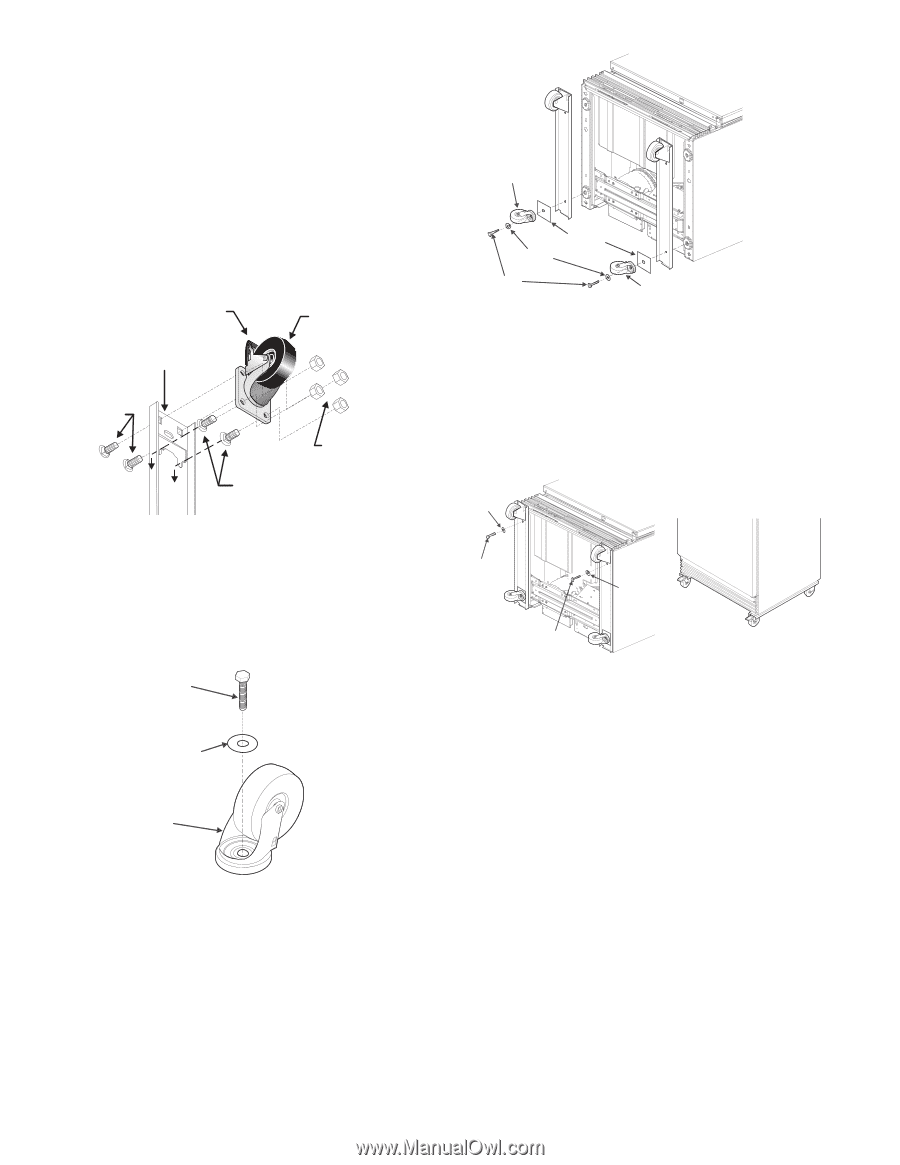
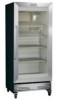
Front Fixed Caster Installation, Rear Swivel Caster Installation, Caster Rail Installation,
 |
UPC - 012505224522
View all Frigidaire FCGM201RFB manuals
Add to My Manuals
Save this manual to your list of manuals |
Page 4 highlights
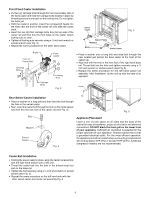
Front Fixed Caster Installation • Put two (2) carriage bolts through the rear (non-brake) side of the fixed caster and hold the carriage bolts loosely in place by threading several turns each on the locking nuts. Do not tighten the bolts yet. • Hold the caster in position, insert the carriage bolt heads into the slots near the front of the caster rail and slide the caster back. • Insert the two (2) front carriage bolts thru the top side of the caster rail and then thru the front holes on the caster. Attach locking nuts to each. • Tighten all locking nuts securely using a ½ inch end wrench or socket wrench (see Fig. 3). • Repeat the same procedure for the other fixed caster. Brake Front of Caster Rail Carriage Bolts Fixed Caster Locking Nuts Swivel Caster Fig. 5 Spacer Plates Washers Bolts Swivel Caster • Place a washer onto a long bolt and slide bolt through the hole located just behind the fixed caster at the front of the caster rail. • Align bolt with the hole in the front foot of the right hand base rail. Thread bolt into the hole and tighten securely using a ½ inch end wrench or socket wrench (see Fig. 6). • Repeat the same procedure for the left hand caster rail assembly. After installation, tip the unit up with the help of an assistant. Carriage Bolts Fig. 3 Washer Rear Swivel Caster Installation Bolt • Place a washer on a long bolt and then feed the bolt through the hole in the swivel caster. • Next, insert the caster bolt through the hole on the metal spacer and then thru the rear hole of the caster rail (see Fig. 4). Bolt Washer Fig. 6 Bolt Washer Swivel Caster Fig. 4 Appliance Placement Leave a one (1) inch space on all sides and the back of the cabinet for ease of installation, proper air circulation and electrical connections. DO NOT block the front grill on the lower front of your appliance. Sufficient air circulation is essential for the proper operation of your appliance. Choose a place that is near a grounded electrical outlet. For the most efficient operation, the appliance should be located where surrounding temperatures will not drop below 40ºF (5ºC) or exceed 110ºF (43ºC). Additional compressor heaters are not recommended. Caster Rail Installation • Holding the swivel caster in place, align the caster rail assembly with the right hand bottom side of the unit. • Thread the caster bolt into the hole in the bottom-most foot pad on the base rail. • Tighten the bolt securely using a ½ inch end wrench or socket wrench (see Fig. 5). • Repeat the same procedure on the left hand side with the other swivel caster and caster rail assembly.Fig. 6 4
-
 1
1 -
 2
2 -
 3
3 -
 4
4 -
 5
5 -
 6
6 -
 7
7 -
 8
8 -
 9
9 -
 10
10 -
11
 |
 |