Frigidaire FEF303CW Use and Care Manual - Page 5
Before Setting Oven Controls, Setting Clock & Minute Timer some models
 |
UPC - 012505526688
View all Frigidaire FEF303CW manuals
Add to My Manuals
Save this manual to your list of manuals |
Page 5 highlights
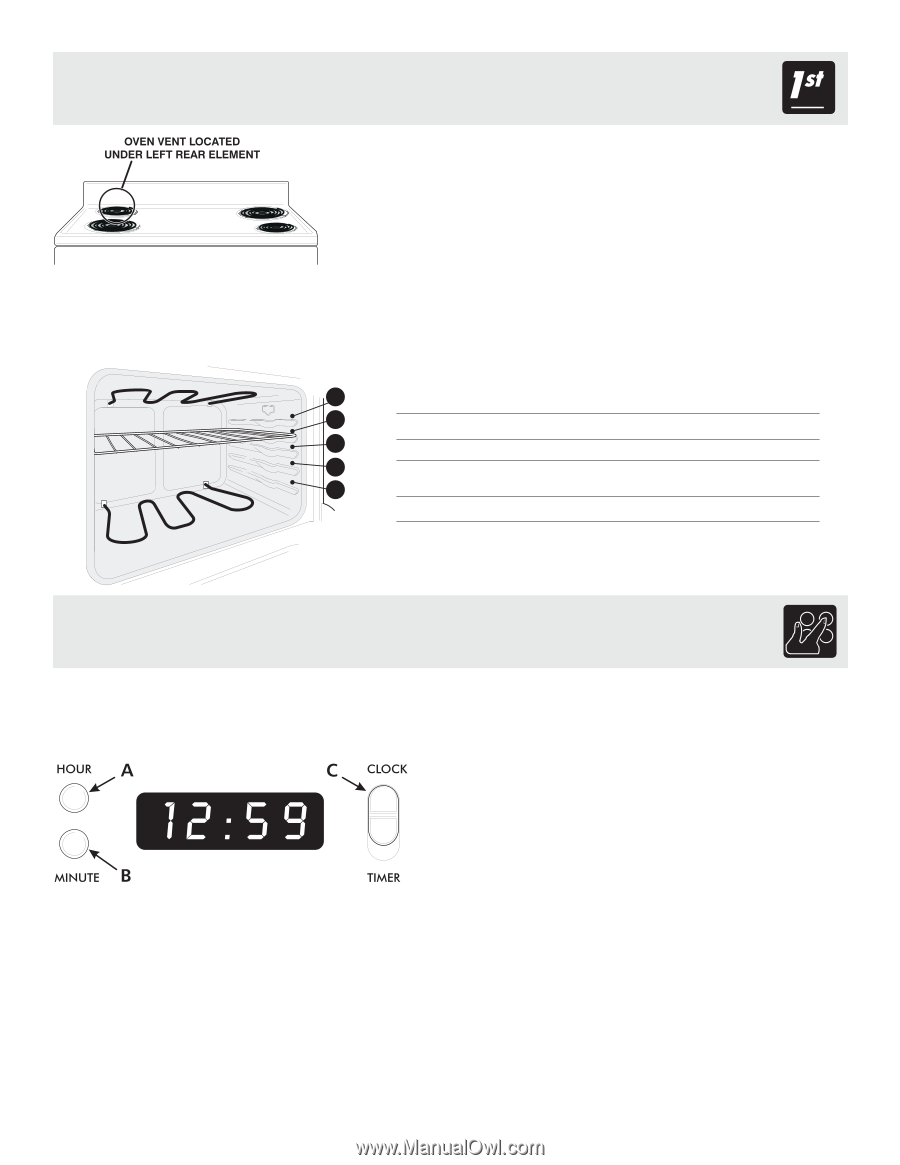
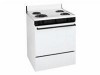
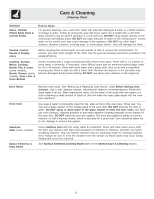
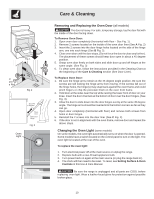
Before Setting Oven Controls Oven Vent Location For models equipped with coiled surface elements, the oven vent is located under the left rear surface element. When the oven is on, warm air flows through the left rear element. This venting is necessary for proper air circulation in the oven and good baking results. DO NOT BLOCK THE OVEN VENT. Arranging Oven Racks ALWAYS ARRANGE OVEN RACKS WHEN THE OVEN IS COOL (PRIOR TO OPERATING THE OVEN). Always use oven mitts when using the oven. Removing & Replacing Oven Racks To remove, pull the rack forward until it stops. Lift up front of rack and slide out. To replace, fit the rack onto the guides on the oven walls. Tilt the front of the rack upward and slide the rack back into place. Rack positions 5 4 3 2 1 RECOMMENDED RACK POSITIONS FOR BROILING, BAKING & ROASTING Food Rack Position Broiling meats, chicken or fish Cookies, cakes, pies, biscuits & muffins Frozen pies, angel food cake, yeast, bread, casseroles, small cuts of meat or poultry Turkey, roast or ham 4, 5 or 6 2 or 3 1 1 Setting Clock & Minute Timer (some models) Models with no Clock If your model has no Clock or Minute Timer, clock settings are not required to operate your range. Please proceed to Setting Surface & Oven Controls in this Use & Care Manual. To Set the 3 Button Clock (some models) When the range is first plugged in, or when the power supply to the range has been interrupted, "12:00" will flash in the display window. 1. Slide switch C (CLOCK/TIMER) to the CLOCK position. 2. Push in and hold button A (HOUR) until the correct hour appears in the display. (The numbers will only count forward.) Note: The 3 button clock graphics shown vary by model. 3. Push in and hold button B (MINUTE) until the correct To Set the 3 Button Minute Timer minutes appear in the display. 1. Slide switch C (CLOCK/TIMER) to the TIMER position, "0:59" (59 MINUTES) will appear in the display window. The timer can be set for any amount of time from 1 minute to 1 hour and 59 minutes. 2. • To set a time more than 59 minutes, push in and release button A (HOUR). The display will show the maximum 1 hour and 59 minutes. The time can now be adjusted down by pushing in and holding button B (MINUTE) until the correct time appears in the display window. • To set a time less than 59 minutes, push in and hold button B (MINUTE) until the correct minutes appear in the display. (The minute timer will automatically start when the button is released.) 3. When the set time has passed, the control will display "0:00" and beep continuously. Slide switch C (CLOCK/TIMER) to the CLOCK position to cancel the timer and return to the clock mode. 5
-
 1
1 -
 2
2 -
 3
3 -
 4
4 -
 5
5 -
 6
6 -
 7
7 -
 8
8 -
 9
9 -
 10
10 -
 11
11 -
12
 |
 |