Frigidaire FFHT1821TS Complete Owner s Guide - Page 6
Warning
 |
View all Frigidaire FFHT1821TS manuals
Add to My Manuals
Save this manual to your list of manuals |
Page 6 highlights
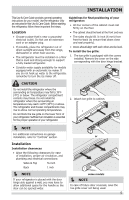
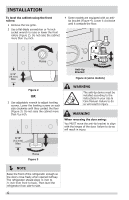
INSTALLATION To level the cabinet using the front rollers: 1 Remove the toe grille. 2 Use a flat-blade screwdriver or ⅜ inch socket wrench to raise or lower the front rollers (Figure 2). Do not raise the cabinet more than 9/16 inch. 4 Some models are equipped with an antitip bracket (Figure 4). Lower it clockwise until it contacts the floor. 9/16" (14 mm) Max Raise Anti-tip Bracket Lower Figure 4 (some models) Figure 2 OR 3 Use adjustable wrench to adjust leveling screws. Lower the leveling screws on each side clockwise until they contact the floor (Figure 3). Do not raise the cabinet more than 9/16 inch. WARNING The anti-tip device must be installed according to the instructions in your Use & Care Manual. Failure to do so will result in injury. WARNING When reversing the door swing: You MUST move the anti-tip bracket to align with the hinges of the door. Failure to do so will result in injury. 9/16" (14 mm) Max Raise Figure 3 NOTE Raise the front of the refrigerator enough so the doors close freely when opened halfway. The refrigerator should slope ¼ inch to ½ inch from front-to-back. Then level the refrigerator from side-to-side. 6
-
 1
1 -
 2
2 -
 3
3 -
 4
4 -
 5
5 -
 6
6 -
 7
7 -
 8
8 -
 9
9 -
 10
10 -
 11
11 -
 12
12 -
13
-
14
-
15
-
16
-
17
-
18
-
19
-
20
-
21
-
22
-
23
-
24
 |
 |
