Frigidaire FGF368GM Complete Owner's Guide (English) - Page 6
Baking Layer Cakes with 1 or 2 Oven Racks - lowes
 |
UPC - 012505544958
View all Frigidaire FGF368GM manuals
Add to My Manuals
Save this manual to your list of manuals |
Page 6 highlights
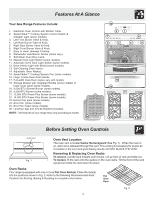
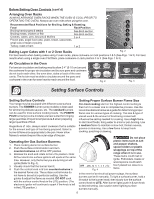
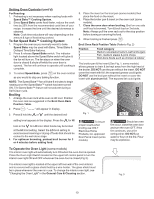
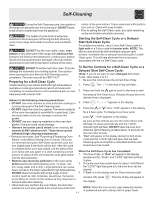
Before Setting Oven Controls (cont'd) Arranging Oven Racks ALWAYS ARRANGE OVEN RACKS WHEN THE OVEN IS COOL (PRIOR TO OPERATING THE OVEN). Always use oven mitts when using the oven. 6 Recommended Rack Positions for Broiling, Baking & Roasting: Food Rack Position 5 Broiling hamburgers & steaks See Broil section 4 Broiling meats, chicken or fish See Broil section 3 Cookies, cakes, pies, biscuits & Muffins 3 or 4 Frozen pies, angel food cake, yeast, bread, casseroles, 2 small cuts of meat or poultry Turkey, roast or ham 1 or 2 1 Baking Layer Cakes with 1 or 2 Oven Racks Fig. 2 For best results when baking cakes using 2 oven racks, place cookware on rack positions 2 & 5 (See Figs. 1 & 2). For best results when using a single oven Flat Rack, place cookware on rack position 3 or 4 (See Figs. 1 & 3). Air Circulation in the Oven For best air circulation and baking results allow 2-4" (5-10 cm) around the cookware for proper air circulation and be sure pans and cookware do not touch each other, the oven door, sides or back of the oven cavity. The hot air must be able to circulate around the pans and cookware in the oven for even heat to reach around the food. Fig. 2 Fig. 3 Setting Surface Controls Setting Surface Controls Your range may be equipped with different sized surface burners. The SIMMER burner (some models) is best used for simmering delicate sauces, etc. The standard burners can be used for most surface cooking needs. The POWER PLUS burner(s) (some models) are best suited for bringing large quantities of liquid to temperature & when preparing larger quantities of food. Regardless of size, always select cookware that is suitable for the amount and type of food being prepared. Select a burner & flame size appropriate to the pan. Never allow flames to extend beyond the outer edge of the pan. Operating the Gas Surface Burners: 1. Place cooking utensil on surface burner. 2. Push the surface control knob in and turn counterclockwise out of the OFF position. 3. Release the knob and rotate to the LITE position. Note: All four electronic surface ignitors will spark at the same time. However, only the burner you are turning on will ignite (Refer to Fig. 4). 3. Visually check that the burner has lit. 4. Push the control knob in & turn counterclockwise to the desired flame size. The surface control knobs do not have to be set at a particular setting. Use the guides & adjust the flame as needed. DO NOT cook with the surface control knob in the LITE position. (The electronic ignitor will continue to spark if the knob is left in the LITE position.) Setting Proper Surface Burner Flame Size For most cooking start on the highest control setting & then turn to a lower one to complete the process. Use the recommendations below as a guide for determining proper flame size for various types of cooking. The size & type of utensil used & the amount of food being cooked will influence the setting needed for cooking. Use a high flame to start most foods; bring water to a boil or pan broiling. Use a medium flame to maintain a slow boil; thicken sauces, gravies or steaming. Use a low flame to keep foods cooking; poaching or stewing. Fig. 4 Do not place plastic items such as salt and pepper shakers, spoon holders or plastic wrappings on top of the range when it is in use. These items could melt or ignite. Potholders, towels or wood spoons could catch fire if placed too close to a flame. In the event of an electrical power outage, the surface burners can be lit manually. To light a surface burner, hold a lit match to the burner head, then slowly turn the surface control knob to LITE. After burner lights push in & turn knob to desired setting. Use caution when lighting surface burners manually. 6
-
 1
1 -
 2
2 -
 3
3 -
 4
4 -
 5
5 -
 6
6 -
 7
7 -
 8
8 -
 9
9 -
 10
10 -
 11
11 -
 12
12 -
13
-
14
-
15
-
16
 |
 |
