Frigidaire FGS365EC Use and Care Manual - Page 11
Setting Warm & Serve Drawer Control
 |
UPC - 057112090382
View all Frigidaire FGS365EC manuals
Add to My Manuals
Save this manual to your list of manuals |
Page 11 highlights
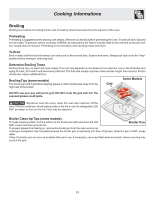
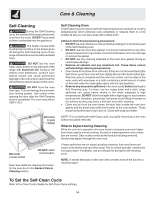
Setting Warm & Serve Drawer Control (If Equipped) Arranging Warm & Serve Drawer Rack Positions The rack can be used in 2 ways: • In the upright position to allow low profile food items to be placed both under and on top of the rack (for example, rolls or biscuits on top of the rack and a casserole dish underneath). • In the downward position to allow you to place light weight food items and empty dishware (for example, rolls or pastries and dinner plates) on the rack. Set the Warm & Serve Drawer Rack in either position as shown below (Figure 1). Operating the Warm & Serve Drawer The purpose of the Warm & Serve Drawer is to keep hot cooked foods at serving temperature. Always start with hot food. It is not recommended to heat cold food in the Warm & Serve Drawer. All food placed in the Warm & Serve Drawer should be covered with a lid or aluminum foil to maintain quality. Do not use plastic wrap to cover food. Plastic may melt onto the drawer and be very difficult to clean. Use only utensils and cookware recommended for oven use in the Warm & Serve Drawer. Always use potholders or oven mitts when removing food from the Warm & Serve Drawer as cookware and plates will be hot and you can be burned. Warm & Serve Drawer Rack in upward position Figure 1 Warm & Serve Drawer Rack in downward position Warm & Serve Drawer Temperature Selection Recommended Warm & Serve Drawer settings table is shown in Figure 2. If a particular food is not listed, start with the MED setting. If more crispness is desired, remove the lid or aluminum foil from the food. Most foods can be kept at serving temperatures on the MED setting. When a combination of foods are to be kept warm (for instance, meat with 2 vegetables and rolls), use the HI setting. To avoid heat loss, do not open the Warm & Serve Drawer while in use. To Set the Warm & Serve Drawer Controls: The control and indicator lights for the Warm & Serve Drawer features are located on the control panel. The temperatures are approximate, and are designated by HI (high), MED (medium) and LO (low). 1. Touch the (see Figure 6) pad at the Warm & Serve Drawer control position. The Warm & Serve Drawer indicator light will flash. Note: If no further pads are touched within 25 seconds the request to power the Warm & Serve Drawer ON will clear. 2. Set the desired power level. Touch once to turn ON the power level for HI (see Figure 3) or to turn ON the power level for LO (see Figure 5). The Warm Warm & Serve Drawer recommended Food Settings Table Food Item Setting Bacon HI Hamburger Patties HI Poultry HI Pork Chops HI Fried Foods HI Pizza HI Gravies MED Casseroles MED Eggs MED Roasts (Beef, Pork, Lamb) MED Vegetables MED Biscuits MED Rolls, hard MED Pastries MED Rolls (soft) LO Empty Dinner Plates LO Figure 2 & Serve Drawer indicator light located beside the pad will turn ON steady. 3. Each touch of the or pads will decrease or increase through 5 power levels from HI (see Figure 3) to MED (see Figure 4) to LO (see Figure 5). Note: For best results, preheat the Warm & Serve Drawer before adding the food . An empty drawer will preheat in approximately 15 minutes. 4. When the food is ready for removal, touch the pad once to turn the Warm & Serve Drawer OFF. The Warm & Serve Drawer indicator light will turn OFF. Note: The Warm & Serve Drawer is inoperable during the self-clean cycle. Note: The Warm & Serve drawer is equipped with a latch Figure 3 11 Figure 4 Figure 5 Figure 6
-
 1
1 -
2
-
3
-
4
-
5
-
 6
6 -
 7
7 -
 8
8 -
 9
9 -
 10
10 -
 11
11 -
 12
12 -
 13
13 -
 14
14 -
 15
15 -
 16
16 -
17
-
18
-
19
-
20
 |
 |
