Frigidaire FMP330RGB Installation Instructions (English) - Page 9
Step 10secure Dishwasher, To Cabinet, Step 11 Connect Water, Supply
 |
UPC - 012505110184
View all Frigidaire FMP330RGB manuals
Add to My Manuals
Save this manual to your list of manuals |
Page 9 highlights
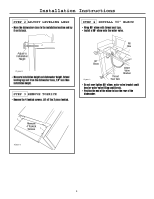
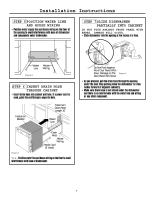
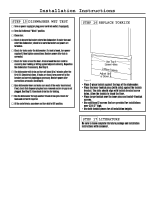
Installation Instructions STEP 10 SECURE DISHWASHER TO CABINET The dishwasher must be secured to the countertop. • Position the dishwasher so that the tub flange aligns with the front face of the cabinet frame. IMPORTANT: Check to be sure the dishwasher is centered in the opening and there is no interference with adjacent cabinets when opening or closing the door. Align Tub Fla nge to Fro nt Fac e of Cab inet Fra me Figure S • Fasten the dishwasher to the underside of the countertop with the 2 Phillips screws provided. IMPORTANT - Drive screws straight and flush. Protruding screw heads will scratch the top of the control panel and can interfere with door closing. STEP 11 CONNECT WATER SUPPLY Connect water supply to 90° elbow. • Slide compression nut, then ferrule over end of water line. • Insert water line into 90° elbow. • Slide ferrule against elbow and secure with compression nut. Compression Nut Ferrule 90° Elbow Hot Water Supply Line Figure T IMPORTANT - Check to be sure that door spring does not rub or contact the fill hose or water supply line. Test by opening and closing the door. Re-route the lines if a rubbing noise or interference occurs. 9
-
 1
1 -
2
-
3
-
 4
4 -
 5
5 -
 6
6 -
 7
7 -
 8
8 -
 9
9 -
 10
10 -
 11
11 -
 12
12
 |
 |
