Frigidaire FRS6R3JW Use and Care Guide - Page 11
Important, Caution, Warning - manual
 |
UPC - 012505695544
View all Frigidaire FRS6R3JW manuals
Add to My Manuals
Save this manual to your list of manuals |
Page 11 highlights
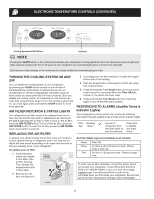
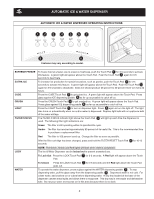
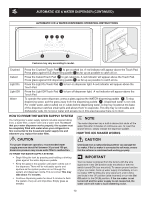
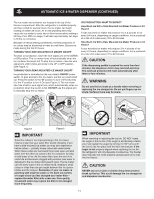
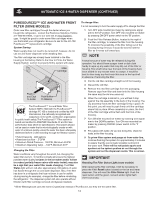
Automatic Ice & Water Dispenser (continued) The ice maker and container are located in the top of the freezer compartment. After the refrigerator is installed properly and has cooled for several hours, the ice maker can begin making ice within 24 hours. Air in new plumbing lines may cause the ice maker to cycle two or three times before making a full tray of ice. With no usage, it will take approximately two days to fill the ice container. Because of new plumbing connections, the first production of ice cubes may be discolored or have an odd flavor. Discard ice made during the first 24 hours. TURNING YOUR SIDE MOUNTED ICE MAKER ON/OFF To begin ice production, lower the wire signal arm to the DOWN or ON position. The ice maker turns off automatically when the ice container becomes full. To stop the ice maker, raise the wire signal arm until it clicks and locks in the UP or OFF position (see Figure 1). TURNING YOUR REAR MOUNTED ICE MAKER ON/OFF Ice production is controlled by the ice maker's ON/OFF power switch. To gain access to the ice maker, pull the ice cream shelf out. Press the switch to the "O" position to turn it Off and press it to the "I" position to turn it On (see Figure 2). The ice maker also has a built-in wire signal arm, which automatically stops ice production when the ice bin is full. DO NOT use this signal arm to manually stop the ice maker. OR . ON OFF ICE PRODUCTION: WHAT TO EXPECT How Much Ice Will a Side Mounted Ice Maker Produce in 24 Hours? A side mounted ice maker will produce 4 to 4.5 pounds of ice every 24 hours, depending on usage conditions. Ice is produced at a rate of 8 cubes every 75 to 90 minutes. How Much Ice Will a Rear Mounted Ice Maker Produce in 24 Hours? A rear mounted ice maker will produce 3 to 4 pounds of ice every 24 hours, depending on usage conditions. Ice is produced at a rate of 8 cubes every 75 to 90 minutes. CAUTION If the dispensing paddle is pushed for more than four minutes, the dispenser motor may overload and stop. The overload protector will reset automatically after three or four minutes. WARNING Do not use the ice chute as a handle when removing or replacing the ice storage bin. Do not put fingers up ice chute. Surfaces there may be sharp. OFF ON Wire Signal Arm Figure 1 Figure 2 IMPORTANT Small Ice cubes or ice chips jamming in the ice maker may be a sign that your water filter needs changing. If you have a side mounted ice maker you may also experience hollow cubes - partially frozen cubes with water inside. When these cubes are harvested they break open and spill water over the other ice cubes in the ice container, forming a solid mass of ice. As the water filter nears the end of its useful life and becomes clogged with particles, less water is delivered to the ice maker during each cycle. The ice maker can't fill every cube in the ice maker mold, leading to small cubes or chips that can get caught between the ice ejector blades and the stripper. Remember, if your ice maker is jamming with small ice cubes or it's been six months or longer since you last changed your water filter - replace the water filter with a new one. Poor quality household water may require the filter to be changed more frequently. IMPORTANT When removing or replacing the ice bin, DO NOT rotate the auger in the ice bin. If the auger is accidentally rotated, you must realign the auger by turning it in 90° turns until the ice bin fits into place with the drive mechanism. If the auger is not properly aligned when replacing the ice bin, the refrigerator will only dispense Crushed Ice. The freezer door may also not close properly causing warm air to leak into the freezer. CAUTION NEVER use an ice pick or similar sharp instrument to break up the ice. This could damage the ice storage bin and dispenser mechanism. 11
-
 1
1 -
2
-
3
-
4
-
5
-
 6
6 -
 7
7 -
 8
8 -
 9
9 -
 10
10 -
 11
11 -
 12
12 -
 13
13 -
 14
14 -
 15
15 -
 16
16 -
17
-
18
-
19
 |
 |