Frigidaire GLEB27S9FS Timer Guide (Timer Guide) - Page 9
continued, CONV ROAST, 350°, 375°, DO NOT, Before Setting Oven Controls
 |
View all Frigidaire GLEB27S9FS manuals
Add to My Manuals
Save this manual to your list of manuals |
Page 9 highlights
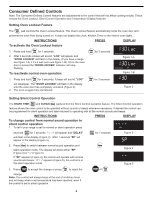
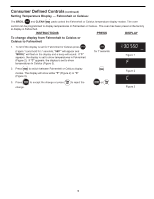
Setting Oven Controls (continued) Setting Convection Roast The CONV ROAST Conv roast pad is designed to give optimum cooking performance for this feature. The Convection Roast pad combines a cook cycle with the convection fan and element to roast meats and poultry. Preheating is not necessary for meats and poultry. Heated air circulates around the food from all sides, sealing in juices and flavors. Foods are crispy brown on the outside while staying moist on the inside. INSTRUCTIONS PRESS DISPLAY To set the Convection Roast feature (example: Meats to cook at 375°F) 1. Arrange interior oven racks and place food in oven. 2. Press Conv roast . "CONV ROAST" will flash and "350°" will be displayed Conv roast (Figure 1). 3. Press 3 7 5 . "CONV ROAST" will flash and "375°" will appear in the display (Figure 2). 3 7 5 4. Press START . "CONV ROAST" and "375°" will appear in the display START (Figure 3). The convection fan icon will come on. TIMED DELAY TIMER DOOR LOCKED CLEAN CONV BAKE BROIL ROAST WARM PROBE Figure 1 TIMED DELAY TIMER DOOR LOCKED CLEAN CONV BAKE BROIL ROAST WARM PROBE Figure 2 Press Clear /Off to stop Convection Roast at any time. Clear /Off Note: The display will show an icon of rotating fan within a square. This rotating fan icon indicates when the Convection Fan is operating. Electric Models: The convection fan and convection element will start AS SOON AS the oven is set for Convection Bake. Gas Models: Please allow up to 6 minutes for the convection fan and convection element to activate. TIMED DELAY TIMER DOOR LOCKED CLEAN CONV BAKE BROIL ROAST WARM PROBE Figure 3 Roasting Rack Instructions (some models) When preparing meats for convection roasting, use the broiler pan and insert along with the roasting rack (if equipped). The broiler pan will catch grease spills and the insert will help prevent grease splatters. The roasting rack will allow the heat to circulate around the meat. To prevent food from contacting the broil element and to prevent grease splattering, DO NOT use the roasting rack when broiling. 1. Place oven rack on bottom or next to the bottom rack position. See Arranging Oven Racks in the Before Setting Oven Controls section. 2. Place the insert in the broiler pan. The roasting rack fits on the insert allowing the heated air to circulate under the food for even cooking and helps to increase browning on the underside. Make sure the roasting rack is securely seated on the insert in the broiler pan. DO NOT use the broiler pan without the insert. DO NOT cover the insert with aluminum foil. 3. Position food (fat side up) on the roasting rack (See Figure 4). 4. Place the broiler pan on the oven rack. Figure 4 9
-
 1
1 -
2
-
3
-
 4
4 -
 5
5 -
 6
6 -
 7
7 -
 8
8 -
 9
9 -
 10
10 -
 11
11 -
 12
12 -
 13
13 -
 14
14 -
15
-
16
-
17
-
18
-
19
-
20
 |
 |
