Frigidaire GLGFM98GPB Use and Care Manual - Page 25
To replace Bake-n-Warm™ Double Oven - parts
 |
UPC - 012505547119
View all Frigidaire GLGFM98GPB manuals
Add to My Manuals
Save this manual to your list of manuals |
Page 25 highlights
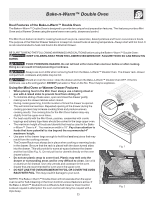
Bake-n-Warm™ Double Oven Bake-n-Warm™ Double Oven Light Operation (some models): The Bake-n-Warm™ Double Oven light operates with the upper oven light and automatically turns ON when the upper oven door is opened. If equipped, the Bake-n-Warm™ Double Oven light may also be manually operated by pressing the pad. To Remove the Bake-nWarm™ Double Oven Drawer & Replace the Oven Light: 1. Before drawer removal, be sure to turn OFF the Bake-n-Warm™ Double Oven and let the drawer area cool completely. 2. Pull the drawer away from the oven. Using a phillips-head screwdriver remove the two drawer screws from the insides of the front oven drawer compartment (See Fig. 1). 3. With one hand hold the drawer front in place. Use your other hand to pull the glide away from the oven (See Fig. 2) until the glide hook disengages (See Fig. 3). 4. Repeat from step 3 above for the other side of the drawer. 5. With BOTH glide hooks disengaged, carefully lift the drawer up and away from the oven. Push both drawer glides into lower oven cavity. 6. Replace the lower oven light with a 40 Watt Appliance light bulb (Refer to Fig.5). Fig. 1 Be sure the range is unplugged and all parts are COOL before replacing oven light. Wear a leather-faced glove for protection against possible broken glass. To replace Bake-n-Warm™ Double Oven Drawer: 1. Pull both drawer glides and fully extend outward from lower oven cavity. 2. Carefully rest the drawer on top of both glides. 3. Adjust the drawer position on top of the rails until both of the drawer side slots are correctly engaged with the glide hooks (See Fig. 4). 4. Pull the drawer forward to line up the drawer with both screw holes in the glides. Using a phillips-head screwdriver replace the two screws removed from the inner drawer sides. 5. Replace drawer rack if removed. 6. Close lower oven drawer. 25 Fig. 2 Glide Hook Disengaged Fig. 3 Glide Hook Engaged Fig. 4 Fig. 5
-
 1
1 -
2
-
3
-
4
-
5
-
6
-
7
-
8
-
9
-
10
-
11
-
12
-
13
-
14
-
15
-
16
-
17
-
18
-
19
-
 20
20 -
 21
21 -
 22
22 -
 23
23 -
 24
24 -
 25
25 -
 26
26 -
 27
27 -
 28
28 -
 29
29 -
 30
30 -
31
-
32
-
33
-
34
-
35
-
36
 |
 |
