Frigidaire PLCF489GC Installation Instructions
Frigidaire PLCF489GC - 40 Inch Dual Fuel Range Manual
 |
UPC - 057112083445
View all Frigidaire PLCF489GC manuals
Add to My Manuals
Save this manual to your list of manuals |
Frigidaire PLCF489GC manual content summary:
- Frigidaire PLCF489GC | Installation Instructions - Page 1
40" DUAL FUEL RANGE INSTALLATION INSTRUCTIONS (Models with Electric Ovens and Gas Cooktop) IMPORTANT: SAVE FOR LOCAL ELECTRICAL INSPECTOR'S USE. READ AND SAVE THESE INSTRUCTIONS FOR FUTURE REFERENCE. OBSERVE ALL GOVERNING CODES AND ORDINANCES. If the information in this manual is not followed - Frigidaire PLCF489GC | Installation Instructions - Page 2
40" DUAL FUEL RANGE INSTALLATION INSTRUCTIONS (Models with Electric Ovens and Gas Cooktop) Important Notes to the Installer 1. Read all instructions contained in these installation instructions before installing range. 2. Remove all packing material from the oven compartments before connecting the - Frigidaire PLCF489GC | Installation Instructions - Page 3
40" DUAL FUEL RANGE INSTALLATION INSTRUCTIONS (Models with Electric Ovens and Gas Cooktop) Volts 120/208 Volts Rating Cord Kit Direct Connection 0 -16.5 kW 0 -12.5 kW 40 Amp 16.6-22.5 kW 12.6-18.5 kW 50 Amp 1-3/8 in. 1-3/8 in. 1-1/8 in. 1-3/8 in. NOTE: Dual-fuel range is shipped from factory - Frigidaire PLCF489GC | Installation Instructions - Page 4
40" DUAL FUEL RANGE INSTALLATION INSTRUCTIONS (Models with Electric Ovens and Gas Cooktop) 2. Remove Cord Mounting Plate. Wire sizes (copper wire only) and connections must conform to the rating of the appliance. Where local codes permit connecting the appliance grounding conductor to the neutral - Frigidaire PLCF489GC | Installation Instructions - Page 5
40" DUAL FUEL RANGE INSTALLATION INSTRUCTIONS (Models with Electric Ovens and Gas Cooktop) Junction Box Location Locate junction box as shown in Figure 7. If a service cord is used, the wall receptacle should be located in accordance with the dimensions below. Figure 5 3-Wire (Grounded Neutral) - Frigidaire PLCF489GC | Installation Instructions - Page 6
40" DUAL FUEL RANGE INSTALLATION INSTRUCTIONS (Models with Electric Ovens and Gas Cooktop) the cabinet. If back of range will not be flush with the wall (the location of the outlet may not allow the range to be positioned against the wall), draw a line on the floor where the back edge of the range - Frigidaire PLCF489GC | Installation Instructions - Page 7
40" DUAL FUEL RANGE INSTALLATION INSTRUCTIONS (Models with Electric Ovens and Gas Cooktop) Tighten all main power source, and turn off the manual gas shut-off valve. Make sure the range is cold. Remove the service drawer and open the oven door. Lift the range at the front and slide it out of - Frigidaire PLCF489GC | Installation Instructions - Page 8
40" DUAL FUEL RANGE INSTALLATION INSTRUCTIONS (Models with Electric Ovens and Gas Cooktop) Range Installation When unpacking the range, do not discard the 4 shipping bolts. These are to be replaced on the unit for use as leveling legs and height adjustments. NOTE: 1. The back of the range may be - Frigidaire PLCF489GC | Installation Instructions - Page 9
40" DUAL FUEL RANGE INSTALLATION INSTRUCTIONS (Models with Electric Ovens and Gas Cooktop) 2. Turn on Electrical Power and Open Main Shutoff Gas Valve 3. Check the Igniters Operation of electric igniters should be checked after range and supply line connectors have been carefully checked for leaks - Frigidaire PLCF489GC | Installation Instructions - Page 10
40" DUAL FUEL RANGE INSTALLATION INSTRUCTIONS (Models with Electric Ovens and Gas Cooktop) Important Safety Warning To reduce the risk of tipping of the range, the range must be secured to the floor by properly installed anti-tip brackets and screws packed with the range. Those parts are located in - Frigidaire PLCF489GC | Installation Instructions - Page 11
INSTRUCCIONES DE INSTALACION PARA LA ESTUFA DE FUEL DUAL DE 40" (Para modelos con un horno eléctrico y una estufa a gas) IMPORTANTE: GUARDE ESTAS INSTRUCCIONES PARA USO DEL INSPECTOR LOCAL DE ELECTRICIDAD. LEA Y GUARDE ESTAS INSTRUCCIONES - Frigidaire PLCF489GC | Installation Instructions - Page 12
FUEL DUAL DE 40" (Para modelos con un horno eléctrico y una estufa a gas) Notas importantes para el Instalador 1. Lea todas las instrucciones contenidas en este manual patas niveladoras. 4. Dos soportes antivuelco DEBEN quitarse de la parte de inferior trasera de la estufa y DEBEN ser instalados. - Frigidaire PLCF489GC | Installation Instructions - Page 13
INSTRUCCIONES DE INSTALACION PARA LA ESTUFA DE FUEL DUAL DE 40" (Para modelos con un horno eléctrico y una estufa a regimén de amperios del ensamblaje de cordón de suministro eléctrico. Vea la placa de serie de la cocina para información Mínimo sobre el regimén de regimén de kilovatio. amperios - Frigidaire PLCF489GC | Installation Instructions - Page 14
INSTRUCCIONES DE INSTALACION PARA LA ESTUFA DE FUEL DUAL DE 40" (Para modelos con un horno eléctrico y una estufa a gas) 1. Quite los tres tornillos en la parte más baja del panel trasero, luego levante la parte más baja del panel trasero (la cubierta de acceso) exponiendo el bloque de conexiones - Frigidaire PLCF489GC | Installation Instructions - Page 15
INSTRUCCIONES DE INSTALACION PARA LA ESTUFA DE FUEL DUAL DE 40" (Para modelos con un horno eléctrico y una estufa más afuera de la parte inferior de los armarios. CL de la LCeiensnettuoerffa Range FSoilgloawlaisnisntsrutrcutciocinosnfeosr para elthtiepotypdeeoinf sintastlalclaiótinonquyoeuuhsatevde - Frigidaire PLCF489GC | Installation Instructions - Page 16
FUEL DUAL DE 40" (Para modelos con un horno eléctrico y una estufa a gas) Si la estufa no será instalada junta contra un armario, mueva la estufa a su posición final. Marque el piso por los dos lados de la estufa. Si la parte conectado en serie con la tuber válvula de cierre manual, 2- adaptor de - Frigidaire PLCF489GC | Installation Instructions - Page 17
LA ESTUFA DE FUEL DUAL DE 40" (Para modelos titulada "FOR LP/PROPANE GAS CONVERSION", localizado en la parte posteriora del horno, cerca de la válvula del estufa a la fuente de poder principal, y apague la válvula de cierre manual de gas. Asegúrese de que la estufa esté fresca. Quite el caj - Frigidaire PLCF489GC | Installation Instructions - Page 18
FUEL DUAL DE 40" (Para modelos con un horno eléctrico y una estufa a gas) Instalación de la estufa Mientras se desembala la estufa, ne deseche los cuatro (4) pernos de embabalaje. Reemplácelos como patas niveladoras y para ajustar la altura de la unidad. NOTA: 1. La parte Consulte el Manual del - Frigidaire PLCF489GC | Installation Instructions - Page 19
INSTRUCCIONES DE INSTALACION PARA LA ESTUFA DE FUEL DUAL DE 40" (Para modelos con un horno eléctrico y una estufa a modelo y de serie y el número o letra del lote de la placa de serie de su estufa. Antes de Llamar al Servicio Lea la sección Lista de control de averías en su Manual del Usuario. Esto - Frigidaire PLCF489GC | Installation Instructions - Page 20
INSTRUCCIONES DE INSTALACION PARA LA ESTUFA DE FUEL DUAL DE 40" (Para modelos con un horno eléctrico en concreto). Instrucciones de Instalación del Soporte Antivuelco Los soportes se fijan al suelo en la parte trasera de la estufa para sujetar ambos niveladores de las patas traseras. Cuando los esté - Frigidaire PLCF489GC | Installation Instructions - Page 21
INSTRUCCIONES DE INSTALACION PARA LA ESTUFA DE FUEL DUAL DE 40" (Para modelos con un horno eléctrico y una estufa a gas) Notes/ Notas 21 - Frigidaire PLCF489GC | Installation Instructions - Page 22
INSTRUCCIONES DE INSTALACION PARA LA ESTUFA DE FUEL DUAL DE 40" (Para modelos con un horno eléctrico y una estufa a gas) Notes/ Notas 22 - Frigidaire PLCF489GC | Installation Instructions - Page 23
WIRING DIAGRAM - DIAGRAMA DE LA INSTALACIÓN ALÁMBRICA (Models with Electric Ovens and Gas Cooktop - Para modelos con un horno eléctrico y una estufa a gas) 23 - Frigidaire PLCF489GC | Installation Instructions - Page 24
WIRING DIAGRAM - DIAGRAMA DE LA INSTALACIÓN ALÁMBRICA (Models with Electric Ovens and Gas Cooktop - Para modelos con un horno eléctrico y una estufa a gas) 24
-
 1
1 -
 2
2 -
 3
3 -
 4
4 -
 5
5 -
 6
6 -
 7
7 -
8
-
9
-
10
-
11
-
12
-
13
-
14
-
15
-
16
-
17
-
18
-
19
-
20
-
21
-
22
-
23
-
24
 |
 |
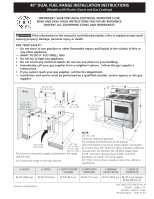
40" DUAL FUEL RANGE INSTALLATION INSTRUCTIONS
(Models with Electric Ovens and Gas Cooktop)
B
A
D
C
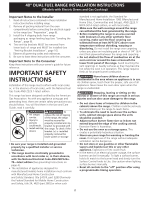
If the information in this manual is not followed exactly, a fire or explosion may result
causing property damage, personal injury or death.
FOR YOUR SAFETY:
—
Do not store or use gasoline or other flammable vapors and liquids in the vicinity of this or
any other appliance.
—
WHAT TO DO IF YOU SMELL GAS:
•
Do not try to light any appliance.
•
Do not touch any electrical switch; do not use any phone in your building.
•
Immediately call your gas supplier from a neighbor's phone.
Follow the gas supplier's
instructions.
•
If you cannot reach your gas supplier, call the fire department.
—
Installation and service must be performed by a qualified installer, service agency or the gas
supplier.
P/N 318201762 (0803) Rev. A
English - pages 1-10
Español - páginas 11-22
Wiring Diagram - page 23-24
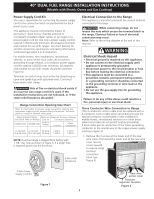
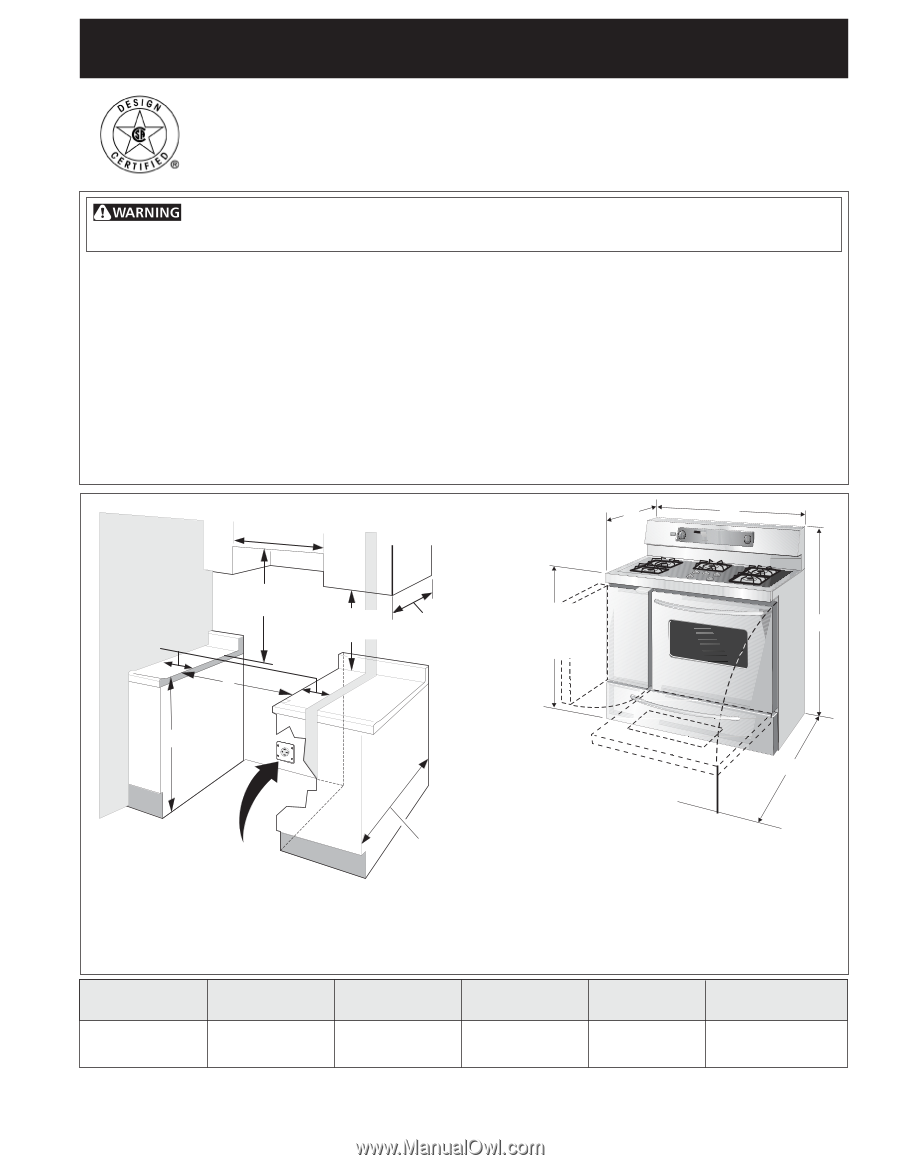
NOTE:
24" (61 cm)
minimum clearance between
the cooktop and the bottom of the cabinet
when the bottom of wood or metal cabinet is protected
by not less than 1/4" (0.64 cm) flame retardant millboard
covered with not less than No. 28 MSG sheet metal,
0.015" (0.4 mm) stainless steel, 0.024" (0.6 mm)
aluminum, or 0.020" (0.5 mm) copper.
30" (76.2 cm) minimum clearance when the cabinet is
unprotected.
Do not pinch the power supply cord between the range
and the wall.
Do not seal the range to the side cabinets.
IMPORTANT: SAVE FOR LOCAL ELECTRICAL INSPECTOR'S USE.
READ AND SAVE THESE INSTRUCTIONS FOR FUTURE REFERENCE.
OBSERVE ALL GOVERNING CODES AND ORDINANCES.
A. HEIGHT
B. WITDH
C. DEPTH TO FRONT
D. DEPTH WITH
E. MINIMUM
F. HEIGHT OF
OF RANGE
DOOR OPEN
CUTOUT WIDTH
COUNTERTOP
48 1/8" (122.2 cm)
40 1/8" (101.9 cm)
25 7/8" (65.7 cm)
43 3/4" (111.1 cm)
40 1/4" (102.2 cm)
36" (91.4 cm) standard
35 3/8" (90 cm) min.
13" Min.
(33 cm Min.)
24" Min.
(61 cm Min.)
24 1/2" Max.
(62.2 cm Max.)
40 1/8" Min.
(101.9 cm Min.)
See
note
Grounded
Wall Outlet
WALL
WALL
2 1/2" Min.
(6.4 cm Min.)
Both sides,
if there is a wall
18" Min.
(45.7 cm Min.)
F
E
36" (91.4 cm)
with feet
extended
Printed in United States