Frigidaire PLRU1778ES Use and Care Manual - Page 4
Features At A Glance, Temperature Controls - side by side refrigerator
 |
UPC - 012505223563
View all Frigidaire PLRU1778ES manuals
Add to My Manuals
Save this manual to your list of manuals |
Page 4 highlights
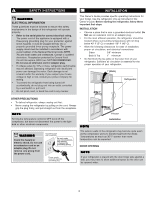
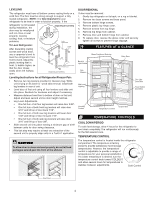
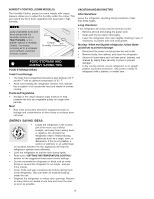
LEVELING The refrigerator must have all bottom corners resting firmly on a solid floor. The floor must be strong enough to support a fully loaded refrigerator . NOTE: It is Very Important for your refrigerator to be level in order to function properly. If the refrigerator is not leveled during installation, the door may be misaligned and not close or seal properly, causing cooling, frost, or moisture problems. To Level Refrigerator: After discarding crating screws and wood base, use a carpenter's level to level the refrigerator from front-to-back. Adjust the plastic leveling feet in front, ½ bubble higher, so that the door closes easily when left halfway open. Turn Right To Lower Unpacking and Leveling Turn Left To Raise Plastic Leveling Feet Crating Screw Discard The (4) Crating Screws And (2) Wood Bases Unpacking and Leveling Leveling Instructions for all Refrigerator/Freezer Pair: • Remove two leg levelers provided in literature bag. While unit is lying on its back for wood skid removal, install both leg levelers in rear of unit. • Level door of first unit using all four levelers and slide unit into place. Recheck for levelness and adjust if necessary. • Measure distance from floor to bottom of door on first unit. Adjust and level second unit so door height matches. • Leg Level Adjustments • One full turn of all four leg levelers will raise door 5/32". • One full turn of both front leg levelers will raise door 3/16" and tilt top of door back 7/16". • One full turn of both rear leg levelers will lower door 1/32" and tilt top of door forward 7/16". • One full turn of both side leg levelers will raise door 3/16" and tilt top of door 3/8". • Slide second unit into place leaving a minimum gap of 3/16" between units for door swing clearance. • This last step may require at least one extraction of the second unit to properly align units in a "built-in" application. CAUTION To allow door to close and seal properly, do not let food packages extend past the front of the shelves DOOR REMOVAL If door must be removed : 1. Gently lay refrigerator on its back, on a rug or blanket. 2. Remove two base screws and base panel. 3. Remove bottom hinge screws. 4. Remove plastic top hinge cover. 5. Remove screws from top hinge. 6. Remove top hinge from cabinet. 7. Remove door and bottom hinge from cabinet. 8. To replace door, reverse the above order and securely tighten all screws to prevent hinge slippage. FEATURES AT A GLANCE TEMPERATURE CONTROLS COOL DOWN PERIOD For safe food storage, allow 4 hours for the refrigerator to cool down completely. The refrigerator will run continuously for the first several hours. TEMPERATURE CONTROL The temperature control is located inside the refrigerator compartment. The temperature is factory preset to provide satisfactory food storage temperatures. However, the temperature control is adjustable to provide a range of temperatures for your personal satisfaction. If a colder temperature is desired, turn the temperature control knob toward COLDEST and allow several hours for temperatures to stabilize between adjustments. Cold Control Shelf Front 4
-
 1
1 -
 2
2 -
 3
3 -
 4
4 -
 5
5 -
 6
6 -
 7
7 -
 8
8 -
 9
9 -
 10
10
 |
 |
